

You just unboxed your new unit, but figuring out how to use Brita water dispenser models correctly requires more than just filling them with tap water. Proper setup activates the filter, prevents leaks, and ensures every glass tastes fresh and clean.
This guide walks you through cleaning components, installing filters, resetting indicators, and avoiding common mistakes like using hot water. Follow these steps to maximize filter life and enjoy great-tasting water daily.
Essential Safety Steps Before Repairing Your Vacuum

Before pouring your first glass, you must prepare the unit to remove manufacturing residues. This critical phase activates the filtration media and ensures hygiene for your household.
Clean All Components Thoroughly
Start by disassembling the lid, reservoir, and internal parts.
* Wash each piece by hand using mild dish soap and warm water.
* Use a soft sponge to avoid scratching the plastic surfaces.
* Rinse thoroughly to eliminate all soap residue.
Critical Warning: Never place any part in the dishwasher. High heat can warp the plastic and compromise the seals.
Install the Correct Filter Type
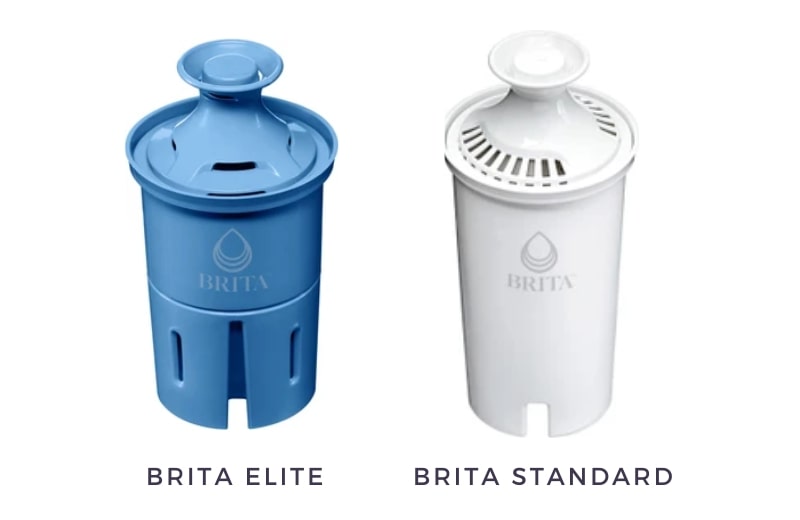
Identify your filter before installation, as the activation process differs significantly between types.
Activate Standard Original Filters
If your filter is white or labeled “Standard,” it requires rinsing.
1. Hold the filter under cold running water for exactly 15 seconds.
2. This step removes loose carbon dust that causes cloudiness.
3. Align the groove on the filter with the notch inside the reservoir.
4. Press down firmly until it clicks into place.
Insert Long Last Elite Filters
Blue or “Long Last” filters come pre-primed from the factory.
* Do not rinse these filters under water.
* Align the groove with the reservoir notch immediately.
* Press firmly to secure the seal without extra preparation.
Flush the System Before First Use
Once installed, fill the reservoir with cold tap water and let it filter completely. Discard this first batch to clear any remaining carbon fines. If the water looks cloudy, repeat the process up to three times. You can safely use this discarded water for houseplants.
Daily Operation Guide for Fresh Filtered Water
Daily usage is simple, but following specific guidelines ensures consistent performance and longevity for your dispenser.
Fill with Cold Tap Water Only
Always use cold water between 32°F and 85°F. Hot water damages the filter media and plastic components instantly.
* Top Fill: Open the flip-lid and pour directly into the reservoir.
* Faucet Fill: Place the entire unit under the sink if space allows.
* Max Fill Line: Stop when water reaches the internal mark to prevent spills.
Pro Tip: Remove the lid entirely when filling with a cup to avoid splashing on the counter.
Seal the Lid Properly
On press-to-seal models, apply light downward pressure after filling. Listen for a click to ensure the lid locks. A secure seal prevents leaks and ensures the electronic counter registers the fill correctly.
Dispense Water Smoothly
The spout features anti-drip valve technology for mess-free pouring.
* Pull the spout forward over your glass or bottle.
* Water flows fast and stops completely when released.
* The rectangular design lets you place the unit safely at the edge of a counter.
Filter Maintenance Schedule and Replacement

Your filter works hard to reduce contaminants, but it only functions properly if replaced on time. Staying on schedule keeps your water tasting great.
Know Your Filter’s Lifespan
| Filter Type | Replace Every | Gallons Filtered |
|---|---|---|
| Standard (Original) | 2 months | 40 gallons |
| Long Last (Elite) | 6 months | Up to 120 gallons |
Filter life depends on your water hardness and daily usage volume. Replace the filter early if you notice a decline in taste.
Reset the Electronic Indicator
Most lids feature a status button to track filter life accurately.
Reset Standard Filter
- Press and hold the button for 2 seconds.
- The light will flash or turn green to confirm the reset.
Reset Long Last Filter
- Press and hold the button for 6 seconds.
- The indicator switches to a 6-month countdown cycle.
Note: The system counts a “fill” only if the lid stays open for more than 15 seconds. Quick opens will not advance the counter.
Use Sticker Tracking as Backup
If your model lacks electronics, use the provided date sticker. Apply it to the lid and mark the replacement date two or six months from today. Check this monthly to stay on track.
Cleaning the Dispenser Regularly
Even with a high-quality filter, the dispenser body needs regular cleaning to prevent mold and stale tastes.
Weekly Cleaning Routine
- Remove the filter and set it aside safely.
- Wash the reservoir, lid, and spout with mild soap and a soft cloth.
- Scrub hard-to-reach areas around the spout base gently.
- Rinse thoroughly with cold water.
- Air dry completely before reassembling.
Avoid These Cleaning Mistakes
Never use dishwashers, bleach, harsh chemicals, or steel wool. These agents damage seals, warp plastic, or leave harmful residues. Clean the unit weekly if you use it daily, or immediately if water has sat for more than three days.
Model-Specific Features and Capacities
Brita offers several dispenser models, and knowing your specific specs helps maximize utility in your kitchen.
UltraMax Large Capacity
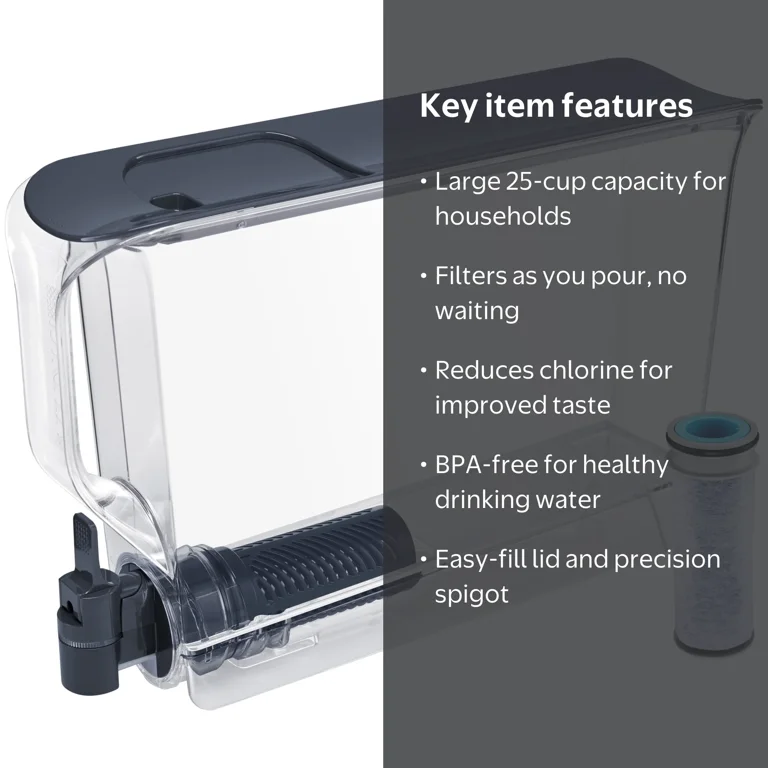
- Holds up to 27 cups or approximately 1.7 gallons.
- Ideal for large families or frequent entertaining.
- Fits in most refrigerator doors due to its slim profile.
Standard Dispenser Models
- Holds approximately 18 cups or 1.1 gallons.
- Compact dimensions suit small kitchens perfectly.
- Still holds significantly more water than standard pitchers.
All models are BPA-free and certified to reduce chlorine, copper, zinc, mercury, and cadmium.
Troubleshooting Common Issues
Even well-maintained dispensers can encounter issues. Here is how to fix them quickly.
Reservoir Stuck in Housing
If the inner reservoir is hard to remove, try warming the outer housing with a warm cloth. Ensure the tab aligns with the groove when reinserting. The fit usually loosens naturally with repeated use.
Handle Breaks or Feels Fragile
The lightweight plastic aids portability but lacks impact resistance. Avoid dropping the unit, even from short heights. Lift by the base when full to protect the handle.
Water Drips After Dispensing
Brita valves are anti-drip, so leaks indicate a problem. Check for debris in the spout, ensure the unit is level, or replace the lid if it is cracked.
Cloudy Water or Black Specks
This is usually loose carbon from a new filter. Run two to three full flushes and discard the water. If it persists beyond three batches, contact support.
Final Tips for Best Results
To get the most from your Brita water dispenser, adopt these expert habits immediately. Always use cold tap water and replace filters on schedule. Clean the unit weekly and reset the indicator after every change.
Avoid putting parts in the dishwasher or using hot water. Never ignore cloudy water after the first flush. Store your unit in the fridge for chilled, great-tasting water anytime.
Frequently Asked Questions About Brita Water Dispensers
Can I put my Brita dispenser in the dishwasher?
No, never place any part of the dispenser in the dishwasher. High heat warps the plastic and compromises the structural integrity of the seals.
How often do I need to replace the filter?
Replace Standard filters every two months or 40 gallons. Long Last filters need replacement every six months.
Why is my filtered water cloudy at first?
Cloudiness usually comes from loose carbon dust in new filters. Flush the system two to three times and discard the water to fix this.
Does the dispenser remove lead from water?
Standard Brita filters reduce chlorine taste, copper, zinc, mercury, and cadmium. Check your specific filter certification for lead reduction claims.
Can I use hot water in the dispenser?
No, only use cold water between 32°F and 85°F. Hot water damages the filter media and can warp the plastic components.
Key Takeaways for Using Your Brita Water Dispenser
Mastering how to use Brita water dispenser units ensures you get clean, great-tasting water every day. Remember to hand-wash components, activate filters correctly, and replace them on schedule.
Avoid common pitfalls like using hot water or skipping the initial flush. With proper care, your dispenser will provide reliable filtration for years. Start enjoying fresh water today by following these simple steps.



