

An InSinkErator hot water dispenser leaking under your sink creates a messy situation that demands immediate attention. You might see a slow drip or a steady stream, but either way, escaping water risks cabinet damage and mold growth near your heating unit.
This guide helps you diagnose the root cause and stop the leak quickly using basic tools. You will learn to distinguish normal operation from mechanical failure, adjust internal components, and determine if a full replacement is necessary.
Decode Drip Patterns to Identify Severity
Not every drop indicates a broken part, so observing the frequency of the leak is your first diagnostic step. Understanding the difference between normal pressure release and mechanical failure saves you from unnecessary repairs.
Cyclical Drips vs. Continuous Flow
Cyclical dripping involves a drop appearing every few minutes before stopping completely after about 20 minutes. This behavior is often normal shortly after installation or when the water inside the tank reaches a boiling point.
- Lower the tank temperature using the touchpad on HWT300 models.
- Turn the thermostat dial counterclockwise on other units.
- Wait 15 to 20 minutes for the system pressure to stabilize.
Continuous dripping means water flows without stopping and signals a mechanical issue requiring intervention. This persistent flow suggests a failed seal, mineral blockage, or physical damage to the tank itself.
Pro Tip: Place a dry towel under the unit and check it every five minutes. If the towel remains damp, you are dealing with a continuous leak.
Isolate the Leak Source Accurately
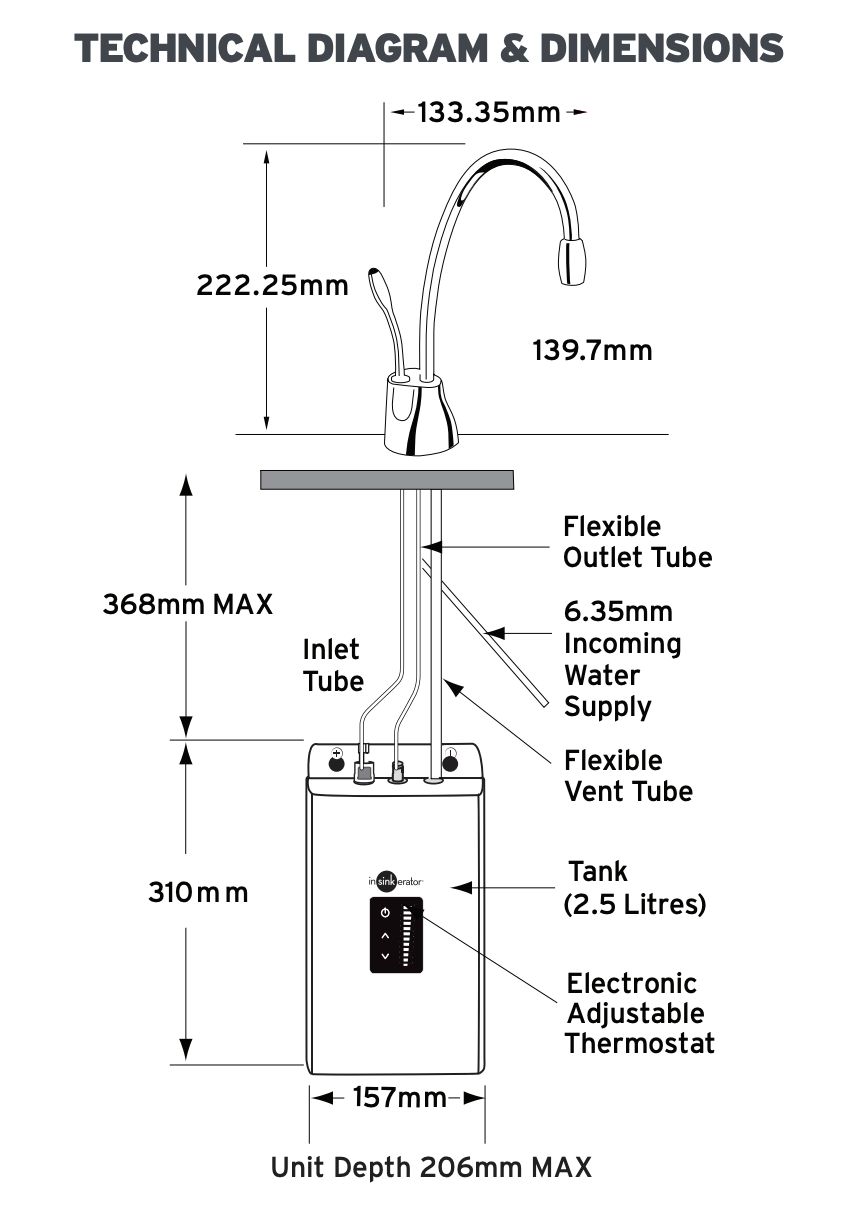
Pinpointing the exact origin of the water prevents wasted effort on the wrong components. Use these specific isolation tests to confirm whether the issue lies with the valve, supply lines, or the tank.
Shut Off and Disconnect Test
This test determines if the leak originates from the water supply or the internal valve assembly.
- Turn off the water supply valve located under your sink.
- Disconnect the hose from the valve assembly carefully.
- Turn the water supply back on while the hose remains disconnected.
- Watch the disconnected line and the spout closely.
If water leaks from the disconnected line, the supply line or valve inlet is faulty. If the spout continues to drip, the internal valve is failing to seal properly.
Check Water Pressure Requirements
Low water pressure prevents the valve from closing completely, leading to constant dripping. Your system requires at least 15 PSI to function correctly.
- Reverse osmosis (RO) systems often deliver pressure below this threshold.
- Use a water pressure gauge on the supply line to verify levels.
- Install a booster pump or bypass the RO system if pressure is low.
Warning: Units connected to reverse osmosis filters are three times more likely to develop leaks due to inconsistent pressure.
Measure Tubing Length Constraints
Excess tubing between the tank and faucet creates backpressure that forces water out of the spout. The maximum allowable distance is 16 inches from the tank to the faucet.
- Inspect the tubing path for unnecessary loops or extensions.
- Re-route or replace tubing to meet the 16-inch specification.
- Ensure cut ends are clean for secure snap-fit connections.
Inspect for Tank Leaks in Older Units
Units aged 15 years or older often develop micro-cracks in the plastic tank material. Look for dripping from the bottom of the unit where no hose connections exist.
- Check for rust on mounting screws near the power cord.
- Look for water pooling directly under the tank body.
- Replace the entire unit if the tank body is compromised.
Repair the Faucet Valve Assembly
Most InSinkErator hot water dispenser leaking issues stem from the faucet valve assembly. You can often fix this in five simple steps without replacing the whole unit.
Clean Mineral Buildup Inside Valve
Hard water leaves mineral deposits that prevent the valve from closing fully. Cleaning these deposits often restores proper function immediately.
- Spray a calcium remover solution directly into the faucet handle.
- Work the handle up and down to agitate the cleaning solution.
- Wait 10 minutes for the solution to dissolve deposits.
- Reconnect the supply and flush by turning on the hot water.
Pro Tip: Perform this cleaning monthly if you live in a hard water area to prevent future clogs.
Adjust the Plunger Height Correctly
A misaligned plunger is the most overlooked cause of leaks, even after replacing O-rings. The plunger may sit too low, preventing the seals from making full contact with the valve seat.
- Remove the top ring nut to access the plunger mechanism.
- Pull out the plunger and inspect both O-rings for damage.
- Replace cracked or swollen O-rings with new ones.
- Reinsert the plunger into the valve body.
- Back off the top nut two to three turns without tightening it fully.
- Test the handle activation to see if dripping stops.
- Apply thread locker to the nut threads once satisfied.
- Tighten the nut securely to lock the adjustment.
Loosening the nut allows the plunger to rise slightly, ensuring the O-rings seat correctly against the valve body.
Replace Faulty Components When Needed
Swap specific parts if cleaning and adjustment fail to stop the leak. Common failure points include the solenoid valve and the snap-connect fitting.
- Match your model number exactly when ordering parts.
- Turn off both water and power before starting work.
- Label all tubes before disconnecting them to ensure correct reassembly.
Replace the Entire Unit Safely

When the tank itself leaks, repair is not an option and you must replace the entire unit. Follow this protocol to ensure a safe and leak-free installation.
When to Replace Your Dispenser
You should replace the unit if water seeps from the tank body or if rust is visible on internal screws. Joints leaking between the top and bottom halves also indicate irreversible failure.
- Plastic tanks degrade over time and cannot be patched.
- Units over 15 years old are prime candidates for replacement.
- Internal cracks are often invisible but cause constant leaking.
Step-by-Step Installation Guide
Replacing the unit requires careful attention to electrical safety and connection integrity.
- Unplug the unit from the electrical outlet immediately.
- Shut off the water supply using the Y-fitting valve.
- Verify the shutoff by running the hot handle until only a trickle remains.
- Place a small pan under the connections to catch residual water.
- Disconnect the three tubes using the appropriate release method.
- Lift the unit slightly to clear the bracket hooks and slide it forward.
- Align the new unit with the bracket hooks and slide it until it clicks.
- Reconnect the vent, outlet, and switch connector tubes firmly.
- Turn the water on and run hot and cold water to test for leaks without power.
- Plug in the unit and wait 15 to 20 minutes for the heating cycle.
Warning: Never skip the no-power leak test because combining water and electricity creates a serious hazard.
Prevent Future Leaks Effectively

Simple maintenance habits can extend the life of your dispenser and prevent recurring InSinkErator hot water dispenser leaking problems. Regular care keeps your system running smoothly for years.
Flush the System Quarterly
Sediment accumulates over time and can clog valves or damage seals. Flushing the system removes these harmful deposits before they cause issues.
- Turn off water and power to the unit.
- Disconnect the outlet tube and place a bucket underneath.
- Turn the water on briefly to flush out debris.
- Reconnect tubes and test for proper operation.
Monitor Reverse Omosis Pressure
If your unit connects to an RO system, consistent pressure monitoring is vital. Low pressure leads to improper valve closure and eventual leaking.
- Test water pressure monthly with a gauge.
- Install a booster pump if readings consistently fall below 15 PSI.
- Consider bypassing the RO filter if pressure issues persist.
Inspect Connections Annually
Regular visual inspections help you catch small problems before they become major leaks. Check under the sink after your annual cleaning routine.
- Look for kinked or bent tubes restricting flow.
- Ensure all quick-connect fittings are fully snapped in place.
- Check for white mineral crust around the faucet base.
Frequently Asked Questions About InSinkErator Leaks
Why does my dispenser drip only every few minutes?
Cyclical dripping is often normal behavior caused by steam pressure release when water boils. Lower your thermostat setting slightly and wait 20 minutes to see if it stops.
Can low water pressure cause my hot water dispenser to leak?
Yes, systems need at least 15 PSI to close the valve properly. Reverse osmosis systems often provide insufficient pressure, leading to continuous dripping.
How do I fix a leak after replacing the O-rings?
If new O-rings do not stop the leak, the plunger is likely sitting too low. Back off the top nut a few turns to raise the plunger and ensure a tight seal.
Is it worth repairing a 15-year-old leaking unit?
No, plastic tanks degrade after 15 years and develop invisible micro-cracks. Replacement is the only permanent solution for old units with tank body leaks.
What tools do I need to stop my dispenser from leaking?
You typically need an adjustable wrench, screwdriver, calcium remover, and thread locker. Most repairs cost under $10 and take less than an hour to complete.
Key Takeaways for Stopping InSinkErator Hot Water Dispenser Leaking
Fixing an InSinkErator hot water dispenser leaking issue often requires simple adjustments rather than full replacement. Most problems stem from plunger misalignment, mineral buildup, or low water pressure rather than catastrophic tank failure.
Take action today by performing the isolation tests to identify your specific leak source. With the right diagnosis and these repair steps, you can restore your system quickly and avoid costly plumber visits.


