
A slow drip from your reverse osmosis faucet might seem minor, but it can waste hundreds of gallons of water a year and signal deeper system issues. More often than not, the leak is not just a faulty faucet. It is a symptom of clogged lines, worn seals, or improper installation. This guide delivers step-by-step fixes backed by technical insight so you can diagnose the true cause, perform targeted repairs, and prevent future leaks.
You will learn how to identify whether the problem stems from the drain line, internal seals, or faucet mechanism, and exactly which tools and techniques resolve each issue.
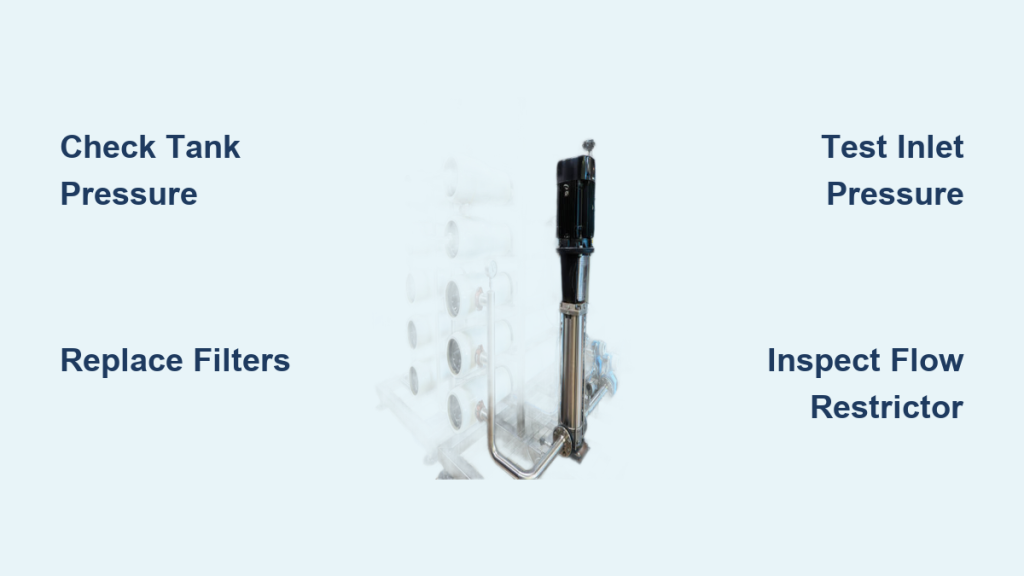
Start with the Drain Line
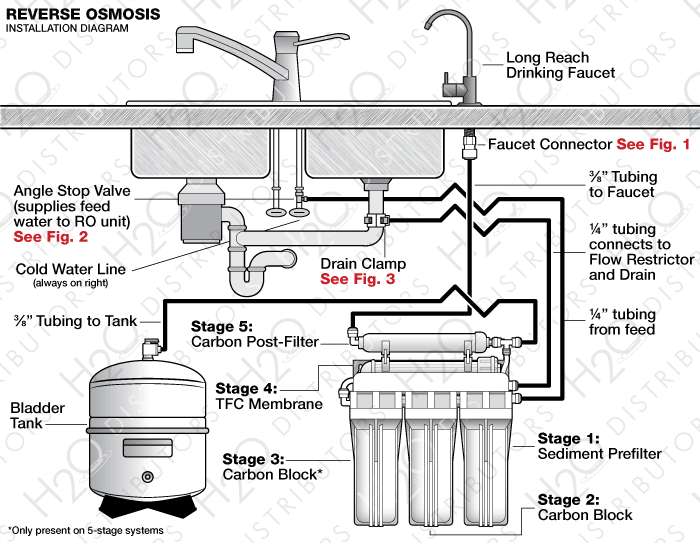
A clogged drain line is the most overlooked yet common cause of what appears to be a leaky faucet. When waste water cannot exit, pressure builds and forces water out through the air gap or spout. Always inspect this first before disassembling the faucet.
Clear the Black Drain Tube
- Shut off the RO system at the cold water supply valve.
- Open the RO faucet to release pressure.
- Locate the black drain line under the sink and disconnect it from the slip-fit fitting.
- Probe the tube with a bamboo skewer or small screwdriver to break up debris.
- Flush with compressed air by sealing one end and using canned air to blast out remaining blockage.
- Reconnect and turn water back on, then run the system to confirm waste water flows freely.
Pro Tip: If water spurts from the air gap during or after use, a clogged drain line is almost certainly the culprit.
Clean the Air Gap
Some RO faucets have a built-in air gap with a small vent hole. Remove the cap and use a pipe cleaner or small brush to clear internal passages, then reassemble and test.
Warning: Never ignore air gap leaks. They are a safety feature preventing backflow contamination.
Fix Spout Drips with Bolt Adjustment

If water drips from the spout after turning off the faucet, the issue is likely mechanical tension in the lever mechanism. This is a common problem across multiple iSpring and GE models.
Adjust the Brass-Headed Bolt
- Pull the spout up from its holder.
- Push the lever forward to expose the internal bolt.
- Turn the brass-headed bolt half a turn counterclockwise using pliers.
- Slide the lever back over the bolt.
- Reinsert the spout and test.
Repeat in quarter-turn increments if dripping continues. Over-tightening can cause binding and make the problem worse.
User Confirmed: This simple fix resolved persistent drips in multiple iSpring and GE models.
Disassemble and Clean the Faucet
When the leak persists after adjusting the bolt, internal wear is likely the cause. Most often, the washer, O-rings, or metal seat has deteriorated.
Remove the Faucet Components
- Shut off water and open the faucet to drain pressure.
- Twist and pull the spout off. Use vinegar if stuck from mineral buildup.
- Pry off the decorative cap on the handle.
- Unscrew the Phillips-head screw underneath.
- Wrap pliers in electrical tape to protect the finish.
- Turn the cap counterclockwise six to seven turns and pull it off.
Inspect and Replace Key Parts
Check the metal seat for rust, pitting, or debris. Clean with a soft brush and replace if corroded, as it is a critical sealing surface.
Remove the old rubber washer and check for cracks or flattening. Install a new washer matching the exact size, either one-fourth or three-eighths inch.
Inspect O-rings to ensure they are seated properly. Lubricate with food-grade silicone grease before reassembly, and replace if brittle or cracked.
Reassemble Without Overtightening
- Reinstall the metal seat with smooth side down.
- Insert the new washer.
- Hand-tighten the cap, then nudge with taped pliers. No force is needed.
- Replace the handle screw and decorative cap.
Critical: Overtightening damages threads and crushes seals, causing more leaks.
Stop Handle Leaks with Teflon Tape
For push-up handle models like iSpring, leaks around the handle stem often stem from loose threads. This is a quick fix that can resolve the issue in under five minutes.
Disassemble and Seal the Handle
- Unscrew the handle by turning counterclockwise.
- Remove the Allen screw securing the internal switch.
- Lift off the handle assembly to expose the shaft.
- Use an adjustable wrench to loosen the base nut.
- Wrap three to five layers of plumber is tape clockwise around the stem threads.
- Ensure the internal stem is fully seated, then reassemble in reverse order.
User Success: This method fixed leaks in under five minutes and delayed the need for replacement.
Try the Hammer Trick
An unorthodox but widely reported method provides temporary relief for immediate results. Use a hammer to tap the side of the handle gently. The impact may reseat internal components.
Note: This is not a permanent solution. It is a temporary patch until proper repair can be performed.
User Feedback: Tapped it once and the drip stopped. Crazy but it worked.
Repair Base and Gasket Leaks

Water pooling around the faucet base usually means a failed rubber gasket or poor mounting. This is common after sink replacements or years of use.
Replace the Countertop Gasket
- Shut off water and drain the system.
- Under the sink, remove the large hex nut.
- Shift the faucet left to disengage the locking mount.
- Loosen the central screw and remove two Phillips-head screws holding the base.
- Inspect the rubber gasket. Replace if cracked, flattened, or misaligned.
- Reassemble in reverse, ensuring the gasket is centered, then reattach screws and tighten the hex nut.
Tip: After sink replacement, check for flush fit. A gap may require silicone caulk as a temporary seal only.
When to Replace the Faucet
Some leaks cannot be fixed by repair. Know when to upgrade to avoid recurring issues and water waste.
Replace If
The faucet body is cracked or corroded. The internal valve leaks and is non-serviceable. The leak returns after multiple repairs. The unit is older than five to seven years. A brand new faucet leaks out of the box.
Install a New Faucet
- Shut off RO water supply.
- Remove the hex nut under the sink.
- Pull the old faucet up and out.
- Insert the new faucet with a fresh gasket.
- Secure and test.
Compatibility: Most RO faucets fit standard three-eighths or one-half inch drill holes.
Use Warranty for Free Replacements
Many faucet leaks are due to manufacturing defects. Do not pay for replacements when the warranty covers the issue.
File a Warranty Claim
- Contact the manufacturer with proof of purchase.
- Submit the claim online or via customer support.
- Most offer free replacements within one to five years.
User Win: iSpring sent a new faucet. No questions asked.
Caution: Some brands respond slowly. Follow up within a week.
Pro Tip: iSpring faucets often match Tomlinson 802. This is useful for sourcing parts.
Prevent Future Leaks
Regular maintenance beats emergency repairs every time. A small investment of effort prevents major water waste.
Maintenance Schedule
Monthly checks should include looking for moisture under the sink, listening for hissing or gurgling, and monitoring water flow rate.
Every six months, inspect the drain line, clean the air gap, and examine tubing for brittleness.
Annually, replace sediment and carbon filters, sanitize the RO system, clean the metal seat and replace washers, and lubricate O-rings with food-grade silicone grease.
Never use petroleum-based lubricants. They degrade rubber seals.
Seal Connections Correctly
For threaded fittings, apply three to five wraps of Teflon tape clockwise. For push-fit fittings, insert tubing fully, pull back slightly to ensure the seal engages, and confirm the clip is locked in place.
When to Call a Professional
Some issues go beyond DIY. Know when to escalate to avoid damage or contamination.
Seek Expert Help If
The leak persists after repairs. Water pressure is too low or high. You hear banging or gurgling. Water tastes or smells off, indicating possible membrane failure. The system was flooded, creating biofilm risk. You are upgrading and adding components like remineralization.
Recommended services include annual inspection by an RO technician, water quality testing, and system pressure checks.
Final Test After Repair
Never assume the fix worked immediately. A thorough test catches delayed leaks before they cause damage.
24-Hour Leak Test
- Close the faucet.
- Slowly open the main supply valve.
- Wait two to four hours for the tank to refill.
- Open the faucet and run for one to two minutes to purge air.
- Inspect all connections, including spout, base, and drain line.
- Place a container under the sink for 24 hours.
Success: No water in the container. Faucet and base remain dry.
Quick Fix Guide by Leak Location
| Leak Location | Likely Cause | Fix |
|---|---|---|
| Spout drip | Loose mechanism | Adjust brass bolt half turn CCW |
| Base pool | Failed gasket | Replace rubber gasket under sink |
| Air gap hole | Clogged drain | Clear black tube with air or brush |
| Handle leak | Loose stem | Use Teflon tape on threads |
| Internal valve | Non-serviceable | Replace faucet |
| Countertop gap | Poor fit | Re-seat or caulk temporarily |
Frequently Asked Questions About Fixing a Leaky RO Faucet
Why does my RO faucet drip even after replacing the washer?
The drip often continues because the metal seat inside the faucet is corroded or the O-rings are damaged. Clean the metal seat thoroughly, and replace all seals including O-rings. If the problem persists, the internal valve may be non-serviceable and require faucet replacement.
Can a clogged drain line cause a faucet leak?
Yes. A blocked drain line creates backpressure that forces water through the air gap or spout during the purge cycle. This is frequently mistaken for a faucet problem. Clear the black drain tube with a bamboo skewer or compressed air before repairing the faucet itself.
How do I stop a leak around the handle of my RO faucet?
Leaks around the handle usually stem from loose threads on the internal stem. Disassemble the handle, wrap three to five layers of plumber is tape clockwise around the threads, and reassemble. This seals the connection and stops the leak.
Is the hammer trick safe to try on my RO faucet?
The hammer trick is a temporary fix that may reseat internal components, but it is not a permanent solution. Use it only as a stopgap while awaiting proper repair parts. The impact is gentle and unlikely to damage the faucet, but it does not address the root cause.
How often should I replace the seals in my RO faucet?
Inspect and replace washers and O-rings annually during routine maintenance. Filters should be replaced every six to twelve months, as overused filters increase system pressure and accelerate seal wear.
Should I try to repair or replace my leaking RO faucet?
Repair if the issue is a worn washer, O-ring, or loose mechanism. Replace if the faucet body is cracked, the internal valve is non-serviceable, the leak returns after multiple repairs, or the unit is older than five to seven years. Check the warranty first. Many manufacturers replace defective faucets free of charge.
Key Takeaways for Fixing Your Leaky RO Faucet
A leaky RO faucet is rarely just about the faucet. Start with the drain line, as it is the most commonly misdiagnosed cause. Move to internal seals like washers and O-rings, and use warranty options when needed. With regular maintenance and the right tools, you can stop leaks fast, extend system life, and ensure your reverse osmosis unit delivers pure water without a single drip wasted.