

If your reverse osmosis faucet is leaking, corroded, or simply doesn’t match your kitchen’s updated style, replacing it is one of the simplest upgrades you can make under the sink. The reverse osmosis faucet serves as the dispensing point for purified water from your RO system, and swapping it out takes under 30 minutes with minimal tools. This guide walks you through the complete replacement process, from shutting off the system and removing the old faucet to installing the new one with leak-proof connections and verifying proper performance.
You’ll keep your entire RO system intact while gaining better durability, easier maintenance, and a sleeker finish that complements your kitchen. Whether you’re fixing a dripping spout or upgrading to a modern slip-fit connector, this step-by-step process ensures a clean, reliable installation.
Prepare the Work Area
Before touching any tools, you need to isolate the RO system to prevent accidental water sprays or pressure bursts.
Shut Off Water and Relieve Pressure
Follow these steps in order to ensure safe working conditions.
- Close the RO tank valve, which is typically a small shutoff on top of the pressurized storage tank.
- Turn off the feed water valve, which is the saddle valve or inline shutoff connected to your cold water line.
- Open the existing RO faucet and let it run until water stops completely. This drains residual pressure from the line.
- Place a bucket or bowl under the connections and lay down towels to catch any drips.
Always depressurize the system before disconnecting any tubing. Skipping this step risks sudden water bursts when you remove the lines.
Gather Tools and Replacement Parts
Ensure you have the following items before starting.
• New RO faucet (such as MetPure, APEC, or compatible model)
• Adjustable wrench or specialty faucet tool
• Teflon (PTFE) tape
• Blue retention clip (if using slip-fit connectors)
• Abrasive sponge for cleaning the sink hole
• Optional: drill and ½-inch bit if creating a new mounting hole
Verify the faucet includes a rubber gasket, mounting nut, flange, and quick-disconnect fitting. Most kits come with these components. Confirm your tubing size compatibility: either 1/4 inch or 3/8 inch.
Remove the Old RO Faucet
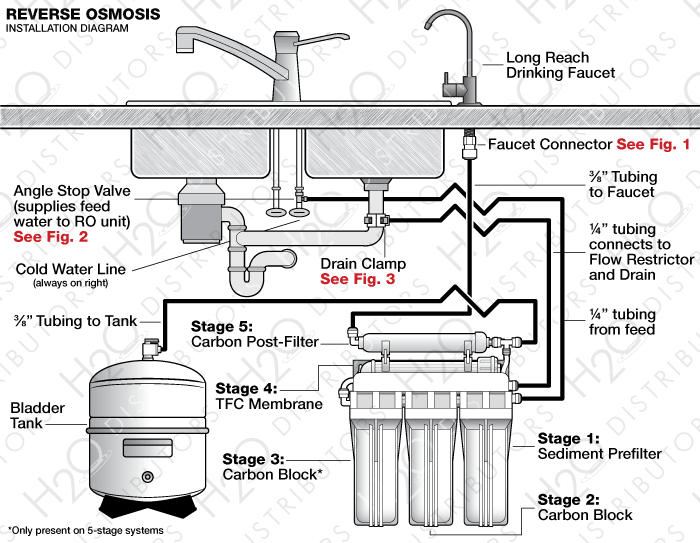
Working in the tight space under the sink requires a methodical approach to avoid damaging surrounding plumbing.
Disconnect the Tubing
If your system uses compression fittings, use pliers to loosen the compression nut. If it’s corroded or stuck, carefully cut it off with a utility knife or tubing cutter.
If your system uses slip-fit connectors, press the locking collar inward while pulling the tube straight out. Wiggle gently if stuck, but avoid yanking the tubing.
Older systems often use a 1/4-inch compression nut with a 3/8-inch to 1/4-inch reducer, which is a common leak source. Replacing the faucet eliminates this weak point.
Unscrew the Mounting Nut
- Locate the mounting nut under the sink that secures the faucet to the countertop.
- Use an adjustable wrench to loosen it.
- If the faucet spins when turning the nut, have a helper hold the handle from above, or clamp vice-grips on the stem to stabilize it.
- Once loose, remove the nut completely and lift the faucet out from the top.
Inspect and Clean the Sink Hole
Scrape away old gasket material, rust, or mineral buildup with an abrasive sponge. Wipe the hole dry, because moisture compromises sealing. Check that the hole is 7/16 inch to 1/2 inch in diameter, which is standard for most RO faucets.
Optional: Apply a thin bead of food-safe silicone sealant around the flange base before reinstalling to prevent water seepage into the countertop.
Install the New RO Faucet
Proper assembly order and sealing prevent leaks and ensure long-term performance.
Assemble Mounting Components
From top to bottom (as viewed from below the sink), assemble these parts in sequence.
- Insert the faucet body through the sink hole.
- Place the flange (the decorative top ring) onto the stem.
- Add the rubber gasket, which creates the watertight seal.
- Slide on the washer to distribute pressure evenly.
- Thread the mounting nut onto the stem.
Follow your specific model manual, because some faucets reverse the gasket and washer order.
Tighten the Mounting Nut
- Hand-tighten the nut first.
- Finish with a wrench, applying firm but controlled torque.
- Avoid over-tightening, because plastic nuts can crack and gaskets can deform.
- If the faucet spins, use vice-grips or a second person to hold it steady from above.
Connect the Tubing Securely
This is where most leaks occur, so using the right technique is essential for a dry, reliable connection.
Use Slip-Fit Connectors
Modern faucets use push-to-connect slip-fit fittings, which are faster, reusable, and less error-prone than compression fittings.
- Screw a threaded adapter (3/8 inch or 1/4 inch) onto the faucet inlet.
- Wrap at least four layers of Teflon tape clockwise on the threads.
- Hand-tighten the adapter. Do not over-tighten plastic parts.
- Insert the RO tubing into the slip-fit connector until it clicks.
- Reinstall the blue retention clip to lock the tube in place.
Test the connection by gently tugging the tubing. It should not pull out. If it does, reseat it fully before proceeding.
Handle Mismatched Tubing Sizes
If your system uses 3/8-inch tubing but the faucet accepts only 1/4 inch, replace the outlet line or use an adapter. For permanent upgrades, replace the entire line from the final filter to the faucet with 3/8-inch tubing to improve flow rate. Use color-coded tubing (such as blue for RO water) to avoid confusion during future maintenance.
Upgrading from 1/4 inch to 3/8 inch reduces pressure drop and improves dispensing speed, which is especially beneficial with larger tanks.
Reactivate the System
With the faucet installed, restore water flow and check for any leaks.
Turn Valves Back On
- Open the RO tank valve slowly.
- Open the new faucet and let water run for 2 to 5 minutes.
- Expect sputtering or air bursts, which is normal as air clears from the line.
Check for Leaks
Inspect under the sink for drips at these locations.
• Mounting nut and gasket
• Tubing connection
• Adapter threads
• Retention clip
If you find a leak, shut off the valves again. Re-tighten fittings or reseat the tubing. Add more Teflon tape if threads are seeping, and replace cracked gaskets immediately. Observe the system for at least 30 minutes, because some leaks appear only after pressure stabilizes.
Flush the System and Test Output
Even though you’re only replacing the faucet, flushing removes debris introduced during installation.
Flush for 2 to 3 Minutes
- Run the RO faucet continuously for 2 to 3 minutes.
- Repeat once more to flush carbon fines, preservatives from membrane housing, and air bubbles.
Discard this initial water, because it’s not safe to drink yet.
Wait 24 Hours Before Testing TDS
The RO system needs time to stabilize. Accurate TDS readings should be taken after 24 hours of normal operation. A properly functioning system should reduce TDS by 85 to 95 percent compared to feed water. Ideal drinking water TDS is 10 to 50 ppm after RO filtration.
Upgrade to a Triple Faucet (Optional)
If you want to eliminate the separate RO faucet entirely, consider a 3-way triple faucet.
What It Does
A triple faucet combines hot, cold, and RO water in one unit. It uses a selector lever or push button to switch between water sources. This requires 3/8-inch hot and cold lines plus 1/4-inch RO line.
Installation Impact
This replaces your entire kitchen faucet and requires disconnecting hot and cold lines and installing a new valve body. It’s best done during a full kitchen remodel or faucet upgrade. The benefit is saving counter space and creating a clean, unified look, but the installation is more complex than a simple RO faucet swap.
Maintain Your New Faucet
Long-term reliability depends on simple, regular care.
Clean the Aerator Annually
Unscrew the tip of the spout. Soak the aerator in vinegar to dissolve mineral buildup. Reinstall and flush briefly.
Inspect Every 6 Months
Look for drips, cracks, or corrosion. Replace brittle gaskets every 5 to 7 years. Ensure retention clips are still in place.
Avoid Harsh Cleaners
Use mild soap and water on the finish. Avoid bleach, ammonia, or abrasive pads, because these damage brushed nickel and chrome finishes.
Most replacement faucets come with a limited lifetime warranty. Register the product online and keep your receipt.
Troubleshoot Common Issues
Even with careful installation, problems can arise.
Faucet Leaks at Base
Cause: loose mounting nut or damaged gasket. Fix: tighten the nut slightly or replace the gasket.
Tubing Won’t Stay Connected
Cause: tube not fully seated or missing retention clip. Fix: press tubing in until it clicks and reinstall the blue clip.
Low Flow or Sputtering
Cause: air in the line (normal after install) or clogged aerator. Fix: run water for 5 minutes or clean the aerator.
Faucet Spins During Removal
Cause: no counter-hold on the handle. Fix: use vice-grips or have a helper hold the top while you work from below.
Key Takeaways for Replacing Your RO Faucet
Replacing a reverse osmosis faucet is a low-effort, high-impact upgrade that improves both function and appearance. Always shut off and depressurize the system first. Use slip-fit connectors, because they’re reusable and leak-resistant. Apply at least four wraps of Teflon tape on threaded adapters. Verify tubing size before buying a new faucet. Match finishes for a professional look, and keep old parts in case you need to revert.
Call a professional if your sink requires diamond core drilling for a new hole, if you’re upgrading to a triple faucet and aren’t comfortable with full plumbing removal, or if leaks persist after re-tightening and reseating.
The slip-fit connector makes the difference, preventing leaks that plague older compression-style connections. With the right tools and this guide, you’ll have clean, purified water flowing reliably in under 30 minutes.
Frequently Asked Questions About Replacing a Reverse Osmosis Faucet
How long does it take to replace a reverse osmosis faucet?
The entire replacement process takes 20 to 30 minutes for most homeowners. This includes shutting off the system, removing the old faucet, installing the new one, and testing for leaks.
Can I replace just the RO faucet without touching the rest of the system?
Yes. The RO faucet is a standalone component that dispenses water from your existing RO system. You can replace it while keeping all filters, tubing, and the storage tank intact.
What size tubing does an RO faucet use?
Most RO faucets accept either 1/4-inch or 3/8-inch tubing. Check your existing system to confirm the size, and ensure your replacement faucet is compatible or includes the correct adapter.
Why is my new RO faucet leaking at the base?
A leak at the base usually means the mounting nut is loose or the rubber gasket is damaged. Tighten the nut slightly, or replace the gasket if it’s cracked or deformed.
Do I need to flush the system after replacing the faucet?
Yes. Run the faucet for 2 to 3 minutes immediately after installation, then repeat once more. This flushes out carbon fines and air bubbles. Wait 24 hours before testing water quality with a TDS meter.



