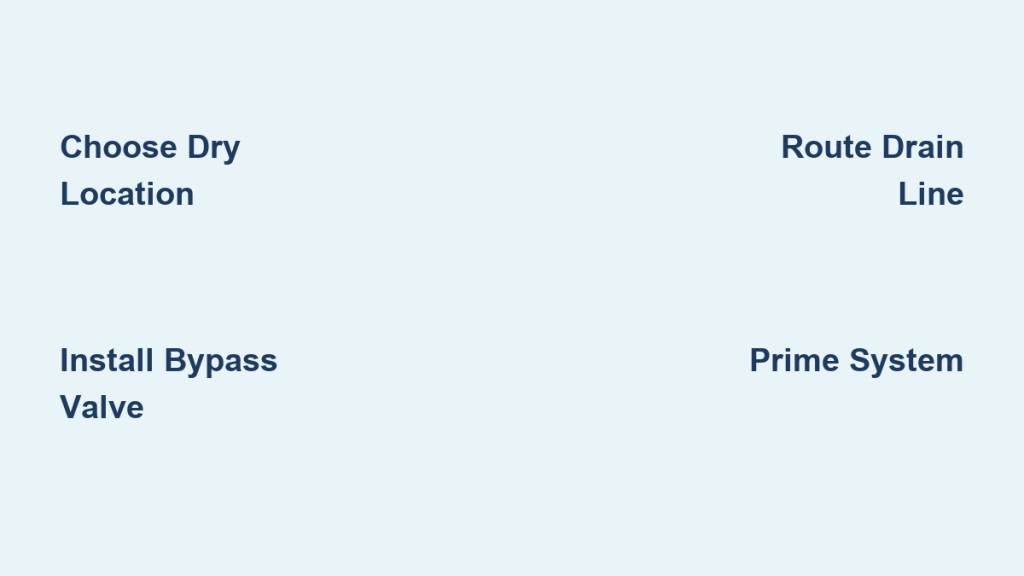
Spotty dishes and stiff laundry often signal hard water issues that damage pipes and appliances over time. Learning how to plumb a water softener correctly solves these problems while protecting your home infrastructure from costly scale buildup.
This guide details every step from selecting a dry location near your main entry point to sanitizing the resin bed for safe drinking water. You will discover specific connection methods for copper or PEX pipes and critical drain routing rules that prevent dangerous backflow contamination.
Select the Ideal Installation Location Near Main Entry
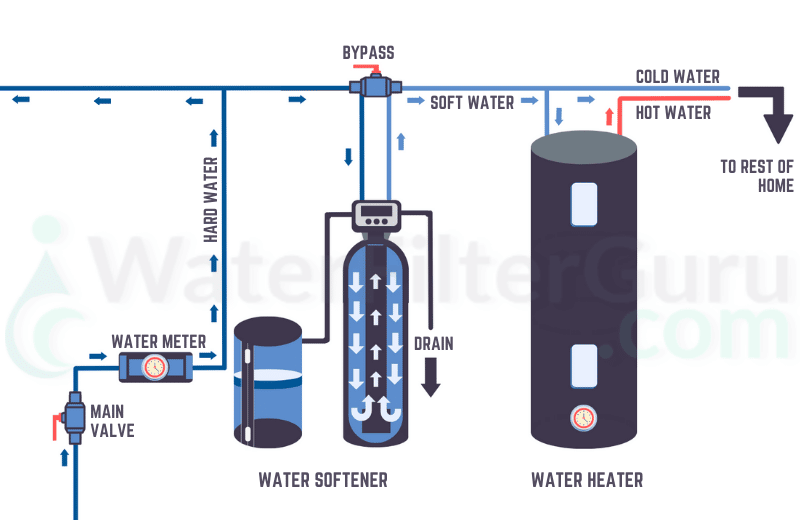
Placing your unit in the correct spot ensures maximum efficiency and prevents freezing damage during cold months. The system must sit on a level floor where temperatures stay between 35°F and 100°F year-round.
Position Unit Before Water Heater
Install the softener immediately after your water meter and before the water heater to treat all household water. This placement prevents scale from forming inside your water heater and hot water pipes. Never install the unit after the water heater since untreated hot water causes rapid mineral accumulation.
Verify Drain and Power Access
Your chosen spot needs a grounded 120V electrical outlet and a nearby floor drain or utility sink. The backwash drain line cannot exceed 30 feet in length or rise more than 8 feet above the floor level. Gravity must move the wastewater so ensure the discharge point sits lower than the brine tank.
Gather Required Tools and Specific Plumbing Materials
Successful installation depends on having the right equipment for your specific pipe material before you start cutting. Preparation prevents leaks and ensures a smooth workflow during the plumbing process.
Prepare Pipe-Specific Cutting Tools
You need different tools depending on whether your home uses copper PEX or CPVC piping. Essential items include a pipe cutter for copper or PEX and a hacksaw as a backup option. Keep a bucket and towels nearby to manage any accidental water spills during the work.
Collect Necessary Fittings and Connectors
Gather two 1-inch NPT female connectors that match your softener inlet size exactly. You will also need ½-inch ID flexible drain tubing rated for 75 PSI pressure and hose clamps for security. Silicone grease is critical for O-rings but never use petroleum-based lubricants on these parts.
Shut Off Water Supply and Relieve System Pressure
Safety requires shutting off the main water source and draining residual pressure before making any cuts. This step protects your home from flooding and prevents injury from high-pressure water release.
Turn Off Main Water Valve
Locate the main shut-off valve where water enters your home and close it completely to stop all flow. Open a faucet at the lowest point in your house to confirm the water is off and drain remaining pressure. Place a bucket under your work area to catch drips when you cut into the main line.
Power Down Water Heating System
Turn off the circuit breaker for electric water heaters to prevent element damage if air enters the tank. Switch gas water heaters to pilot mode to avoid ignition issues while plumbing work occurs. This precaution protects your heater from thermal stress during the installation process.
Assemble Resin Tank and Control Valve Components
Proper assembly of the mineral tank ensures the resin beads function correctly during the ion exchange process. Follow these steps carefully to avoid damaging internal components or creating leaks later.
Install Distributor Tube and Resin Media
Insert the distributor tube into the empty mineral tank ensuring the screen sits flat on the bottom center. Tape the top opening securely then fill the tank two-thirds full with resin beads leaving room for expansion. Remove the tape gently without lifting the tube to keep debris out of the media.
Mount Control Valve Without Sealant
Screw the control valve onto the mineral tank by hand ensuring the center hole fits over the distributor tube. Do not use thread sealant or Teflon tape on tank threads as this prevents the O-ring from sealing properly. Apply silicone grease to all O-rings before assembly to ensure leak-free connections throughout the system.
Install Bypass Valve and Connect Main Water Lines
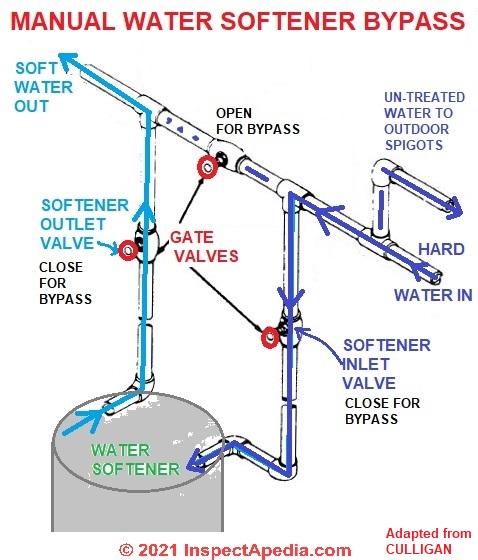
The bypass valve allows you to isolate the softener for maintenance while keeping water flowing to your home. Correct installation ensures proper flow direction and prevents damage to the control valve.
Attach Bypass Valve Assembly
Align the IN and OUT arrows on the bypass valve with the flow direction on the control valve. Use the provided rubber washers between the male threads and female swivel nuts for a tight seal. Tighten the nuts evenly by alternating sides a few threads at a time to avoid warping the valve body.
Cut and Connect Main Cold Water Line
Cut the main cold water line after the meter but before the water heater using your pipe cutter. Connect the IN port of the bypass to the incoming supply and the OUT port to the house distribution line. Double-check arrow directions because reversing inlet and outlet ports will cause system malfunction.
Route Backwash Drain and Overflow Lines Safely

Proper drain routing prevents sewage backflow and ensures the regeneration cycle discharges wastewater safely. Strict adherence to air gap requirements is mandatory for code compliance and health safety.
Connect Backwash Drain Line
Attach ½-inch ID plastic tubing to the center outlet on the control valve and secure it with a hose clamp. Run this line to a floor drain or standpipe maintaining an air gap of 1 to 2 inches above the waste pipe. Never tie the drain directly into a sealed pipe as this violates plumbing codes and risks contamination.
Install Separate Brine Tank Overflow
Connect a separate ½-inch tube to the overflow elbow on the brine tank and route it to a drain point. Keep this line independent from the backwash line because mixing them can cause pressure lock during regeneration. The overflow line only activates if the brine tank overfills so it must remain unobstructed.
Prime System and Check for Leaks Before Use
Priming the system slowly removes air pockets that could damage the resin bed or cause noisy operation. Careful inspection during this phase catches small leaks before they become major water damage issues.
Pressurize System Slowly
Ensure the bypass valve is in bypass mode then open the main water supply about one-quarter turn initially. Listen for air escaping through the drain line and wait until water flows steadily before opening the valve fully. Opening the valve too fast can blow resin beads out of the tank and into your drain line.
Bleed Air from Household Faucets
Open hot and cold faucets throughout your house starting from the lowest elevation and moving upward. Let water run until it appears clear and free of bubbles to remove trapped air from all plumbing lines. Check every joint including inlet fittings and drain lines for any signs of dripping water.
Fill Brine Tank with Water and Initial Salt Charge
Adding water before salt prevents bridging and ensures the brine solution mixes correctly during regeneration. Proper salt levels are critical for the ion exchange process to soften your household water effectively.
Add Water Before Salt
Pour clean water into the brine tank first until it reaches about one inch above the grid platform. This water helps dissolve the salt evenly and prevents the formation of hard crusts that block brine creation. Small tanks need about four gallons while larger units may require up to eight gallons initially.
Load Initial Salt Charge
Add 40 pounds of solar salt or evaporated pellets to the brine tank breaking up any large clumps first. Avoid using rock salt as it leaves more sediment that can clog the injector valve over time. Fill the tank about half full initially then top it off later as needed for regular operation.
Program Control Valve and Sanitize Resin Bed
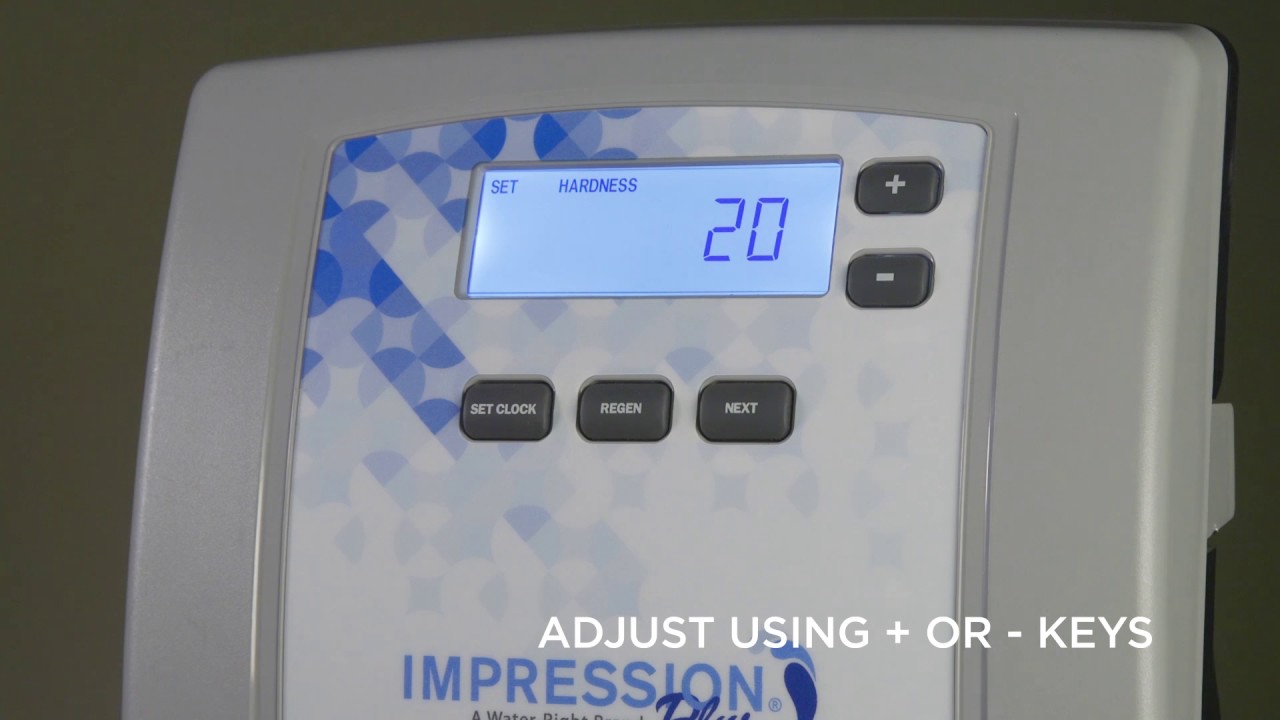
Programming the controller sets the regeneration schedule based on your water usage and hardness level. Sanitizing the system eliminates bacteria introduced during installation and ensures safe drinking water quality.
Set Hardness and Regeneration Schedule
Test your water hardness using test strips then input the grains per gallon into the control panel accurately. Set the regeneration time for off-peak hours like 2:00 AM when water usage is lowest in your home. Choose sodium chloride or potassium chloride settings to match the type of salt you added to the tank.
Sanitize System with Bleach Solution
Mix 3 ounces of unscented household bleach with water and pour it directly into the brine well tube. Initiate a manual regeneration cycle to draw the solution through the resin bed and sanitize internal components. Flush multiple faucets after the cycle completes and wait one to two hours before using water for drinking.
Perform Final Checks and Establish Maintenance Routine
Regular maintenance ensures your water softener operates efficiently for years while providing consistent soft water output. Simple monthly checks prevent common failures and extend the life of your investment significantly.
Verify Soft Water Output
Test your water hardness again after 24 hours to confirm the system is removing calcium and magnesium effectively. If water remains hard check that the bypass valve is in service mode and salt is dissolving properly. Ensure the unit is regenerating on schedule and that the brine tank has adequate water levels.
Schedule Monthly Maintenance Tasks
Check salt levels monthly and refill every four to six weeks to keep the tank at least half full. Inspect the brine tank annually for salt bridging and clean it if crusts form around the edges. Test water hardness quarterly to confirm performance and adjust settings if your water source changes.
Frequently Asked Questions About Plumbing Water Softeners
Can I install a water softener outside?
No you should never install a water softener outdoors unless it is in a climate-controlled enclosure. The unit requires temperatures between 35°F and 100°F to operate safely without freezing or overheating damage.
How far can the drain line be from the softener?
The backwash drain line must not exceed 30 feet in length and cannot rise more than 8 feet above the floor. Gravity moves the wastewater so the discharge point must always be lower than the brine tank.
Do I need thread sealant on the tank threads?
No you must not use thread sealant or Teflon tape on the mineral tank threads. Using sealant prevents the O-ring from sealing properly and will likely cause leaks at the valve connection.
Why is my water still hard after installation?
Check that the bypass valve is pulled out to the service position and that salt is dissolving in the brine tank. Verify your hardness setting matches your water test results and ensure the unit is regenerating on schedule.
How often should I add salt to the tank?
Check your salt level monthly and refill every four to six weeks to keep the tank at least half full. The frequency depends on your household size and water hardness but regular checks prevent running out completely.
Key Takeaways for Successful Water Softener Installation

Plumbing a water softener correctly requires precise location selection proper drain routing and careful system sanitization. Always install the unit before your water heater use separate drain lines with air gaps and avoid thread sealant on tank threads.
Follow these steps to ensure your system delivers soft water efficiently while protecting your home appliances from scale damage. Regular monthly maintenance and annual cleaning will extend the life of your unit and keep your water quality high.