
Reverse osmosis (RO) systems deliver clean, safe drinking water, but only when properly maintained. Over time, biofilm, bacteria, and residue can build up in filter housings, tubing, the storage tank, and membrane chamber, compromising water quality and system performance. Learning how to clean a reverse osmosis system is essential for eliminating microbial growth, preventing off-tastes, and ensuring long-term reliability.
This guide walks you through every step of the cleaning process: when to sanitize, what tools you need, how to circulate disinfectant safely, and how to flush and reassemble your system for optimal results. You will also learn maintenance tips to keep your RO unit running efficiently for years.
Why Sanitize Your RO System
Biofilm, a slimy layer of bacteria and microorganisms, develops in low-flow or stagnant areas of your RO system. The storage tank, drain line, and feed side of the membrane are especially vulnerable. Even with chlorine in city water, biofilm can form over time because carbon pre-filters remove chlorine before water reaches the membrane, leaving downstream components unprotected.
Skipping sanitization leads to foul tastes or odors in purified water, reduced water flow from clogged lines, premature membrane failure, and visible mold in filter housings or tubing. Even if your water tastes fine, hidden biofilm may be present. Annual sanitization is the best defense against these issues.
When to Clean Your Reverse Osmosis System
Clean your RO system once per year as routine maintenance. This removes early-stage biofilm and ensures all wetted parts stay hygienic. Annual cleaning pairs well with filter replacement, making it easy to remember.
Sanitize immediately after periods of inactivity. If the system has been idle for more than 1 to 2 weeks, whether after moving, vacation, or storage, clean before turning it back on. Stagnant water fosters bacteria and mold, especially in warm environments.
Other key triggers for sanitization include replacing the RO membrane, seeing dark residue or mold in filter housings, noticing strange smells or tastes, and reactivating a stored system. Even if filters are new, internal components can harbor microbes.
Components That Need Cleaning
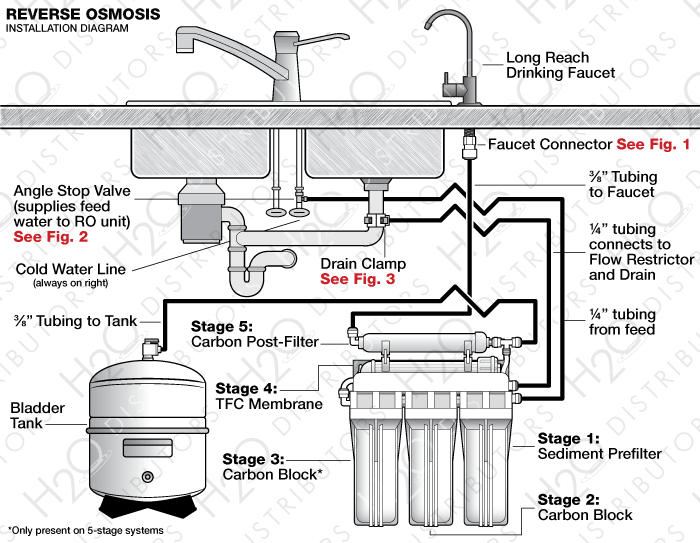
Each part of your RO system has unique risks that require attention during cleaning.
Filter housings for stages 1 through 3 often accumulate dark sludge on the drain side. This is normal and does not affect water quality, but it indicates organic buildup that should be removed during sanitization.
The RO membrane chamber may develop mold spots if biofilm forms upstream. While the membrane blocks pathogens, the chamber itself must be sanitized, especially when replacing the membrane.
The storage tank interior is a common site for bacterial growth due to water stagnation. You cannot see inside the tank, but circulating sanitizer through the system is the only way to clean it.
Tubing and fittings, especially on the drain line or post-membrane side, can trap water and support biofilm. Inspect for cloudiness or slime during maintenance.
The post-filter should never be reused after sanitization. It is designed to polish water and cannot withstand bleach or sanitizer exposure.
Tools and Supplies Needed
Gather these items before starting your cleaning project.
Essential supplies include unscented household bleach at 5 to 6 percent concentration or RO-specific sanitizer, filter housing wrench, bottle brush, push-fit shut-off valve, tubing cutter or razor blade, bike pump and tire pressure gauge, gloves, clean cloth, and measuring spoons.
Use only food-safe disinfectants. Avoid scented bleach, dish soap, or cleaners with additives.
Safety precautions to follow include wearing gloves to protect your hands, working in a ventilated area when using bleach, never mixing bleach with other chemicals, and keeping children and pets away during cleaning.
Step 1: Shut Down and Drain the System
Turn off the feed water using the ball valve under the sink. Rotate it 90 degrees so the handle is perpendicular to the pipe.
Close the tank shut-off valve if equipped. This prevents pressure loss during disassembly.
Open the RO faucet and let all water drain. This may take 10 minutes or longer.
Disconnect tubing as needed for access. Place a towel or drip pan under the system to catch spills.
Step 2: Remove Filters and Membrane
Use a filter housing wrench to loosen the first-stage sediment housing.
Remove and discard the stage 1 sediment filter, stage 2 carbon block filter, and stage 3 carbon filter.
Disconnect tubing from the RO membrane housing by pressing the quick-connect collar and pulling the tube out.
Extract the RO membrane using needle-nose pliers. Gently twist and pull it from the housing.
Leave the post-filter stage 5 installed unless your manufacturer advises otherwise. It will be replaced after sanitization.
Never reuse old filters or membranes after sanitization. They harbor bacteria and will recontaminate the system.
Step 3: Clean Filter Housings and Install Drain Valve
Rinse each housing with warm water. Use a bottle brush to remove residue from the backside, especially near the drain connection. Avoid harsh scrubbers that could damage O-rings.
Inspect O-rings for cracks or wear. Replace if damaged to prevent leaks.
Install a shut-off valve on the drain line to trap sanitizer in the system. Cut the drain line at a 90-degree angle using a razor blade, then insert a push-fit shut-off valve and reconnect the tubing.
Step 4: Add and Circulate Sanitizer

For household bleach, mix 3 to 4 teaspoons of unscented bleach at 5 to 6 percent concentration into the first-stage filter housing. Do not pour undiluted bleach directly into the system.
For RO-specific sanitizer, follow the product label instructions for dosage. Products like Sani System or hydrogen peroxide-based cleaners are gentler on rubber parts.
Hydrogen peroxide is ideal for storage tank cleaning. It breaks down into water and oxygen, leaving no residue.
Step 5: Soak the System
Turn on the feed water and let water push the sanitizer through the system and fill the storage tank. Without filters, this takes just 2 to 4 minutes.
Close the drain shut-off valve to trap sanitizer inside the system. Keep the tank valve open so sanitizer enters the tank.
Shut off feed water using a needle valve if available to prevent dilution.
Let sanitizer soak for 30 minutes. This ensures full microbial kill, especially after system downtime. A 5-minute soak is the minimum, but 30 minutes provides thorough disinfection.
During soak time, the solution disinfects the membrane housing, tubing, check valve, and storage tank interior.
Step 6: Flush Out Sanitizer
Open the RO faucet and drain all water from the system and tank. Remove all housings and empty residual bleach. Strong chlorine smell is normal.
Do not rinse housings. Residual sanitizer helps disinfect during reassembly.
Reinstall empty housings and reconnect tubing.
Turn on feed water and let the tank refill. Once full, open the faucet and drain completely. Repeat once more.
This double-flush removes all traces of sanitizer and prepares the system for new filters.
Step 7: Install New Filters and Membrane
Insert the new sediment filter in stage 1.
Add new carbon filters in stages 2 and 3.
Install the new RO membrane. Lubricate O-rings with food-grade silicone grease and insert carefully to avoid tearing.
Replace the post-filter stage 5, even if recently changed. It is sensitive to bleach and must be fresh for safe drinking water.
Reconnect all tubing and tighten fittings by hand.
Step 8: Final Flush Before Use
Turn on feed water and let the tank fill. This takes 2 to 4 hours.
Open the faucet and drain completely. Repeat 2 to 3 times.
This final flush removes residual sanitizer, glycerin preservative from the new membrane, and carbon fines from new filters.
Discard the first 2 to 3 tanks of water before drinking. After the final flush, water should taste clean and neutral.
Maintaining the Storage Tank
You cannot open or scrub the internal bladder of the storage tank. However, you can sanitize it by circulating disinfectant through the system as described above.
For gentler tank cleaning, use hydrogen peroxide. Disconnect the tank from the system, drain all water, add 2 tablespoons of 3 percent hydrogen peroxide, fill the tank to the brim with water, let sit for 30 minutes, then empty and rinse once before reinstalling. Flush 1 to 2 tanks through the system afterward.
This method is best for long-term storage, rubber-safe disinfection, or households avoiding chlorine.
Checking Tank Pressure
Use a bike tire pressure gauge and pump to check tank air pressure.
Drain the tank completely, then remove the air valve cap, usually on the bottom.
Measure pressure. It should be 5 to 7 PSI when empty.
If low, use a bike pump to add air, then recheck.
Low pressure reduces water output and causes slow refill. Adjust annually.
Maintenance Schedule
Perform a monthly 5-minute check. Look for leaks under the sink, listen for continuous running that indicates valve failure, test water flow and taste, and wipe down housings. This catches small issues before they become big problems.
Perform annual tasks including sanitizing the entire system, replacing all filters, and flushing and checking tank pressure. Pair cleaning with a TDS meter test to verify performance.
Troubleshooting Common Issues
Slow water flow likely indicates clogged pre-filters, low tank pressure, or a failing membrane. Fix by replacing filters, checking PSI, and testing TDS.
Bad taste or smell means exhausted carbon filters or biofilm in the tank or tubing. Fix by sanitizing the system and replacing filters.
System running constantly indicates a failed auto shut-off valve or leaking check valve. Fix by replacing the faulty valve.
High TDS in purified water means rejection has dropped below 90 percent. Replace the membrane. For example, if tap water measures 300 ppm, RO water should be 30 ppm or lower.
DIY vs Professional Service
You can handle monthly inspections, filter and membrane replacement, system sanitization, and tank flushing and pressure checks yourself. Most homeowners can manage these tasks with basic tools.
Call a professional for persistent leaks, electrical issues with smart faucets or pumps, uncertainty about sanitization, or when the system will not produce water.
Final Checklist After Cleaning
Verify that all old filters and membrane are discarded, new components are installed correctly, housings are reassembled with intact O-rings, the system is flushed 2 to 3 times, there are no leaks at connections, tank pressure is 5 to 7 PSI when empty, water tastes clean with no chlorine odor, and TDS reading confirms greater than 90 percent reduction.
Check each item before resuming regular use.
Frequently Asked Questions About Cleaning a Reverse Osmosis System
How often should I clean my RO system?
Clean and sanitize your RO system once per year as routine maintenance. Also sanitize after any period of inactivity exceeding 2 weeks, such as after vacations or storage.
Can I use bleach to clean my RO system?
Yes, unscented household bleach at 5 to 6 percent concentration is commonly used. Mix 3 to 4 teaspoons in the first-stage housing. Alternatively, RO-specific sanitizers or hydrogen peroxide are gentler on rubber components.
Do I need to replace the post-filter after sanitization?
Yes, always replace the post-filter after sanitization. It is sensitive to chlorine and other disinfectants and must be fresh to ensure safe drinking water.
How long does the sanitization process take?
The actual cleaning process takes about an hour, including 30 minutes of soaking time. However, the entire procedure including flushing and reassembly takes several hours due to tank fill times.
What happens if I do not clean my RO system?
Neglecting cleaning leads to biofilm buildup, reduced water flow, foul tastes and odors, premature membrane failure, and potential health risks from bacterial contamination.
How do I know if my RO system needs cleaning?
Signs include slow water flow, bad taste or smell, visible mold or slime in housings, system running constantly, or high TDS readings indicating membrane degradation.
Key Takeaways for Cleaning Your Reverse Osmosis System
Regular cleaning and sanitization are essential for maintaining safe, great-tasting water and extending the life of your RO system. Annual sanitization removes biofilm and microbial buildup that compromises water quality, while prompt replacement of filters and membrane ensures optimal performance.
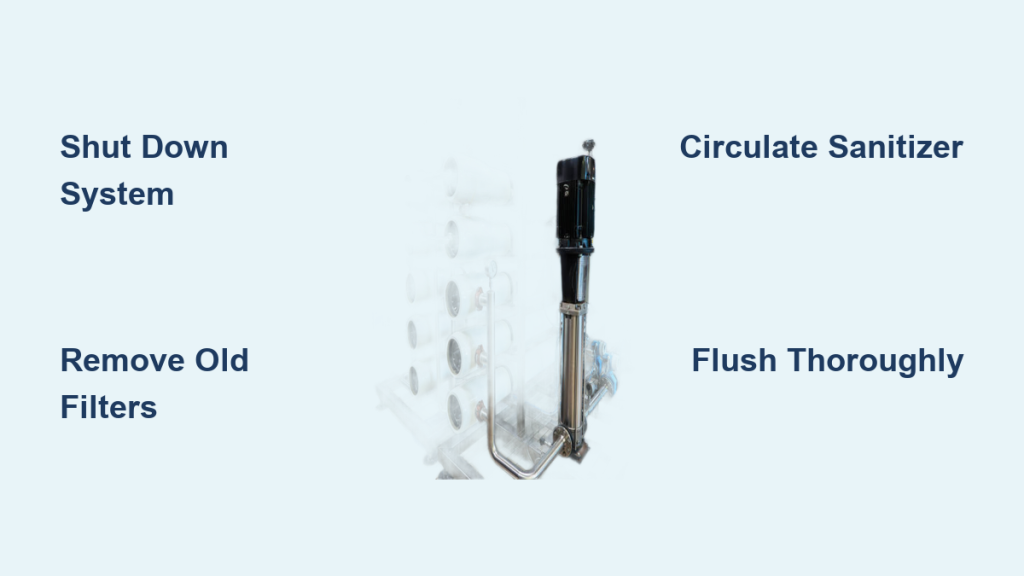
The process involves shutting down the system, removing and discarding old components, circulating a diluted sanitizer through all internal pathways, soaking for 30 minutes, flushing thoroughly, and installing fresh filters and membrane. Always discard the first 2 to 3 tanks of water after reassembly before drinking.
With proper maintenance including monthly leak checks, annual cleaning, and timely filter changes, a well cared-for RO system delivers pure water for 10 to 15 years. Set phone reminders for maintenance tasks and keep spare filters on hand to never delay essential service.



