
If your reverse osmosis system is producing only a trickle of water or taking hours to refill, the storage tank is likely failing. Over time, the internal bladder wears out, air pressure drops, or biofilm builds up, leading to poor performance and bad-tasting water. Replacing your RO tank restores full flow, improves water availability, and extends the life of your entire system. This guide walks you through every step from diagnosing tank failure to installing a new unit and even upgrading for greater capacity.
Signs Your RO Tank Needs Replacement
Low Water Output or Fast Depletion
When your RO faucet delivers just one glass before slowing to a drip, the tank likely cannot hold pressure. A healthy 4-gallon tank should provide 1.5 to 2 gallons of usable water. If it empties after just a few cups, the internal bladder may be ruptured or undercharged.
Heavy Empty Tank Indicates Bladder Failure
A failed bladder allows water to flood the air chamber. Lift the tank after draining it should feel light. If it feels heavy, water has filled the air side, confirming bladder rupture. Replacement is required since repair is not possible.
No Water Flow Despite System Operation
If the RO unit runs but the tank does not fill, check the shut-off valve and air pressure first. However, if the tank remains empty after several hours, the bladder may be stuck closed or the tank internally blocked, both signaling that replacement is needed.
Stale Taste or Odor After Long Storage
Water sitting too long in a degraded tank can develop a musty smell. This suggests biofilm buildup inside the bladder. Even after flushing, if the taste persists, replace the tank to restore purity.
Tools and Supplies Needed
Essential Tools for Installation
Gather these items before starting your replacement project:
- Adjustable wrench for threaded fittings
- Tire pressure gauge to test bladder PSI
- Bicycle pump or small compressor for adjusting air charge
- Tubing cutter for clean cuts on RO lines
- Measuring ruler or caliper to confirm tubing size
- Teflon tape (PTFE) for sealing threads
- Towels or bucket to catch residual water
Use a push-to-connect tubing cutter, not scissors, to prevent fraying and future leaks.
Confirm Tubing Size and Thread Type
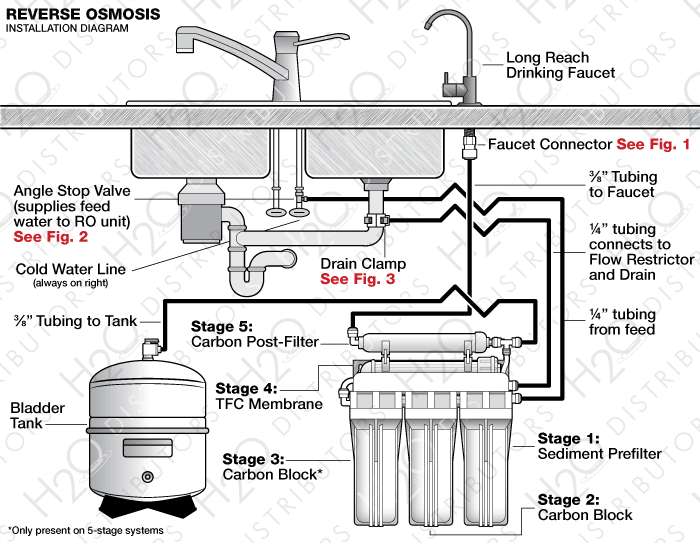
Most RO systems use 3/8-inch OD tubing, but older models may have 1/4-inch. Measure your existing line with a ruler. Also verify the tank port is 1-inch Male NPT, the industry standard. Never assume compatibility because mismatches require full valve replacement.
Check and Adjust Air Pressure

Ideal PSI Range: 6 to 8 PSI
The tank uses air pressure to push water out. Too low, below 5 PSI, and flow stops early. Too high, above 10 PSI, and storage capacity drops. Always set pressure between 6 and 8 PSI when the tank is empty.
How to Measure Bladder Pressure
Shut off water and open the RO faucet to depressurize. Drain all water from the tank. Use a tire gauge on the Schrader valve, which looks like a bike tire valve, located on the top or bottom. Read the PSI. If it falls outside 6 to 8, adjust accordingly.
Never test or adjust pressure while the tank is full because this risks bladder damage.
Recharge an Undercharged Tank
If pressure reads low, attach a bicycle pump to the Schrader valve. Add air in short bursts and recheck with the gauge. Stop when pressure hits 7 PSI, the ideal midpoint. Check air pressure annually during maintenance, even in working tanks.
Remove the Old RO Tank
Shut Off Water and Depressurize
Close the main feed-line shutoff valve. Open the RO faucet and let it run until dry. Keep it open for one minute to ensure all pressure is released. If your tank has a shut-off valve, turn it off with the handle perpendicular to the tubing.
Never disconnect components under pressure because this prevents water bursts and fitting damage.
Disconnect Tubing and Remove Tank
Place towels under the unit. Disconnect the water line by pressing the release collar and pulling tubing straight out for push-fit fittings. For threaded fittings, use a wrench to loosen the nut. Unscrew the shut-off valve if not reusing it. Then unmount the tank from its bracket. If it feels waterlogged, the bladder is dead and immediate replacement is needed.
Install the New Reverse Osmosis Tank
Attach the Shut-Off Valve If Not Pre-Installed
Some tanks, like the Ice Spring 4G, come with a valve already attached. Others do not. If installing one yourself, wrap 2 to 3 tight turns of Teflon tape clockwise on the 1-inch Male NPT threads. Hand-tighten the valve, then give it a quarter to half turn with a wrench. Do not overtighten. Ensure the rubber washer is seated inside the valve to prevent backflow.
The rubber washer stops water from flowing backward during filter changes, protecting the membrane.
Set Correct Air Pressure Before Installation
Check the Schrader valve on the new tank. If pressure is not between 6 and 8 PSI, adjust it now, before connecting water lines. This prevents underperformance and premature failure.
Mount the Tank and Connect Tubing
Secure the tank in the mounting bracket under the sink. Allow space for access and expansion. Reconnect the tubing by pushing the 3/8-inch or 1/4-inch line fully into the quick-connect fitting until it clicks. Gently pull back to confirm it is locked.
If tubing sizes do not match, such as old 3/8-inch to new 1/4-inch valve, use a push-to-connect adapter rated for RO systems.
Restore Water and Check for Leaks
Slowly Turn On Water Supply
Open the main shutoff valve slowly. Let the system fill and pressurize over 2 to 4 hours. Do not rush because sudden pressure can damage new components.
Inspect All Connections Hourly
For the first few hours, check the tank valve threads, quick-connect fittings, filter housings, and feed line joints. Wrap paper towels around connections because any moisture will show immediately.
Open Valve and Flush the System
Release the Tank Shut-Off Valve
Once pressurized, turn the valve handle parallel to the tubing to open flow. If no valve is present, skip this step.
Run Water to Clear Air and Debris
Open the RO faucet and let water run for 1 to 2 minutes. This flushes trapped air and initial impurities. Discard the first 2 to 3 batches to ensure fresh, clean taste. A 4-gallon tank should deliver 2 to 4 jars before slowing.
Sanitize After Tank Replacement
Why Sanitizing Is Critical
Even new tanks can harbor microbes introduced during handling. After installation, sanitize to eliminate bacteria and ensure water purity.
Step-by-Step Sanitization
Shut off and depressurize the system. Mix 1 teaspoon unscented bleach per gallon of water. Install sanitation cartridges in place of standard filters. Bypass or remove the RO membrane if recommended. Reconnect and let sanitizer circulate for 30 to 60 minutes. Drain, then flush with clean water for 10 to 15 minutes. Reinstall regular filters and membrane.
Always follow manufacturer guidelines because some systems require specific sanitizers.
Upgrade for More Water Capacity
Replace with a Larger Tank
Swap a 3 or 4-gallon unit for a 10 or 14-gallon tank. Benefits include longer draw time, less frequent refills, and better performance for large households. Ensure the larger tank fits under your sink and matches your system pressure limits, typically 80 to 100 PSI.
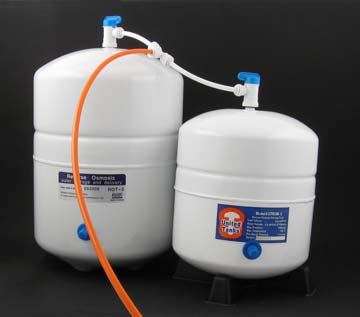
Add a Second Tank with a Tee Fitting
Double capacity by installing a Tee connector between the RO membrane and the original tank. Run a new line to a second tank and pressurize both tanks to 6 to 8 PSI. Use a 3/8-inch push-to-connect Tee for compatibility.
This setup improves surge flow when filling kettles or pitchers.
Prevent Future Issues and Extend Tank Life
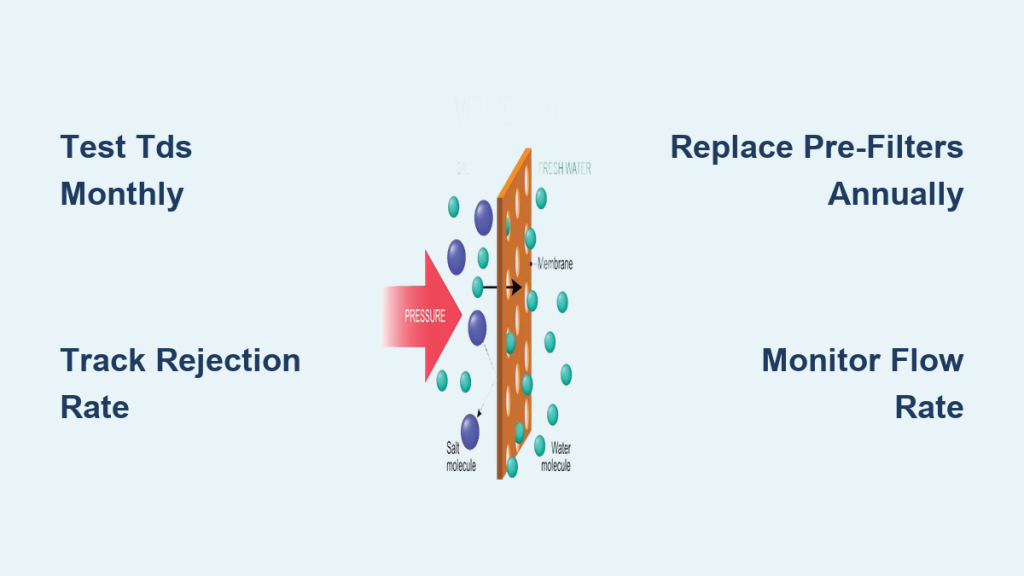
Maintain Proper Air Pressure
Check bladder pressure once a year with a tire gauge. Recharge to 6 to 8 PSI if needed. This simple step prevents 80% of tank-related failures.
Avoid Freezing and Stagnation
Never install an RO tank in a garage or unheated space. Temperatures below freezing can rupture the bladder. Also, flush the system after long absences to prevent biofilm buildup.
Replace Tank Every 3 to 10 Years
Even with care, bladders degrade. Most tanks last 5 to 7 years under average use. Replace proactively if water flow declines or taste changes. Upgrading to a 10-gallon tank cuts refill wait times by half and supports daily coffee, cooking, and drinking needs.
Frequently Asked Questions About Replacing an RO Tank
How Do I Know If My RO Tank Is Failing?
Signs of failure include low water output where the faucet slows to a trickle after just one glass, rapid depletion where the tank empties within minutes, a heavy tank when it should feel light, and stale or musty tasting water. If your system takes hours to refill or produces no water despite running, the tank likely needs replacement.
Can I Recharge My RO Tank Instead of Replacing It?
You can try recharging by depressurizing and adding air to the Schrader valve if the bladder is intact. However, if the bladder has ruptured, indicated by a heavy empty tank, recharging will not work and replacement is necessary. Check pressure first because low PSI is often mistaken for bladder failure.
What Air Pressure Should My RO Tank Have?
The ideal range is 6 to 8 PSI when the tank is empty. Under 5 PSI causes rapid emptying and reduced usable water. Above 10 PSI compresses the bladder and reduces storage capacity. Check annually and adjust only when the tank is empty.
How Long Does It Take to Replace an RO Tank?
The actual installation takes 15 to 60 minutes, depending on your experience and whether adapters are needed. However, you must allow 2 to 4 hours for the system to fully pressurize before testing. Plan accordingly and do not rush the pressurization process.
Do I Need to Sanitize My RO System After Tank Replacement?
Yes, sanitization is recommended after replacing any major component. Even new tanks can harbor microbes from handling. Use a bleach solution or manufacturer-recommended sanitizer, circulate for 30 to 60 minutes, then flush thoroughly before using the water.
Can I Upgrade to a Larger Tank at the Same Time?
Yes, you can replace a 3 or 4-gallon tank with a 10 or 14-gallon model for greater capacity. Ensure adequate under-sink space and verify your system pressure can handle the larger volume. This upgrade reduces refill frequency and improves water availability during peak use.
Key Takeaways for Replacing Your Reverse Osmosis Tank
Replacing a reverse osmosis tank is a straightforward DIY task that restores performance and water quality. Monitor for failure signs like low output, rapid depletion, and stale taste. Check air pressure annually and maintain 6 to 8 PSI for optimal performance. Always verify tubing size and thread compatibility before purchasing replacement parts. Install the shut-off valve with Teflon tape and a rubber washer to prevent leaks. Allow 2 to 4 hours for pressurization and check all connections hourly. Sanitize after installation to ensure clean water. Consider upgrading to a larger tank or adding a second tank for greater capacity. With proper maintenance, your new RO tank will provide clean, reliable water for 5 to 7 years or longer.