Hard water creeping back into your home? Your GE water softener might need immediate attention. These systems typically last 10 to 15 years, but mineral buildup and mechanical wear often cause premature failure. The good news is that most issues like a stuck turbine or clogged venturi are fixable without replacing the entire unit.
You do not need to call a plumber right away. With basic tools and this guide, you can troubleshoot common GE water softener problems yourself. From restoring brine draw to cleaning a jammed flow meter, we walk you through step-by-step fixes that save time and money. Whether your softener isn’t regenerating or your dishes have a chalky film, the solution is likely closer than you think.
Verify Power and Electrical Connections Before Disassembly
Many apparent mechanical failures are actually simple electrical oversights. Confirming power status is the first critical step in any GE water softener repair process.
Test the Outlet and Plug Functionality
Ensure the unit is fully plugged into the wall outlet. Use a lamp or phone charger to test the specific socket the softener uses. If the test device fails to power on, check your home’s breaker panel or fuse box immediately. A tripped breaker is a common culprit behind a completely dead softener unit.
Check Sensor Wire and Circuit Board Response
A disconnected sensor wire prevents the production of soft water entirely. Refer to your manual’s Manually Initiated Electronics Diagnostics section to verify connectivity. For turbine-related errors, test the electronic sensor first before taking anything apart.
- Unclip the flow sensor from the housing carefully.
- Pass a fridge magnet across the face of the sensor.
- Watch the display closely for a beep or count increase.
- If it responds, the circuit board works and the fault is mechanical.
Pro Tip: Always unplug the unit before handling internal components to avoid electrical hazards. No response from the display suggests rare electronic failure.
Diagnose the Flow Meter and Turbine Performance

The turbine inside the flow meter tracks water usage and triggers regeneration cycles. In hard water areas, calcium and debris bind the rotor, stopping it from spinning correctly.
Enter Flow Test Mode for Diagnostics
Use this built-in diagnostic feature to check turbine function accurately.
- Press and hold the Mode button for three seconds.
- Press the button twice more to reach water flow test mode.
- Observe the display showing three zeros as your flow counter.
- Turn on a faucet and watch the numbers rise steadily.
What the Display Readings Indicate
| Reading | Issue | Likely Cause |
|---|---|---|
| Jumps to 8 or 10 then stops | Turbine not spinning | Stuck rotor or broken magnet |
| No change with water running | No flow detected | Disconnected sensor or dead circuit |
| Steady increase with beeps | Working correctly | System is functional |
Manually Spin the Turbine Rotor
If the display does not respond, remove the flow meter assembly for inspection. Turn off the water supply and relieve pressure by opening a tap. Unplug the unit and locate retaining clips on both sides of the housing. Gently pop them out with a screwdriver while watching for cracks. Pull out the flow meter and extract the turbine rotor.
Spin the fins with a small screwdriver while in test mode. If the counter increases, the sensor works and you simply need to clean the turbine. No movement confirms a mechanical blockage.
Clean the Stuck Turbine Assembly Thoroughly
A dirty turbine is the number one cause of failed regeneration in GE units. Restoring it requires careful cleaning and proper reassembly.
Disassemble and Inspect Internal Components
Once the rotor is out, shine a flashlight into the housing. Look for white crust indicating calcium, black specks of carbon, or general grit. Check the two small magnets at the back and clean any residue found there.
Soak and Flush with White Vinegar
- Spray white vinegar into the housing and around the rotor shaft.
- Let it sit for 10 to 15 minutes to dissolve mineral deposits.
- Flush the area with clean water to remove loosened debris.
- Wipe all parts with a soft cloth and avoid using abrasives.
Reassemble with Proper Alignment
Reinsert the turbine with magnets facing backward. Ensure the metal shaft slides in straight because misalignment causes binding. Snap the housing back into place. If clips broke, temporarily tape them to hold the unit together. Reconnect the sensor wire securely.
Confirm Operation After Cleaning
Return to flow test mode to verify your repair. Manually spin the fins and ensure the display counts up. Turn on the water and watch the count rise smoothly. Restore the bypass valve to the OUT service position. Initiate a manual regeneration cycle. Soft water should return within 24 to 48 hours.
Prevention: Clean the turbine every 6 to 12 months in hard water areas.
Fix Brine Draw Failure and Venturi Clogs
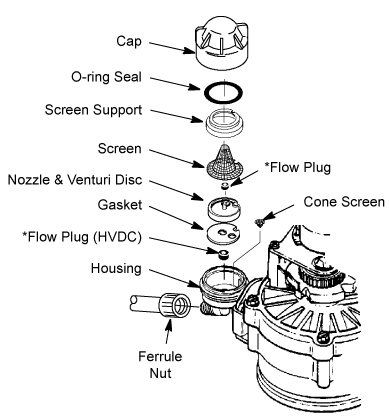
If the brine tank stays full or overflows, the venturi is not creating suction. This usually means a clogged venturi assembly, especially in models like the GE GXSH40V.
Recognize the Symptoms of Clogging
- Brine tank does not draw down after regeneration.
- Water leaks near the softener or basement floor.
- Softening performance drops despite salt presence.
The venturi uses water pressure to create a vacuum. Any blockage from salt crystals or sediment breaks the suction required for regeneration.
Access the Venturi Assembly Safely
Open the softener cabinet to begin. Remove the brine tank lid by pressing release tabs behind it. Use a flathead screwdriver to gently pry if the lid is stuck. This exposes the venturi assembly for cleaning.
Disassemble and Clean Components
Remove the following parts by hand:
* Venturi body
* Internal screen or filter
* O-ring
* Check valve or washer if present
Lay parts on a clean towel and reference your model diagram. Use distilled water only because tap water adds more minerals. Scrub the internal screen with an old toothbrush. Replace it if torn or corroded. Clear salt buildup from the venturi chamber. Clean the O-ring groove thoroughly since debris here causes leaks. Inspect the O-ring and replace if cracked or brittle.
Reassemble Without Over-Tightening
Reinsert the screen and filter carefully. Apply plumber’s grease to the O-ring. Seat it carefully with no pinching or twisting. Hand-tighten the venturi cap and do not use tools. Over-tightening damages the O-ring and leads to leaks.
Test After Reassembly
Replace the brine tank cover. Run a manual regeneration cycle. Watch for brine draw as the water level in the tank should drop. Check for leaks around the venturi. Success means full suction and no drips.
Maintenance Tip: Clean the venturi every 6 to 12 months to prevent clogs.
Resolve Common Configuration Errors Quickly
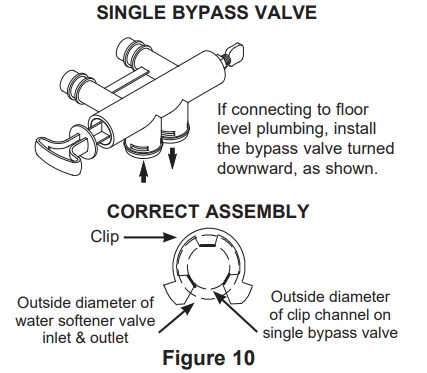
Many softening problems stem from simple user settings rather than hardware failure. Checking these can solve your GE water softener repair needs instantly.
Check Bypass Valve Position
The bypass valve controls water flow through the unit. If the handle is pushed IN, the system is bypassed and hard water flows directly. If the handle is pulled OUT, the softener is in service. Move the handle to OUT if you are experiencing hard water issues.
Adjust Blending Valve Settings
This valve controls the mix of soft and untreated water. Turning it clockwise closes it for 100% soft water. Turning it counter-clockwise opens it to blend in hard water. Turn it fully clockwise for maximum softening performance.
Set Correct Hardness Level
Incorrect settings cause regeneration to occur too frequently or too rarely.
- Press MODE/SET until the arrow points to HARDNESS.
- Adjust the number to match your water’s grains per gallon (GPG).
- Use a water test kit or check local utility reports for accuracy.
Regional Note: In high-hardness areas, accurate GPG entry is critical for efficiency.
Address Salt Supply and Bridging Problems

Even a perfectly working softener fails without proper salt maintenance. Ensuring adequate supply is essential for operation.
Maintain Proper Salt Levels
Keep the brine tank at least one-third full at all times. Never let it go empty. Use water softener salt only and avoid rock salt or table salt. Impurities in regular salt damage internal components over time.
Break Salt Bridges Effectively
A salt bridge is a solid crust that forms above the water, blocking brine creation. You can detect it if the tank looks full but the water level is low. Salt that does not dissolve is another sign.
- Tap the tank’s sides with a rubber mallet gently.
- Insert a broom handle and break the crust carefully.
- Pour 3 to 4 gallons of hot water to dissolve remaining salt.
- Press RECHARGE to initiate regeneration.
Prevention: Check for bridging every 2 to 3 months, especially in humid environments.
Prevent Future Failures with Regular Maintenance
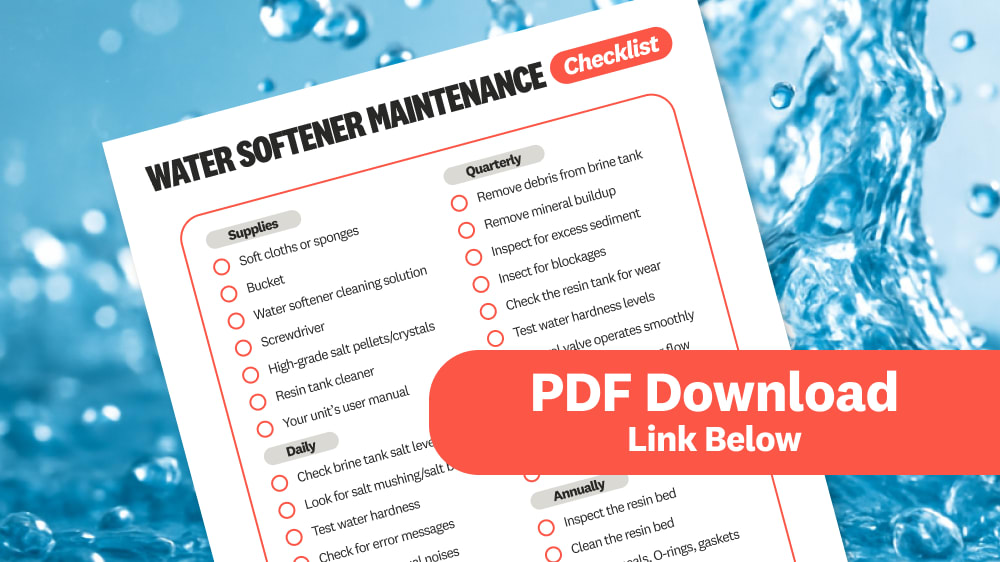
Regular care extends your GE softener life beyond the typical 15-year window. A consistent schedule prevents most common issues.
Create a Maintenance Schedule
| Task | Frequency | Tools Needed |
|---|---|---|
| Turbine cleaning | Every 6 to 12 months | Vinegar, screwdriver, cloth |
| Venturi cleaning | Every 6 to 12 months | Toothbrush, distilled water, grease |
| Salt level check | Monthly | Flashlight |
| Salt bridge inspection | Every 2 to 3 months | Broom handle, mallet |
| Leak inspection | Monthly | Visual check under unit |
Perform Vinegar Flushes
Every six months, pour 1 to 2 cups of white vinegar into the brine tank. Run a manual regeneration cycle. The vinegar cleans resin beads and dissolves internal deposits effectively.
Inspect for Leaks Regularly
Check these spots monthly:
* Venturi cap
* Brine tank seams
* Flow meter housing
* Fittings and hoses
Catch small issues before they cause significant water damage.
Know When to Call a Professional Technician
Some problems require expert help beyond basic GE water softener repair. Knowing the difference saves money and frustration.
Repair vs Replace Decisions
Repair the unit if the turbine, venturi, O-rings, or settings are the issue. Replace the unit if the control board is dead, the motor is seized, or the unit is over 15 years old with multiple failures.
When to Hire a Technician
Seek professional help for confirmed circuit board failure where there is no display or response. Broken drive motors in the control head also require experts. Persistent leaks after O-ring replacement indicate deeper issues. Complex wiring issues should also be left to professionals.
Cost Tip: DIY turbine cleaning saves $150+ compared to a service call.
Frequently Asked Questions About GE Water Softener Repair
Why is my GE water softener not regenerating?
The most common cause is a stuck turbine due to mineral buildup. Enter flow test mode to check if the counter moves. If not, clean the turbine with vinegar. Salt bridging or incorrect settings can also prevent regeneration cycles.
How do I fix a GE softener brine tank that won’t empty?
This indicates a clogged venturi assembly preventing suction. Remove the brine tank cover and disassemble the venturi. Clean the screen and chamber with distilled water and a toothbrush. Replace the O-ring if damaged.
How often should I clean my GE water softener turbine?
Clean the turbine every 6 to 12 months in hard water areas. Regular cleaning prevents calcium and carbon buildup that stops the rotor. This simple maintenance task ensures accurate water usage tracking.
What does it mean if my softener display shows no power?
Check if the unit is plugged in and the outlet is working. Test the socket with another device. If the outlet works, check your home’s breaker box for a tripped circuit. Electrical issues are common causes of total system failure.
Can I use regular table salt in my GE water softener?
No, use only water softener salt. Regular salt contains impurities that damage internal components and create excess sediment. Using the wrong salt type voids warranties and leads to premature system failure.
How do I know if my salt bridge is broken?
The water level in the brine tank will drop after breaking the bridge. You may hear a cracking sound when tapping the tank. Press RECHARGE to confirm the system can now draw brine properly.
Key Takeaways for Successful GE Water Softener Repair
GE water softener repair often involves simple fixes like cleaning a stuck turbine or unclogging a venturi. Most homeowners can resolve these issues with basic tools and vinegar. Regular maintenance prevents 80% of common failures and extends unit life significantly.
Remember to check power and settings before disassembling any parts. Follow the diagnostic steps to isolate the problem accurately. If you maintain your system every six months, you can avoid costly service calls and enjoy soft water for years. Start with the flow test mode today to diagnose your specific issue.