
Is your water softener keeps running nonstop, sending gallons of water down the drain even when no cycle is active? This frustrating issue usually points to an internal valve failure rather than a simple setting error. Ignoring it can waste hundreds of gallons daily and drastically increase your utility bills.
You can often fix this problem in under an hour using basic tools and a replacement seal kit. This guide explains how to diagnose the root cause, test for internal leaks, and repair common models like Clack WS1 or Fleck 5600. Follow these steps to stop the waste and restore normal operation immediately.
Bypass the System to Isolate the Issue
You must confirm the problem lies within the softener before attempting repairs. Start by flipping your bypass valve to the bypass position. This action redirects hard water around the unit so you can test the drainage safely.
If the water flow to the drain stops completely, the issue is definitely inside the softener unit. If water continues flowing to the drain line, check your external plumbing for crossed lines or other connection errors.
Caution: Never open internal components while the system is under pressure. Always engage the bypass valve first to prevent flooding.
Verify External Plumbing Connections
Check all pipes leading away from the unit. Ensure no other appliances are incorrectly tied into the softener drain line. Misconnected lines can mimic a mechanical failure.
Rule Out Normal Regeneration Cycles
A water softener keeps running during its scheduled regeneration phase. This process cleans the resin bed and recharges the system with brine. It is normal for water to flow to the drain during this time.
Check your control panel display for a countdown timer or an illuminated Regen indicator. Listen for the hum of the motor as it moves through different cycle stages. Most full cycles take between 60 and 90 minutes to complete.
How to Fast-Forward a Stuck Cycle
If the unit is regenerating but seems stuck, press the regen button once. This command forces the controller to advance to the next stage or complete the cycle quickly.
Wait for the cycle to finish fully. If the drainage stops once the timer reaches zero, your system is functioning correctly. However, if water flows continuously while the display shows Service mode, you have a mechanical valve failure.
Test for Internal Valve Leaks
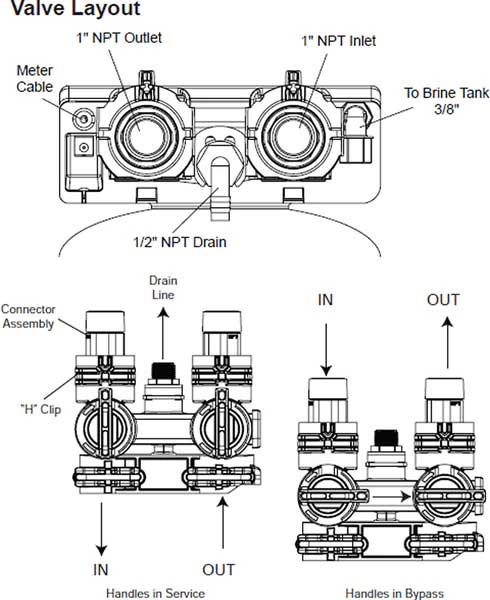
Slow internal leaks can be difficult to spot with the naked eye. You need a definitive test to confirm if the valve is failing to seal properly inside the housing.
Disconnect the Drain Line Safely
- Ensure the system bypass valve is fully engaged.
- Locate the flexible drain line connected to the valve outlet.
- Place a bucket underneath the connection point to catch residual water.
- Loosen the clamp and disconnect the drain line from the valve.
Return the bypass valve slowly to the service position while watching the open drain port on the valve body. Do not reconnect the drain line yet.
Identify Water Flow from Drain Port
If water immediately begins flowing out of the drain port while the unit is in service mode, you have confirmed an internal leak. This means the internal piston is not blocking the flow path to the drain.
Note: This specific symptom indicates the valve cannot direct water properly due to a failed seal or a stuck piston assembly.
Diagnose the Faulty Component
Two primary mechanical failures cause a water softener keeps running issue. The problem is usually a stuck piston or a worn-out seal pack inside the control head.
Listen closely to the unit when you press the regen button. The sound of the motor tells you which part has failed.
Motor Runs But Water Still Flows
If you hear the motor humming and see the timer advancing, the electrical components are working. The mechanical parts inside are likely seized or the seals are torn.
This scenario confirms you need to replace the piston and seal pack. The motor is trying to move the piston, but it cannot create a watertight seal against the valve body.
Motor Is Silent or Clicks Only
If there is no sound or just a clicking noise, the motor itself may be dead or the gears are stripped. In this case, the piston is not moving at all.
You may need to replace the entire motor assembly or the control head. However, mechanical seal failures are far more common than electrical motor failures.
Replace the Seal Pack and Piston Assembly

This repair procedure applies to Clack WS1, Fleck 5600, WaterBoss, and Aquamaster models. You will need a flathead screwdriver, adjustable wrench, bucket, and plumber’s silicone grease.
Purchase a replacement kit that includes both the piston and the seal pack. Replacing both parts together ensures a complete fix and prevents future leaks.
Power Down and Relieve Pressure
- Flip the bypass valve to the bypass position.
- Press the regen button to start a cycle and relieve internal pressure.
- Wait about 15 seconds until you hear the flow slow down significantly.
- Unplug the softener power cord from the wall outlet immediately.
Warning: Working on live electrical components near water is dangerous. Ensure the unit is unplugged before proceeding.
Remove the Valve Control Head
- Disconnect the drain line completely and let any remaining water drip into your bucket.
- Remove the large E-clip that secures the valve body to the tank connector.
- Gently pull the clack valve body upward to separate it from the tank.
- Unplug the small electrical connector from the motor assembly.
Undo the two metal side clips holding the front faceplate assembly. Pull the entire control head forward carefully to avoid bending wires. Set the assembly on a clean surface.
Disassemble the Drive Unit
- Insert a disassembly tool or flat screwdriver into the drive hub slot.
- Turn counter-clockwise to loosen the drive assembly from the valve body.
- Place a container underneath to catch water trapped in the valve.
- Lift the entire drive assembly out of the valve housing.
You will now see the main piston, the brine piston, and the rubber seal pack. Take a photo of the arrangement to help with reassembly later.
Install the New Seal Pack
- Pull out the old seal pack from its groove. It may be cracked or warped.
- Discard the old seal immediately. Do not attempt to reuse it.
- Slide the new seal pack into the groove until it sits flat and even.
Critical: Never apply grease to the rubber seal pack. Grease causes rubber to swell and fail prematurely.
Replace the Piston Component
- Unclip the old piston from the drive shaft carefully.
- Slide the new piston onto the shaft. Note that it only fits in one specific orientation.
- Reattach the retaining clip to secure the piston firmly.
Apply a pea-sized amount of plumber’s silicone grease to the piston seal ring only. This lubrication ensures smooth movement without damaging the rubber.
Reassemble the Valve Assembly
- Lower the drive assembly back into the valve body.
- Use your tool to tighten the hub securely. Turn until snug plus a quarter turn.
- Reconnect the electrical plug until you hear a distinct click.
- Snap the front assembly back into place ensuring the feet lock into their slots.
- Reattach the side metal clips firmly.
- Reconnect the drain line and secure the E-clip on the tank connector.
Return the System to Service Mode
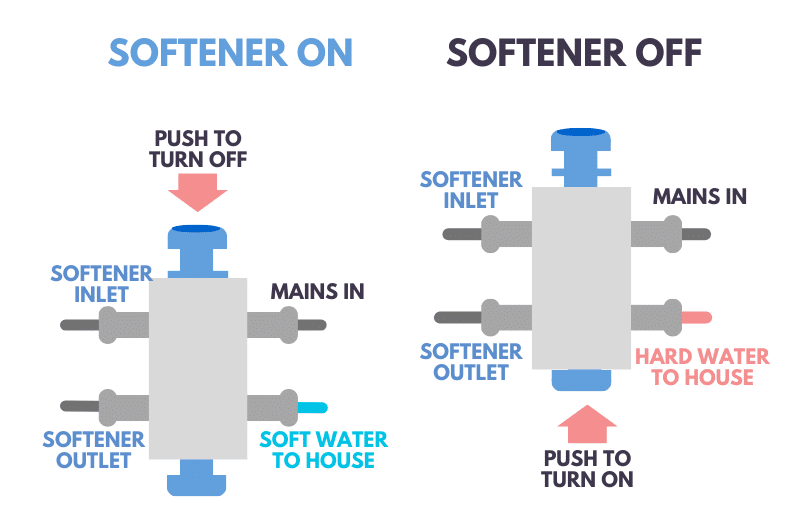
Plug the unit back into the wall outlet. Flip the bypass valve slowly back to the service position. The softener will automatically run a short setup cycle to reset its position.
Watch the motor for a few minutes. It should run briefly to align the piston and then stop completely. Check the drain line to ensure no water is flowing.
Success Check: If the motor stops and no water exits the drain, your repair is complete. Your water softener keeps running only when needed now.
Common Mistakes to Avoid

Many homeowners make simple errors that cause the repair to fail. Avoid these pitfalls to ensure long-term success.
Greasing the Wrong Parts
Applying grease to the rubber seal pack causes it to swell and jam the valve. Only grease the plastic piston seal ring.
Reusing Old Components
Old seals look fine but lose elasticity over time. Always replace the piston and seal pack as a matched set.
Over-Tightening the Hub
Tightening the drive hub too much can crack the plastic valve body. Finger tight plus a slight turn is sufficient.
Skipping Pressure Relief
Opening the valve without relieving pressure can cause water to spray everywhere. Always bypass and cycle the unit first.
When to Replace the Whole Valve
Sometimes the internal damage is too severe for a simple seal replacement. Inspect the valve body closely for signs of irreversible damage.
Look for cracks in the plastic housing or warped ports that prevent proper sealing. If the plastic is discolored or brittle, the entire valve body is compromised.
Solution: If the body is damaged, you must replace the entire control valve. Install a new Clack WS1 or Fleck 5600 head compatible with your tank size.
Prevent Future Failures
Regular maintenance extends the life of your water softener and prevents constant running issues. Follow these simple tips to keep your system efficient.
Flush the Brine Tank Yearly
Salt buildup can clog the system. Clean your brine tank annually to prevent salt mushing.
Use High-Quality Salt
Choose pellet or crystal salt designed for softeners. These forms leave less residue than cheap block salt.
Inspect Inlet Filters
Clean the inlet screen every three to six months. Sediment buildup restricts flow and stresses the valve mechanism.
Frequently Asked Questions About Water Softener Drainage
Why does my water softener run water constantly?
Your water softener keeps running because of an internal valve failure. A worn seal pack or stuck piston prevents the valve from closing the drain path during service mode.
How much water does a leaking softener waste?
A continuously draining softener can waste hundreds of gallons per day. This leads to significantly higher water and sewer bills if not fixed quickly.
Can I fix a running softener myself?
Yes, most cases involve replacing the seal pack and piston. You can complete this repair in under an hour with basic tools and a replacement kit.
Do I need to grease the new seal pack?
No, never grease the rubber seal pack. You should only apply a small amount of silicone grease to the piston seal ring to ensure smooth movement.
What if the motor does not make any sound?
If the motor is silent, the electrical component may be dead. Test the power source first, then consider replacing the motor or entire control head.
Key Takeaways for Fixing a Running Water Softener
A water softener keeps running primarily due to mechanical failures inside the control valve. The most common culprits are worn seal packs and seized pistons that fail to block the drain line. By bypassing the system and testing for internal flow, you can quickly confirm the diagnosis.
Replacing the piston and seal pack is a straightforward task that saves money and conserves water. Remember to relieve pressure before disassembly and avoid greasing the rubber seals. With these repairs, your system will return to quiet, efficient operation.
Gather your tools and order a repair kit specific to your model today. Stopping the constant drainage now prevents water waste and protects your home from potential flooding risks.


