

If your reverse osmosis system is not working, you are not alone. Thousands of homeowners face issues like no water flow, slow production, continuous draining, or bad-tasting water. The good news? Most problems have clear causes and straightforward fixes. Whether your RO system stopped suddenly or has been underperforming for weeks, this guide gives you the exact steps to diagnose and repair it.
In this complete troubleshooting manual, we will walk through every possible failure point. You will learn how to test feed pressure, measure TDS, stop constant drain flow, and restore full function using only basic tools and proven techniques. By the end, you will know exactly what is wrong and how to fix it.
Check Feed Water Pressure First
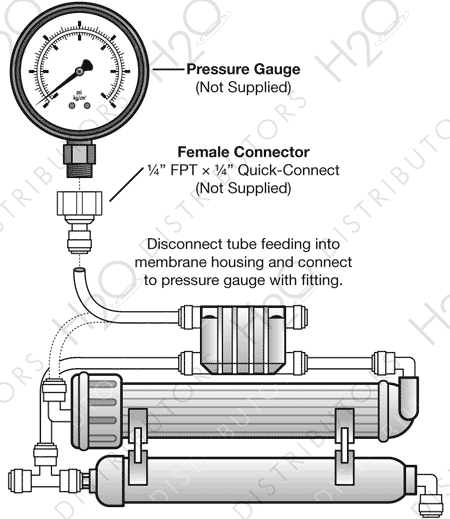
Low pressure is the top reason reverse osmosis systems fail to produce water. Without adequate pressure, the membrane cannot separate contaminants from your water supply.
Why 40 PSI Matters
Your RO system needs at least 40 PSI of cold water pressure to push water through the membrane. Below that, production slows or stops completely.
Pressure ranges to know:
- Below 40 PSI: System will not fill tank properly
- 40 to 80 PSI: Ideal operating range
- Above 80 PSI: Risk of damaging seals, valves, or the tank
Test Your Pressure
- Shut off the RO system at the supply valve
- Install a pressure gauge on the inlet side of the sediment filter
- Open the valve and read the pressure
No gauge? Look for these signs of low pressure:
- Dripping faucet
- Slow fill on other fixtures
- Whole-house pressure issues
Fix low pressure by cleaning or replacing the inlet screen on the saddle valve. Ensure the cold water valve under the sink is fully open. If pressure is consistently low, consider installing a booster pump, especially for well water or homes with softeners.
Diagnose No Water From Faucet
When the tap delivers nothing or just a trickle, start with the simplest causes first.
Rule Out Simple Causes First
Check these three things first:
- Is the tank valve open? The ball valve on the storage tank must be aligned with the tubing. If closed, no water flows to the faucet.
- Is the supply valve on? Confirm the cold water shutoff feeding the RO is fully open.
- Did you just replace filters? New membranes and filters need flushing. Run the system for 30 minutes or more before expecting clean water.
Test the Storage Tank
A dead tank mimics total system failure. Here is how to check it:
- Drain the tank completely: Close supply and tank valves, open faucet until flow stops, then reopen tank valve to drain residual water
- Check air pressure: Use a tire gauge on the Schrader valve on top of the tank. Empty tank should read 6 to 8 PSI
- Zero PSI means the bladder is ruptured. Replace the tank if it cannot hold pressure after recharging
- Lift the tank: A full tank weighs about 20 pounds, an empty tank weighs about 1 to 2 pounds
Pro Tip: Always repressurize the tank to 7 to 8 PSI before reopening the water supply.
Fix Slow or Low Water Flow
Even if some water comes out, slow flow means something is blocking the path.
Common Flow Blockers
- Sediment filter: Clogged with rust, sand, or silt
- Carbon filter: Saturated with chlorine or organics
- Post-carbon filter: Plugged, especially after long idle periods
- Tubing: Kinked, crushed, or improperly inserted
- Membrane: Fouled by scale, biofilm, or iron
Bypass Pre-Filters to Test
- Remove the sediment and carbon filters
- Reinstall housings without filters or use bypass plugs
- Open supply and let system run
Flow returns? The pre-filters were clogged. Replace both sediment and carbon filters. Still no flow? The problem is downstream.
Inspect Tubing and Fittings
Cut 1/4-inch tubing squarely. Burrs or angled cuts prevent full insertion. Push tubing into quick-connect fittings until it seats 3/4 inch deep. Look for kinks behind the unit or near the faucet.
Warning: Never force tubing. Damaged O-rings cause leaks.
Stop Continuous Drain Flow
If water runs nonstop down the drain, your system is not shutting off. This wastes hundreds of gallons daily.
Three Main Causes
- Failed auto-shut-off (ASO) valve
- Leaking check valve
- Missing or wrong flow restrictor
Test the ASO Valve
- Let the tank fill normally
- Close the tank ball valve
- Watch the drain line for 5 minutes
Water still flows? The ASO valve is not closing. Replace the ASO valve.
Check the Check Valve
- Let the tank fill
- Turn off the main water supply to the RO
- Disconnect the drain line
Water flows from drain? The check valve is leaking. Replace the check valve.
Key Insight: Both valves must work together. Failure in either causes endless draining.
Verify Flow Restrictor Size
The restrictor controls how fast waste water leaves the system. If too large or missing, the tank never builds enough pressure to trigger the ASO.
Test drain flow:
- Collect water from drain line for 30 seconds
- Multiply by 2 to get ounces per minute
- Compare to the correct range:
- 50 GPD membrane: 350 to 400 oz/min
- 75 GPD membrane: 575 to 650 oz/min
- 100 GPD membrane: 730 to 900 oz/min
Too high? The flow restrictor is wrong or missing. Install the correct size.
Solve Storage Tank Not Filling
Even with water entering, the tank may not pressurize. Here is the step-by-step diagnosis.
Step-by-Step Diagnosis
- Drain and repressurize tank to 7 to 8 PSI when empty
- Replace all filters. Clogged stages block flow
- Inspect ASO valve function as described above
- Ensure full feed water pressure of at least 40 PSI
Why Tanks Fail to Fill
Common causes and fixes:
- Low tank air charge: Repressurize to 7 to 8 PSI
- Clogged pre-filter: Replace sediment and carbon filters
- Failed ASO valve: Replace inline
- Faulty check valve: Replace immediately
- Pinched tubing: Re-route or replace the line
Expert Note: A properly filled 4-gallon tank should have about 35 PSI when full with 50 PSI feed water pressure.
Lower High TDS in RO Water
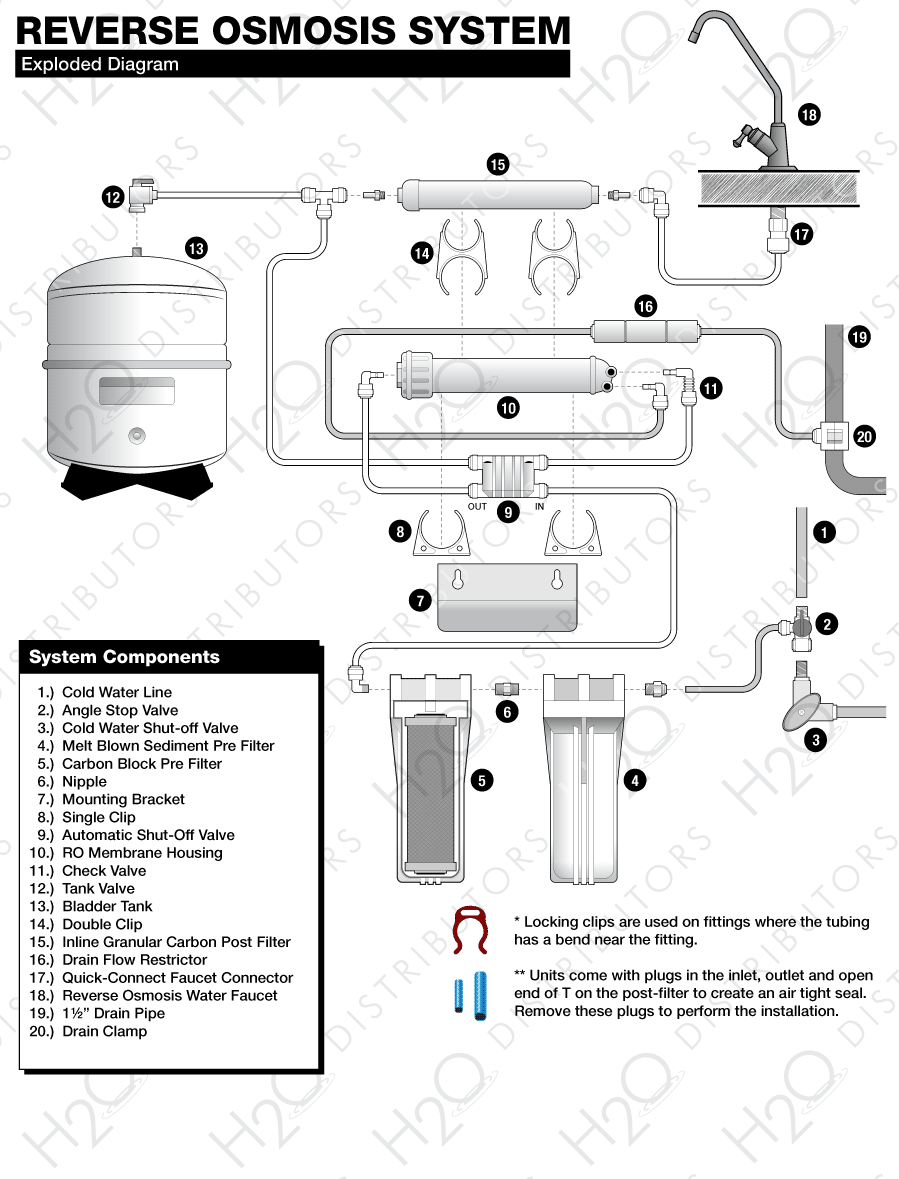
If your purified water tastes bad or a TDS meter shows high readings, the membrane is not doing its job.
What TDS Rejection Should Be
- Good: 90 to 99 percent rejection
- Acceptable minimum: 85 percent
Calculate rejection rate: Take your tap TDS minus the RO TDS, divide by tap TDS, then multiply by 100. Example: Tap is 200 ppm, RO is 30 ppm equals 85 percent rejection, which is acceptable but on the low end.
Fix Poor Rejection
Reseat the membrane:
- Shut off water and relieve pressure
- Remove membrane from housing
- Lubricate O-rings with food-grade silicone grease
- Reinsert fully using a quarter or coin to push it in
- Reassemble and flush 2 to 3 tanks
Common Mistake: Membrane not fully seated causes water to bypass the membrane, resulting in high TDS.
Match flow restrictor to membrane. A 100 GPD membrane needs a 300 ml/min restrictor. Wrong size means inefficient flushing, leading to scaling and poor rejection.
Check for crossed tubing. After service, double-check that orange tube goes to feed water inlet, white tube goes to tank, and black tube goes to drain.
Eliminate Bad Taste or Odor
RO water should taste clean and neutral. Any smell or flavor means contamination.
Replace Post-Carbon Filter
This filter polishes water before it reaches the faucet. Replace every 6 to 12 months.
- Musty or plastic taste: Old post-filter, replace it
- Chlorine smell: Carbon is exhausted, replace both pre- and post-filters
Sanitize the System
Bacteria grow in stagnant tanks and hoses.
Sanitizing steps:
- Mix 1 to 2 teaspoons of unscented bleach per gallon of water
- Pour into system or remove filters first and bypass
- Let sit 20 to 30 minutes
- Flush thoroughly until no chlorine odor remains
Prevention: Sanitize annually or after 5 or more days of inactivity.
Replace Old Storage Tank
After 5 to 7 years, the butyl bladder degrades and imparts a rubbery taste. Persistent bad taste after filter changes means the tank needs replacing.
Clear Milky or Cloudy Water
This is usually harmless but not always.
Air Bubbles (Normal)
Cloudiness that clears from bottom up is trapped air. Run 2 to 3 full tanks of water. Tilt the RO unit to the right to vent air faster.
Carbon Fines (New Filters)
Fresh carbon filters shed fine particles. Flush system for 30 minutes or more. Replace if cloudiness persists beyond 24 hours.
High TDS (Serious)
If water stays cloudy and TDS is high, suspect a failed membrane, bypass due to O-ring leak, or incorrect installation. Test TDS to confirm.
Stop Leaks at Fittings and Tank
Drips under the sink point to failing seals or components.
Fix Filter Housing Leaks
Most leaks are caused by dry or damaged O-rings.
- Shut off water and relieve pressure
- Remove housing
- Inspect O-ring for cracks, flattening, or misplacement
- Clean groove and lubricate O-ring with silicone grease
- Reinstall and hand-tighten only
Never use Teflon tape. It can break off and clog the system.
Repair Tubing Leaks
Cut tubing squarely with snips. Insert 3/4 inch into quick-connect fitting. If leak persists, replace the fitting.
Address Tank Leaks
- Water from Schrader valve? Replace the tank
- Spurting when checking pressure? Bladder burst, replace the tank
Note: Storage tanks are not repairable. Only replacement is possible.
Quiet Noisy Operation
Gurgling, hissing, or humming noises are common but fixable.
Bleed Air from Lines
After filter changes or long shutdowns, open the RO faucet and let water run for 10 to 15 minutes. Air pockets will clear naturally.
Fix Drain Line Siphoning
A kinked or improperly routed drain line creates suction, pulling water continuously.
Correct setup:
- Drain line slopes downward continuously to disposal or drain
- Maximum length is 20 feet
- Air gap faucet must be installed above flood rim
Avoid High Feed Pressure
Over 80 PSI causes loud hissing at valves. Install a pressure-reducing valve if household pressure exceeds 80 PSI.
Prevent Future Failures
A well-maintained RO system lasts 10 years or more. Follow this schedule.
Maintenance Checklist
- Replace sediment filter every 6 months
- Replace carbon filter every 6 to 12 months
- Replace post-carbon filter every 6 to 12 months
- Replace RO membrane every 2 to 5 years
- Replace storage tank every 5 to 7 years
- Sanitize system annually
- Test TDS every 6 to 12 months
- Check tank pressure every 6 months
Pro Tip: Keep a maintenance log with dates, pressures, and TDS readings.
When to Replace the Whole System
Some failures are not worth repairing.
Replace If:
- Manifold is cracked or has internal blockages
- Non-serviceable diaphragms have failed
- Parts are obsolete or incompatible
- Repair cost exceeds 50 percent of new unit price
- System is over 10 to 15 years old
Example: GE RO systems with sealed manifolds often require full replacement when valves fail.
Frequently Asked Questions About Reverse Osmosis System Not Working
Why is my RO system not producing water?
The most common causes are low feed water pressure below 40 PSI, a closed tank or supply valve, a failed storage tank bladder, or clogged pre-filters. Start by checking pressure and valve positions.
How do I know if my RO membrane is bad?
A bad membrane shows high TDS readings in your purified water, significantly reduced water flow, or bad taste. Test your TDS annually. If rejection drops below 85 percent, the membrane likely needs replacement.
Why does my RO system keep draining continuously?
Continuous drain flow means either the auto-shut-off valve is stuck open, the check valve is leaking, or the flow restrictor is missing or wrong size. Test both valves and verify the restrictor matches your membrane GPD rating.
Can I fix my RO system myself?
Yes. Most common issues like clogged filters, low tank pressure, failed valves, and tubing problems can be fixed with basic tools. Only cracked manifolds or failed storage tanks require full system replacement.
How often should I replace filters in my RO system?
Replace sediment filters every 6 months, carbon filters every 6 to 12 months, and post-carbon filters every 6 to 12 months. The RO membrane lasts 2 to 5 years depending on water quality.
What pressure does an RO storage tank need?
An empty tank should have 6 to 8 PSI of air pressure. When full with 50 PSI feed pressure, the tank should reach about 35 PSI. Check and adjust tank pressure every 6 months.
Key Takeaways for Fixing Your Reverse Osmosis System
You do not need a plumber to fix a reverse osmosis system not working. Most issues come down to five common problems: low pressure, clogged filters, dead tank, failed ASO or check valve, and wrong flow restrictor.
Always start with feed pressure and tank pressure. Test your feed water at the inlet to ensure at least 40 PSI. Check the storage tank air charge and maintain it at 7 to 8 PSI when empty.
Test TDS annually to catch membrane failure early. Rejection below 85 percent means the membrane needs attention. Reseat it first, then replace if needed.
Sanitize the system every year to prevent bacterial growth. Use a mild bleach solution and flush thoroughly.
Label tubing during repairs to avoid cross-connections. This prevents routing dirty water into your clean tank.
Flush new or serviced systems for at least 30 minutes before use. This removes carbon fines and trapped air.
If you have tried everything and still have issues, contact the manufacturer or a water treatment specialist. This is especially important if your feed water has high iron, hardness, or chloramines that may require additional pretreatment.
With proper care, your reverse osmosis system will deliver pure, great-tasting water for years to come.


