

You’re about to leave for vacation, or maybe you’ve noticed a drip under the sink. Either way, knowing how to turn off your reverse osmosis system safely and completely is critical. A reverse osmosis system does not just stop when you turn off the faucet. Water continues to flow into the unit unless proper shutoff steps are taken. This guide walks you through every reliable method to turn off your RO system, explains which valves to use, and provides step-by-step procedures for routine maintenance, emergencies, and long-term shutdowns.
Whether you have a basic under-sink model or a system with automatic leak detection, this article ensures you know exactly how to cut water supply, depressurize the system, and protect your home from water damage.
Close the RO Supply Valve First
The most common and effective way to turn off your reverse osmosis system is by closing the dedicated under-sink RO supply valve, typically marked with a blue handle. This valve sits in the cold water feed line that runs from your kitchen sink’s water supply to the RO unit. It is designed specifically to isolate the RO system without affecting the rest of your plumbing.
Locate the Blue Handle Valve
To shut it off, turn the blue handle clockwise. It usually takes about 8 full turns to fully close. Stop when the handle is perpendicular to the pipe, which means the valve is closed. This valve uses a rubber gasket to seal the line, making it durable and safe for frequent use. Once closed, it blocks water from reaching the pre-filters, membrane, and storage tank.
Avoid Pin-Type Valves
Some older or lower-quality systems use an internal piercing pin instead of a gasket. Repeated use can cause the pin to break, leading to leaks. If your valve has no visible handle and punctures the pipe, replace it with a gasket-seal model. These pin-type valves are not recommended for routine shutoffs due to reliability concerns.
Shut Off the Angle Stop Valve
For maximum safety, especially during repairs or extended absences, shut off the angle stop valve that feeds both the sink faucet and RO system. This brass or chrome valve is located under the sink on the main cold water line, before it splits to the RO unit.
Cut Water at the Source
To close the angle stop valve, turn the handle clockwise until tight. This cuts water to both the faucet and RO system. Use this in combination with the RO supply valve for a complete shutdown. This step is essential if your RO unit lacks a dedicated shutoff or if you are unsure whether the blue valve is functioning properly.
When to Use This Valve
Use the angle stop valve when performing plumbing maintenance, when the blue handle valve is stuck or damaged, or when you need to ensure no water reaches the under-sink area. It is the most reliable way to completely isolate water flow to your RO system.
Depressurize the System Properly
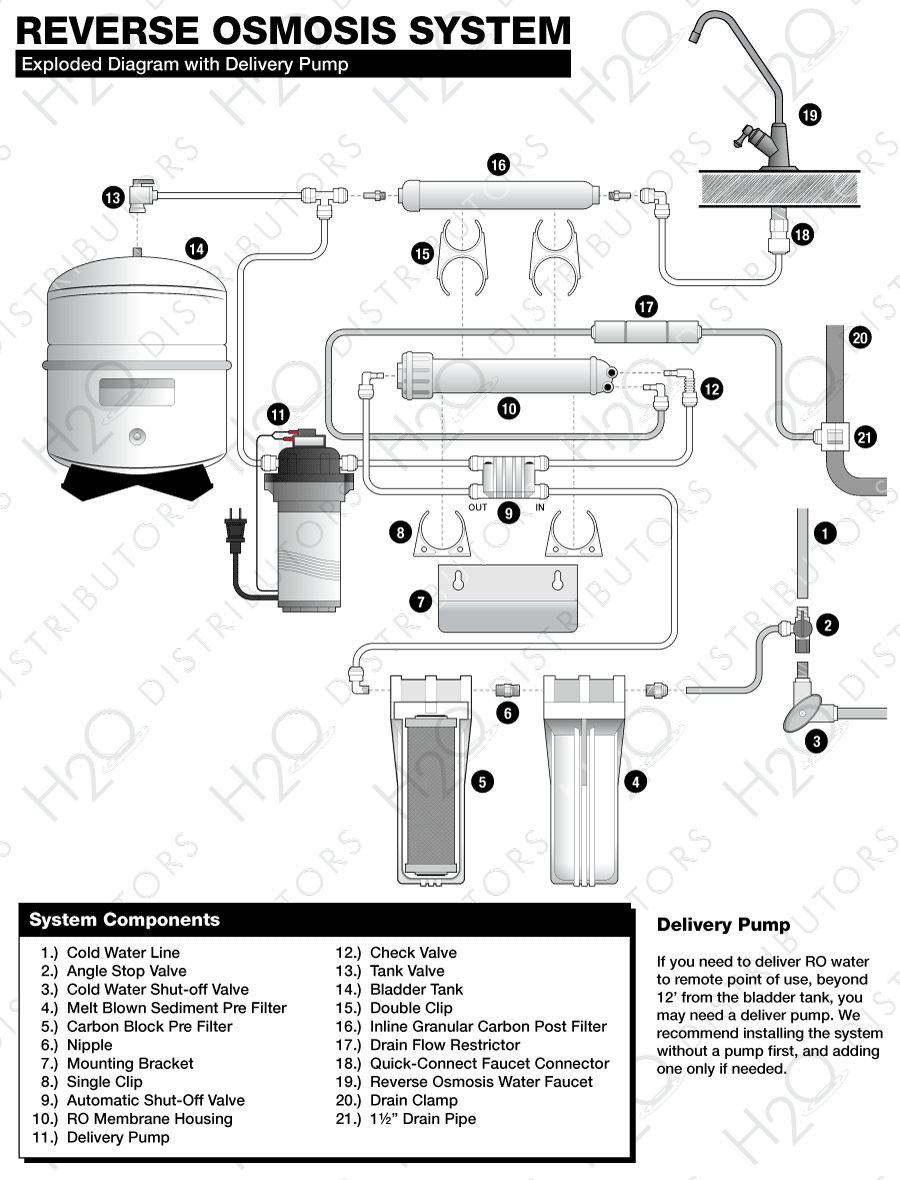
After closing the supply valves, the next critical step is to release pressure from the system. RO units operate under 35 to 65 psi, and working on a pressurized system can cause sudden water bursts.
Open the RO Faucet
To depressurize, open the dedicated RO faucet at the sink. Let water flow until it stops completely. This drains residual water from the lines and membrane housing. This step also empties water from the tubing between the valve and faucet, ensuring a dry, safe environment for filter changes or repairs.
Drain the Storage Tank
The storage tank holds 2 to 4 gallons of purified water under pressure. Even after the supply is cut, this water remains unless drained. To fully drain, keep the RO faucet open and wait until only drips or no water comes out. This may take 1 to 2 minutes depending on tank size and pressure. Once empty, the system is safe for servicing.
Close the Tank Valve to Isolate Storage
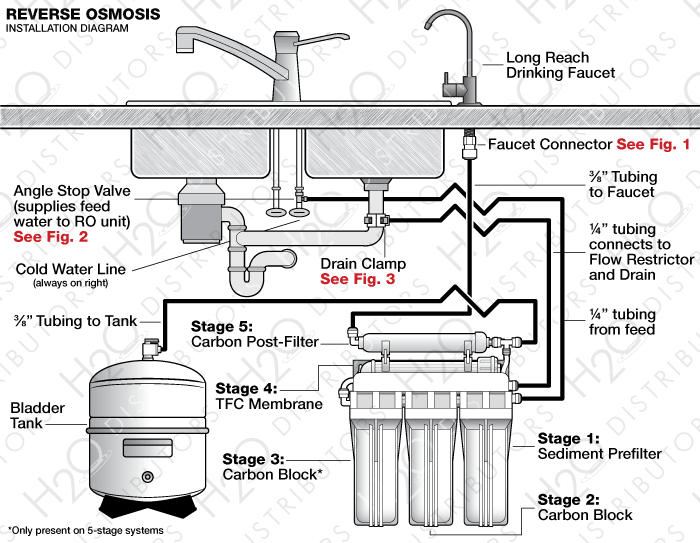
The tank-mounted shutoff valve sits on top of the pressurized storage tank. Turning it 90 degrees sideways stops water from entering or leaving the tank.
When to Use the Tank Valve
Use this valve when replacing the tank, servicing the check valve or bladder, or transporting the system. Rotate the valve handle until it is perpendicular to the outlet to close it. This isolates the tank for removal or service.
Important Limitation
Closing only the tank valve does not stop filtration. The system will continue producing water, which can overflow the membrane or cause leaks. Always close the supply valve first before closing the tank valve.
Emergency Leak Response Steps
If you see water pooling under the sink, act fast to prevent damage. Follow this emergency shutdown sequence immediately.
Immediate Actions for Active Leaks
Step-by-step emergency shutdown includes closing the RO supply valve (blue handle, clockwise), shutting the angle stop valve to cut all water to the sink area, closing the tank valve to stop internal flow, opening the RO faucet to drain remaining pressure, and verifying no flow by testing the faucet. Only drips should appear. If water continues to flow, double-check both supply valves. A failed automatic shut-off valve or faulty connection could still allow seepage.
Install Leak Detection Protection
Prevent future disasters with an automatic leak detection system. These systems use moisture-sensing pads placed under the RO unit and trigger a 9-volt battery-powered shutoff valve when water is detected. This cuts supply automatically, even when you are away. Place a black rubber mat or paper towel under the unit to pool small leaks and trigger the sensor faster. Replace the battery annually to ensure reliability.
Risky Shutoff Methods to Avoid
Some common methods do not actually shut off the RO system. Avoid these approaches to prevent leaks and damage.
Do Not Use the Faucet Alone
Turning off the RO faucet does nothing to stop water from entering the system. The unit will keep filtering and filling the tank until the automatic shut-off valve engages or fails. Never rely on the faucet as a shutoff method.
Skip the Automatic Shut-Off Valve Assumption
The automatic shut-off valve stops water when the tank is full, but it can fail. Pressure drops, membrane issues, or debris can keep water flowing. Never assume the system is off just because the tank is full. Always close manual valves for true shutoff.
Best Practices for Safe Operation
Upgrade your system and maintain it regularly to ensure reliable shutoff capability whenever needed.
Upgrade to Gasket-Seal Valves
Replace fragile pin valves with a blue-handled gasket-seal valve. These are designed for frequent use with no risk of internal breakage. They are easy to install in existing lines and dramatically improve system safety and reliability.
Label All Valves Clearly
Under-sink areas can have multiple valves. Prevent mistakes with clear labels. Mark “RO Shut Off” on the blue handle valve, “Tank Valve” on the storage tank valve, and “Main Angle Stop” on the cold water feed. Use color-coded tags or paint dots for quick identification.
Perform Annual Maintenance
Keep your shutoff system functional with yearly checks. Test valve operation to ensure they open and close smoothly. Inspect gaskets for wear and replace as needed. Replace the 9-volt battery in leak detectors. Verify automatic shut-off valve response. A few minutes of maintenance can prevent costly water damage.
Long-Term Shutdown for Extended Absences
Going on vacation or leaving home for 3 or more months? Follow this shutdown sequence to protect your system.
Complete Shutdown Procedure
First, close the RO supply valve (blue handle). Second, shut the angle stop valve. Third, drain the storage tank completely via RO faucet. Fourth, close the tank valve after draining. Fifth, leave the RO faucet open to prevent stagnation and mold. This routine protects against bacterial growth, pressure buildup, and undetected leaks.
Winter Protection
In freezing climates, disconnect and drain the entire system to prevent pipe bursts. This includes draining the storage tank, disconnecting the feed line, and storing the system in a warm location if possible.
Identify Key Components by Sight
Knowing what each valve looks like helps you find the right one quickly during emergencies.
Visual Reference Table
The blue handle valve appears as a bright blue plastic lever inline with the tubing and is located on the RO feed line under the sink. The tank valve appears as a small ball valve on top of a black cylinder and is located on top of the storage tank. The angle stop appears as a metal handle on a chrome or brass body and is located on the cold water line under the sink. The automatic shut-off valve appears as a T-shaped plastic fitting with a small arm and is located between the pre-filter and membrane.
Frequently Asked Questions About Turning Off Reverse Osmosis Systems
How do I turn off my reverse osmosis system for vacation?
Close the RO supply valve (blue handle) by turning it clockwise. Shut the angle stop valve. Drain the storage tank by opening the RO faucet until water stops flowing. Close the tank valve. Leave the RO faucet open to prevent stagnation. This complete procedure protects your system during extended absences.
Which valve is the main shutoff for an RO system?
The blue-handled RO supply valve is the main shutoff for the reverse osmosis system. It is installed in the cold water feed line and blocks water from reaching the entire RO unit. Use it in combination with the angle stop valve for complete isolation.
Can I just turn off the RO faucet to stop the system?
No. Turning off the RO faucet does not stop water from entering the system. The unit will continue filtering and filling the tank until the automatic shut-off valve engages. Always use the supply valves to properly shut off an RO system.
What happens if I only close the tank valve?
Closing only the tank valve stops the tank from filling, but it does not stop the filtration process. The system will continue producing water, which can overflow the membrane or cause leaks. Always close the supply valve first for a complete shutdown.
How do I know if my shutoff valves are working properly?
Test by closing the valves and then opening the RO faucet. Only a few drips or no water should flow. If continuous water flows, one or both supply valves are not sealing properly. Inspect the valves for damage or wear and replace if necessary.
What is the best valve to use for regular RO system shutdowns?
The blue-handled gasket-seal valve is the best option for regular shutdowns. It is designed for frequent use, uses a durable rubber gasket seal, and poses no risk of internal breakage like pin-type valves do.
Key Takeaways for Turning Off Your Reverse Osmosis System
Turning off your reverse osmosis system properly requires understanding multiple shutoff points and using them together for complete isolation. The blue-handled RO supply valve is your primary shutoff tool, but combining it with the angle stop valve and tank valve ensures maximum safety during emergencies or extended absences. Always depressurize the system by opening the RO faucet after closing the valves. Never rely on the faucet alone or assume the automatic shut-off valve has stopped water flow. Upgrade pin-type valves to gasket-seal models, label all valves clearly, and perform annual maintenance to keep your shutoff system reliable. Following these practices protects your home from leaks and ensures your RO system lasts for years.



