
Building a reverse osmosis system from scratch gives you complete control over water purity for drinking, aquariums, maple syrup production, or off-grid survival. These systems force water through a membrane with pores as small as 0.0001 microns, removing 90–99% of dissolved solids including lead, chlorine, nitrates, and microorganisms. Whether you want to save fuel in syrup making or create ultra-pure water for sensitive aquatic life, a DIY RO setup costs a fraction of commercial units.
This guide walks you through selecting components, assembling the system, optimizing pressure and flow, and maintaining it for years of reliable operation. Every step is backed by real-world testing and field experience.
Select Core RO Components
The success of your RO system depends on choosing the right parts. Each component serves a specific function in the purification process.
Choose the Right RO Membrane
The membrane is the heart of your system. Thin Film Composite (TFC) membranes offer 95–99% contaminant rejection and are the standard choice for DIY builds.
Common sizes and applications:
• 35 GPD: Small household or demonstration use
• 50 GPD: Standard under-sink residential systems
• 100–150 GPD: High-output needs, maple syrup processing
Installation tip: Insert the membrane with the rubber gasket facing up and push until fully seated in the housing. Never reuse a membrane that has dried out.
Install Durable Membrane Housing
Each membrane requires a pressure-rated housing to contain it under operating pressure of 60–100 psi.
Key specifications:
• Use PVC or composite housings rated for at least 100 psi
• Choose horizontal design for easier servicing
• Ensure one feed inlet and two outlets (permeate and concentrate)
• Mount securely using clip brackets attached to a backboard
Add Essential Pre-Filters
Pre-filtration protects your expensive membrane from clogging and chemical damage. Always include these two stages.
5-Micron Sediment Filter: Removes dirt, rust, sand, and silt using spun polypropylene or string-wound filters. Replace every 6–12 months or when flow drops noticeably.
Carbon Block Filter: Eliminates chlorine, chloramines, VOCs, and odors. Carbon block outperforms granular activated carbon by preventing channeling and offering superior filtration.
Critical: If your water contains chloramines, use a chloramine-specific carbon block. Standard carbon will not remove them effectively and your membrane will degrade.
Flush the carbon filter for 5 minutes before connecting the RO membrane to wash out carbon fines.
Assemble the System Step by Step
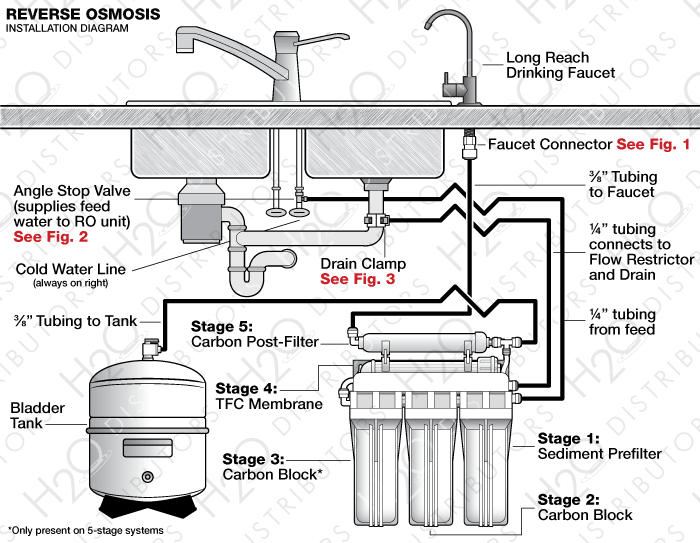
Proper assembly ensures leak-free operation and optimal performance. Follow this sequence for best results.
Mount Components on a Backboard
Start with a sturdy backing board such as ½-inch plywood or OSB lumber. This keeps everything organized and portable.
Mounting sequence:
• Secure filter housings vertically using steel or plastic brackets
• Mount membrane housing horizontally with adjustable clips
• Attach boost pump using screws or fabricate a bracket from metal banding
• Install liquid-filled pressure gauge after pre-filters to monitor input pressure
Arrange components in flow order: sediment filter, carbon filter, pump, membrane, storage or output.
Connect Plumbing with Proper Tubing
Use 1/4-inch or 3/8-inch food-grade LLDPE tubing. Cut ends square and clean to ensure seal integrity.
Connection tips:
• Push-to-connect fittings (John Guest or SharkBite) allow tool-free, leak-proof connections
• Color-code lines: blue for permeate, red for concentrate, clear for feed
• Ensure tubing clicks fully into fittings by listening for the second stop
• Secure all push-fit connections with blue locking clips
Never kink or stretch tubing during installation.
Wire the Boost Pump
RO systems require minimum 40 psi, ideally 60–80 psi. If your source pressure is below 40 psi, install a boost pump.
Power options:
• AquaTech 8800: Popular for maple syrup setups
• 12V DC pumps: Work with solar panels and deep-cycle batteries for off-grid use
• Standard AC adapter for household connection
Wire according to manufacturer specifications and use waterproof connectors if installing outdoors.
Optimize Flow and Pressure

Proper flow control is what makes the system actually purify water. Without the right components, water simply bypasses the membrane.
Install a Flow Restrictor
This small component goes on the concentrate (brine) line and creates backpressure so water is forced through the membrane.
Critical rule: Match the restrictor GPD rating to your membrane (50 GPD membrane requires 50 GPD restrictor). Without it, water bypasses the membrane entirely and you get zero purification.
Add a Check Valve
Install on the permeate line immediately after the membrane housing. This prevents backflow of purified water into the membrane, which can damage it or reduce efficiency.
Use a Needle Valve to Balance Flow
Fine-tune performance with a brass needle valve on the permeate line. Adjust for a 50/50 split between permeate and concentrate.
Troubleshooting:
• Too much waste water: Close slightly
• Low production: Open more
Balancing extends membrane life and improves recovery rate.
Include an Automatic Shut-Off Valve
When using a storage tank, an ASOV stops water flow when the tank reaches pressure (approximately ⅔ of line pressure). This prevents constant draining and reduces wear on pump and membrane.
Test periodically by opening the faucet. If water does not resume within seconds, check the ASOV.
Configure Storage and Output
Connect a Pressurized Storage Tank
Standard under-sink tanks hold 2–4 gallons with an internal bladder charged to 5–7 psi when empty.
Installation:
• Connect via tubing from ASOV to tank inlet
• Tank outlet feeds post-filter then faucet
• Check pre-charge annually by draining tank and measuring air pressure with a tire gauge
Install a Dedicated RO Faucet
Use a non-venting RO faucet to prevent contamination and air locks.
Installation options:
• Replace existing soap dispenser
• Drill new hole using ½-inch or 9/16-inch drill bit
• Mount securely and connect tubing with push-fit fittings
Add Post-Carbon and Remineralization Filters
Post-Carbon Filter (Stage 4): Polishes water after storage to remove any taste or odor. Use granular activated carbon and install inline between tank outlet and faucet.
Remineralization Filter (Optional): Adds back calcium and magnesium for better taste. Recommended for long-term drinking water use. Install after post-carbon filter.
Customize for Specific Applications
Build a Maple Syrup RO System
Maple syrup producers use RO to concentrate sap from 2% to 8% sugar, cutting boiling time by 50–90%.
Key components:
• 2–4 × 150 GPD TFC membranes
• Boost pump (AquaTech 8800 recommended)
• Sediment plus chloramine carbon pre-filters
• Needle valve for flow balancing
• Operates at 60–70 psi
Performance: 5 gallons of sap processes in approximately 45 minutes. Users report 50–75% fuel savings with payback in 1–3 seasons on a $300–$400 build.
Yes, you can run sap through RO twice. A second pass increases sugar concentration further and may enhance flavor.
Cleaning and storage: Flush system with permeate water after each use. At season end, remove membranes, rinse, and store sealed in refrigerator.
Create a Science Fair RO Model
Demonstrate reverse osmosis using a simplified visual setup.
Design approach:
• Use a clear bucket as membrane housing
• Stretch a flat RO membrane sheet across the top
• Seal edges with O-ring or gasket
• Apply pressure manually with a large syringe or hand pump
• Feed colored water (tap water plus food dye) and collect clear permeate below
Use a Culligan AC30 filter membrane for a functional mini-RO demo. Explain osmotic pressure and how external pressure reverses natural flow.
Set Up an Aquarium RO System
Fish and shrimp breeders need 0 ppm TDS water to control mineral content.
Example: Aquatic Life RO Buddy
• 50 GPD TFC membrane
• Includes DI stage for final polishing
• Connects to garden hose for outdoor use
• Cost: approximately $70
Produces water with TDS of 0 ppm, pH of 6.2 (ideal for shrimp at 6.0–6.5), and no chlorine, ammonia, or nitrates.
Important: DI resin is not safe for drinking. Never use DI filters in potable water systems.
Design an Off-Grid RO System
For emergency preparedness or remote living, build a solar-powered RO system.
Components:
• 12V DC booster pump
• Deep-cycle battery (AGM or lithium)
• 18W solar panel with charge controller
• Heavy-duty plastic crate as housing
• 10-micron pleated reusable filter for high-silt sources
RO removes dissolved solids but does not guarantee pathogen removal. If water is microbiologically unsafe, add UV sterilizer, chlorine treatment, or boiling.
Test and Maintain Your RO System
Verify Performance with a TDS Meter
A handheld TDS meter is essential for measuring purification effectiveness.
Testing procedure:
1. Test source water (tap or well)
2. Test RO permeate
3. Calculate reduction: (Input TDS minus Output TDS) divided by Input TDS
Effective systems remove 90–98% of TDS. Example: 300 ppm input should yield 30 ppm or less output.
Follow a Maintenance Schedule
Every 6–12 months: Replace sediment and carbon filters, post-carbon, and remineralization filters.
Every 2–4 years: Replace RO membrane (sooner if TDS rises or flow drops).
Annually: Sanitize housings with 1 teaspoon bleach per gallon of water.
Replace based on performance rather than strict schedule.
For maple syrup systems: Flush after every use and store membranes wet, sealed, and refrigerated.
Troubleshoot Common Problems
Low Permeate Flow
Likely causes:
• Clogged sediment or carbon filter
• Low input pressure below 40 psi
• Failed automatic shut-off valve
• Closed needle valve
Fix: Replace pre-filters, check pump operation, test ASOV by bypassing temporarily, open needle valve slightly.
Leaks at Fittings
Cause: Tubing not fully inserted or missing O-ring
Fix: Pull tubing out and reinsert until it clicks at the second stop. Use blue locking clips on all push-fit connections. Inspect O-rings in housings and replace if cracked.
High TDS in Output
Cause: Worn or damaged membrane, poor seal, or chlorine exposure
Fix: Replace membrane, ensure carbon filter is removing chlorine and chloramines, check housing seals and O-rings.
Pump Will Not Start
Cause: Faulty pressure switch, wiring issue, or dead battery in DC systems
Fix: Check power connections, test switch with multimeter, ensure battery is charged.
No Purification (Water Flows But Is Not Clean)
Cause: Missing flow restrictor
Fix: Install correct GPD-rated restrictor on concentrate line. Without backpressure, water bypasses the membrane entirely.
Maximize Efficiency and ROI
Cost Breakdown: DIY Maple Syrup RO
Component costs:
• Boost pump: $80–$120
• 4×150 GPD membranes: $60–$100
• 4×membrane housings: $40–$80
• Pre-filters plus housing: $20–$40
• Tubing and fittings: $30–$50
• Pressure gauge, needle valve: $15–$30
• Mounting hardware: $10–$20
• Total: $255–$400
Return on investment typically occurs within 1–3 seasons due to fuel and labor savings.
Wastewater Reuse Ideas
RO systems produce 2–4 gallons of wastewater per gallon of permeate.
Reuse options:
• Irrigate non-edible plants (avoid if water is softened)
• Flush toilets
• Clean tools or vehicles
• Recirculate in maple sap processing if clean
Upgrade with Smart Features
• Add TDS meter inline for real-time monitoring
• Label all lines clearly for maintenance
• Use press-lock fittings for quick maintenance
• Start with one membrane, then expand
• Add membranes in parallel for more output or series for higher rejection
Frequently Asked Questions About Building a Reverse Osmosis System
What pressure is required for a DIY RO system?
RO systems require minimum 40 psi, with optimal performance at 60–80 psi. Maximum pressure should not exceed 100 psi. If your source pressure is below 40 psi, you need a boost pump.
Can I use RO water for drinking?
Yes, RO water is safe to drink. Most essential minerals come from food, not water. If desired, add a remineralization filter to restore calcium and magnesium for taste and health benefits.
How long does an RO membrane last?
With proper pre-filtration, RO membranes last 2–4 years. Lifespan depends on water quality, usage volume, and maintenance. Replace when TDS increases noticeably or flow drops significantly.
Do I need a flow restrictor?
Yes, a flow restrictor is essential. It creates backpressure on the concentrate line, forcing water through the membrane. Without it, water bypasses the membrane and you get no purification.
Can RO systems remove sugar from maple sap?
No, RO removes water, not sugar. This concentrates the sugar content in sap, which is exactly what maple syrup producers want. The process increases sugar percentage from 1–3% to 8% or higher.
What is the difference between TFC and CTA membranes?
Thin Film Composite (TFC) membranes offer 95–99% contaminant rejection but are sensitive to chlorine. Cellulose Triacetate (CTA) membranes tolerate chlorine but offer lower removal rates. Use TFC with proper carbon pre-filtration for best results.
Key Takeaways for Building Your Reverse Osmosis System
Building a reverse osmosis system requires attention to three critical factors: pressure, pre-filtration, and flow control. Maintain 60–80 psi for optimal performance and never skip the carbon filter, as chlorine destroys TFC membranes.
Balance your flow using a needle valve for a 50/50 split between permeate and concentrate. This extends membrane life and improves recovery rate. Flush after every use, especially with organic sources like maple sap, and store membranes properly: wet, sealed, and refrigerated.
Whether you are saving fuel in the sugarbush, protecting sensitive aquatic life, or preparing for off-grid independence, a well-built RO system delivers results. With a $300 DIY maple syrup rig, $70 aquarium unit, or solar-powered off-grid model, you gain control over water quality, cost, and sustainability.
Start with quality components, follow the assembly sequence, test with a TDS meter, and maintain regularly. Your pure water system will perform reliably for years.



