You likely bought a Whirlpool water softener to stop hard water from ruining your pipes and appliances. Now you face the installation process and wonder if you can handle it yourself without professional help.
This guide proves you can install the unit safely by covering sizing, location selection, plumbing connections, and digital setup. You will learn specific steps to avoid common errors and ensure your system runs efficiently for years.
Select the Correct Grain Capacity for Your Home

Choosing the right unit size is the most critical first step in how to install a Whirlpool water softener effectively. The grain count determines how many hardness minerals the system removes before it must regenerate.
Match Unit Size to Household Population
You must select a model that handles your specific water usage volume. Undersizing causes frequent regeneration cycles while oversizing wastes space and money.
- 1 to 4 people: Choose a minimum 30,000-grain capacity unit.
- 5 to 6 people: Upgrade to a minimum 40,000-grain capacity model.
Larger families or homes with extremely hard water may require even higher capacities. Selecting the correct size ensures optimal performance and salt efficiency.
Estimate Installation Time and Complexity
The time required depends heavily on your existing plumbing infrastructure. Replacing an old unit with pre-existing connections often takes less than one hour.
A brand new installation involving pipe cutting and new drain lines may take several hours. Check your utility room or basement for a nearby floor drain and electrical outlet before starting.
Determine the Ideal Installation Location
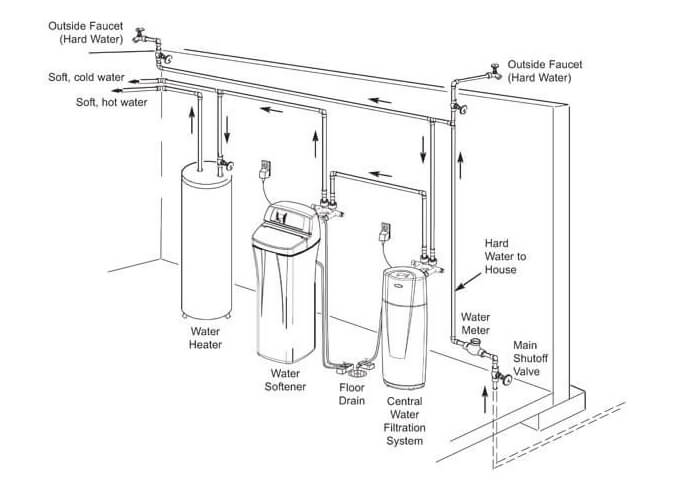
Proper placement protects your investment and ensures the entire home receives softened water. The location must meet specific environmental and logistical requirements.
Position Upstream of the Water Heater
Install the softener as close as possible to the main water entry point of your house. This placement ensures all water entering your home gets treated before reaching any fixtures.
Never install the unit downstream of your water heater. Hot water damages the internal resin beads and voids your warranty. Always route plumbing so softened water flows into the heater to prevent scale buildup inside the tank.
Ideal locations include:
* Basements near the main water shut-off
* Utility rooms close to plumbing stacks
* Climate-controlled garages
Avoid unheated areas where freezing temperatures could crack the tank or valves.
Verify Drain and Electrical Access
The regeneration process requires a nearby drain and a continuous power source. Whirlpool units include 12 feet of drain tubing to reach your disposal point.
- Purchase extra ½-inch tubing if your drain is more than 5 feet away.
- Do not exceed a total drain line length of 30 feet.
- Ensure the vertical rise does not exceed 8 feet above the floor level.
Your site also needs a 120V grounded outlet within 10 feet of the unit. This outlet must remain “continuous live” and not be controlled by a wall switch. Use only a #20AWG appliance grade extension cord if absolutely necessary.
Validate Water Pressure and Flow Requirements
Your home water supply must meet specific hydraulic standards for the softener to function correctly. Ignoring these limits can cause equipment failure.
Check Minimum Flow and Maximum Pressure
The system requires a steady flow rate to operate the control valve during regeneration cycles.
- Minimum Flow: You need at least 3 gallons per minute (GPM) at the inlet.
- Maximum Pressure: The system withstands up to 125 PSI.
Install a pressure-reducing valve if your home pressure exceeds 125 PSI. High pressure can damage internal seals and components permanently.
Test your flow rate by filling a 5-gallon bucket from an outdoor spigot. If it fills in under 100 seconds, you meet the minimum requirement. Low flow may indicate clogged filters or narrow piping that needs attention.
Identify Your Pipe Material Type
Different plumbing materials require specific tools and connectors for a secure fit. Whirlpool softeners use two 1-inch NPT female connectors for inlet and outlet lines.
Prepare the correct adapters for your specific pipe type:
* Copper: Requires compression fittings or push-to-connect adapters.
* PEX: Needs crimp or clamp rings with PEX-specific tools.
* CPVC: Requires solvent-weld cement and primers.
* Galvanized Steel: May need threading tools or transition fittings.
Having the right connectors ready prevents delays during the connection phase.
Prepare the Site and Gather Necessary Tools
Proper preparation minimizes mess and ensures a smooth installation process. You must shut off water and drain lines before making any cuts.
Shut Off Water and Drain Plumbing Lines
Start by turning off the main water supply valve to your home. Open faucets at the highest and lowest points in your house to relieve pressure.
Allow water to drain completely until the flow stops. This step prevents flooding when you disconnect pipes or cut into the main line. Place a bucket under work areas to catch residual water.
Collect Required Tools and Supplies
Gather all necessary items before beginning physical work. Having everything ready keeps the project moving efficiently.
Essential Tools:
* Pipe cutter suitable for your pipe material
* Adjustable wrench or pliers
* Level for unit placement
* Teflon tape for thread sealing
Required Supplies:
* Two 1-inch NPT female adapters
* Additional ½-inch drain tubing if needed
* High-purity salt pellets or crystals
* Remote bypass valve (highly recommended)
A remote bypass valve allows you to shut off the softener for maintenance without cutting water to the whole house.
Execute Plumbing and Drain Connections
Correct plumbing ensures leak-free operation and proper water flow through the resin tank. Follow these steps carefully to connect your unit.
Level the Unit and Connect Water Lines
Place the softener on a flat solid surface and use a level to balance it. An unlevel unit can cause vibration issues and affect brine tank function.
- Set the bypass valve to the “bypass” position to keep water out of the resin tank initially.
- Connect the inlet pipe to the cold water main using a 1-inch NPT connector.
- Attach the outlet pipe to your house plumbing with the second connector.
- Wrap threads with Teflon tape to create a watertight seal.
- Tighten fittings securely but avoid over-tightening which can crack plastic parts.
Ensure you leave enough space around the unit for salt refills and future maintenance access.
Install the Drain Line Properly
Attach the provided drain hose to the drain port on the back of the control head. Route the other end to your floor drain or standpipe.
- Secure the line with zip ties to prevent kinking.
- Use an air gap or drain saddle if connecting to a standpipe.
- Ensure the line does not exceed the 30-foot length limit.
Do not drain directly into a septic tank without checking local codes. The high sodium content in regeneration discharge can harm septic system function.
Pressurize the System and Check for Leaks
Slowly restoring water pressure protects your new connections from water hammer damage. This phase verifies the integrity of your work.
Restore Water Supply Gradually
Keep the bypass valve closed while you slowly open the main water valve. Letting pressure build gradually prevents sudden surges that could loosen fittings.
Listen for loud banging noises which indicate water hammer. If you hear this, close the valve immediately and reopen it more slowly. Watch all new connections closely for any signs of dripping.
Inspect Fittings and Engage Bypass
Check every joint including the inlet, outlet, and drain line connections. Tighten any fittings that show moisture or small leaks.
Once confirmed leak-free:
1. Slowly move the bypass handle to the “service” or “on” position.
2. Allow water to fill the resin tank completely.
3. Inspect the unit again under full operating pressure.
Shut off the water and re-tighten immediately if any leaks appear during this final check.
Initialize Brine Tank and Digital Controls

The final phase involves adding salt and programming the control head. This step activates the softening process.
Add Salt and Connect Power
Remove the brine tank lid and pour in high-quality salt pellets or crystals. Fill the tank only half-full initially to allow proper brine formation.
- Do not mix different types of salt.
- Ensure salt levels stay below the refill line.
- Plug the power transformer into your dedicated 120V outlet.
Verify the display lights up upon connection. If the screen remains dark, check that the outlet is live and not controlled by a switch.
Program Settings and Start First Cycle
Follow the on-screen prompts to set the current time and day. Enter your water hardness level in grains per gallon based on your local water report or test kit.
- Select your preferred regeneration time (overnight is usually best).
- Initiate the manual regeneration cycle to start the system.
- Wait 1.5 to 2 hours for the first cycle to complete.
Do not use water during this initial regeneration. Afterward, flush a cold water tap for 5 to 10 minutes to clear air and carbon fines from the resin. Your water is now soft.
Frequently Asked Questions About Whirlpool Water Softener Installation
Can I install a Whirlpool water softener outdoors?
No, you cannot install these units outdoors or in unheated areas. Freezing temperatures will crack the tank and internal components, voiding your warranty immediately.
What happens if my drain is 35 feet away from the unit?
The maximum drain distance is 30 feet. You must relocate the unit closer to the drain or install a special pump system designed for long-distance drainage.
Do I need a special electrical outlet for the softener?
Yes, you need a standard 120V grounded outlet that is always live. It cannot be on a switch, and you must use a #20AWG cord if an extension is absolutely necessary.
How often do I need to add salt to the brine tank?
Check salt levels every 4 to 6 weeks. Refill the tank when levels drop below one-quarter full, keeping at least 6 inches of salt in the tank at all times.
Why is my water still hard after installation?
Check that the bypass valve is fully in the service position and not stuck in bypass mode. Also verify your drain line is not clogged and the unit completed its first regeneration cycle.
Key Takeaways for Installing Your Whirlpool Water Softener
Successful installation relies on choosing the right grain capacity and placing the unit upstream of your water heater. You must ensure your drain line stays within the 30-foot limit and your water pressure does not exceed 125 PSI.
Follow the step-by-step process of shutting off water, making secure connections, and programming the digital controls carefully. Take your time during the leak testing phase to prevent future water damage.
Start your project today by gathering your tools and measuring your installation site. With proper planning and execution, you will enjoy soft water and protected appliances for over a decade.