
Your reverse osmosis system quietly delivers clean, purified water until it doesn’t. Maybe the flow slows, the taste turns odd, or your first glass smells strange. These signs often point to one fixable cause: a membrane in need of flushing. Flushing your RO system isn’t just routine maintenance, it’s essential for protecting the heart of your system: the RO membrane.
This guide walks you through every scenario: initial startup, routine maintenance, filter changes, and long-term shutdowns. You’ll learn how to flush correctly without damaging your system and avoid the most common mistakes that undermine efficiency. From pre-flushing carbon filters to bypassing flow restrictors safely, you’ll get step-by-step instructions that work across most RO models.
When to Flush Your RO System
Timing your flush correctly prevents damage and maintains water quality. Flushing isn’t just for new installations, it’s a critical response to specific triggers.
Flushing After Installing a New Membrane
New RO membranes come preserved in glycerin or sodium bisulfite to prevent drying and bacterial growth during storage. These chemicals must be flushed out before use. If left in the system, they can foul downstream components, especially DI resin, and reduce membrane efficiency.
Run 5 to 10 gallons of water through the system with the flush valve closed and flow restrictor in place. This forces water through the membrane, removing preservatives effectively.
Flushing After Filter Replacement
New sediment and carbon filters release fine particles, especially carbon fines, that appear as black or gray water at the faucet. These can clog the membrane if not flushed first.
Pre-flush pre-filters by disconnecting the outlet tubing and running water directly to the drain for about 1 minute or until clear. Do not let this water pass through the RO membrane.
Flushing After System Inactivity
If your RO system sits unused for more than 24 hours, stagnant water accumulates on the membrane surface. This concentrated brine increases scaling risk and may affect taste.
Flush 2 to 5 gallons to restore freshness. For shutdowns longer than a week, perform a full flush including pre-filters, membrane, and post-filter.
Routine Maintenance Flushing
Even with regular use, minerals and biofilm slowly build up. A manual flush every 3 to 6 months helps maintain flow and efficiency.
Use the flush valve to bypass the flow restrictor for 5 to 10 minutes, increasing crossflow across the membrane to sweep away loose contaminants.
How to Flush the RO Membrane Correctly

Flushing the membrane is the most critical step, especially after installation. Many users mistakenly believe opening the flush valve is enough. It’s not.
Why Bypass Flushing Isn’t Enough
Opening the flush valve diverts water directly to the drain, bypassing the flow restrictor but not flushing the membrane itself. Without back pressure, water doesn’t properly cross the membrane surface.
To remove preservatives and residues, you need full system pressure with the flush valve closed and flow restrictor in place.
Step-by-Step Initial Membrane Flush
- Pre-flush pre-filters first by running water through sediment and carbon filters until clear.
- Reconnect all lines, ensuring feed, waste (black tubing), and permeate (white tubing) are secure.
- Close the flush valve to force water through the membrane.
- Open the shut-off valve slowly to prevent pressure shock (max 80 PSI).
- Let the system run continuously and discard the first 5 to 10 gallons of permeate water.
- Monitor flow rate. Expect approximately 1 gallon per minute; total flush takes 10 to 30 minutes.
Pro Tip: Remove the DI resin cartridge during this flush. Glycerin and preservatives rapidly deplete DI capacity. Flushing 10 gallons through DI can waste half its lifespan.
How to Tell When Flushing Is Complete
Watch for these indicators:
- TDS stabilization: Use a TDS meter. Initial readings may spike due to preservatives. Continue flushing until TDS matches expected output (0 to 10 ppm for RO/DI systems).
- Taste and odor: Water should taste neutral, not sweet or chemical-like.
- Flow consistency: Permeate flow stabilizes after initial variability.
Warning: TDS meters don’t detect glycerin. Even if TDS looks good, incomplete flushing can still harm DI resin.
Using the Manual Flush Valve for Maintenance
Most RO systems include a manual flush valve on the waste line. This is for routine cleaning, not initial membrane startup.
How the Flush Valve Works
The flush valve bypasses the flow restrictor, allowing higher drain flow. This increases crossflow velocity across the membrane surface, helping to scrub away loose debris and concentrated salts.
Step-by-Step Manual Maintenance Flush
- Locate the black waste line connected to the RO canister.
- Find the ball valve (usually inline with the tubing).
- Open the valve fully. Water now flows freely to the drain.
- Run the system for 5 to 10 minutes (routine) or up to 30 minutes (after chemical cleaning).
- Close the valve to restore normal operation.
For 150 GPD units: The flow restrictor is external. Ensure it’s reinstalled correctly after flushing.
For 75 GPD units: The restrictor is built into the tubing. No removal needed.
Expert Note: Flushing with the bypass open will not force water through the membrane and flush out the preservative.
Flushing Without a Flush Kit
Not all RO systems have a manual flush valve. In these cases, you can simulate a flush by removing the flow restrictor.
Step-by-Step Flow Restrictor Bypass
- Shut off the water supply by closing the under-sink shut-off valve.
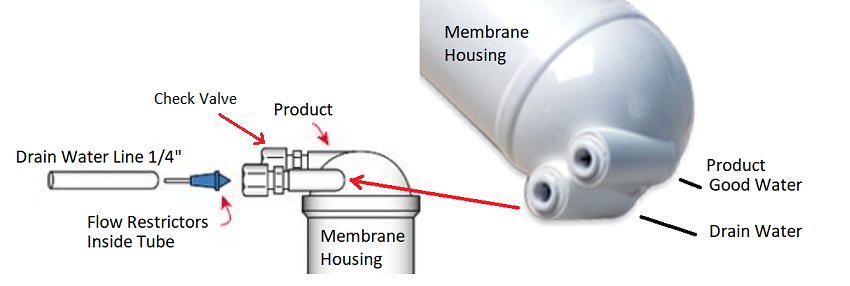
- Locate the flow restrictor, a small white or clear device in the black waste line.
- Disconnect the waste line from the RO canister.
- Remove the flow restrictor and set it aside.
- Reconnect the waste line directly to the canister.
- Turn on the water and let the system run for 30 minutes.
- Shut off water again and reinstall the flow restrictor.
- Reconnect tubing securely.
Use a tube cutter for clean cuts, especially on 150 GPD systems with external restrictors. Jagged edges can cause leaks.
Risks of Improper Bypassing
These mistakes can damage your system:
- Over-flushing: Running unrestricted for more than 30 minutes stresses seals and may damage the membrane.
- Forgetting to reinstall: Without the restrictor, the system won’t build back pressure, reducing filtration efficiency.
- Leaky connections: Ensure all quick-connect fittings are fully seated.
Installing a Manual Flush Kit
A permanent flush kit makes maintenance easier and safer. Kits like LiquaGen integrate the flow restrictor into a valve assembly.
Installation Steps
- Shut off water supply.
- Disconnect waste line from the RO canister.
- Remove flow restrictor from the tubing.
- Insert restrictor into the flush kit’s fitting. Push until you hear a click.
- Connect the flush kit’s tubing to the RO canister.
- Mount the kit in an accessible location under the sink.
Now simply open the ball valve to flush and close it to return to normal operation.
For external restrictor models (150 GPD): Cut the tubing cleanly and insert the end into the kit’s inlet. Follow the same logic as internal systems.
Benefits of a Flush Kit
- Eliminates risk of losing small parts
- Reduces disconnection errors
- Enables quick, repeatable maintenance
- Extends membrane life with consistent care
Flushing Pre-Filters
Pre-filters protect the RO membrane, but they come dirty. New carbon filters in particular release fine black particles.
Why You Must Pre-Flush
Carbon fines can clog the membrane, reduce flow, and cause discoloration in drinking water. Flushing pre-filters before connecting to the membrane prevents these issues.
How to Flush Pre-Filters
- Locate the 1/4-inch outlet on the pre-filter housing.
- Disconnect tubing leading to the RO membrane.
- Attach a temporary hose or connect faucet supply line directly to the outlet.
- Open the shut-off valve.
- Run water for 1 minute or until clear.
- Reconnect to RO system.
Never allow this water to pass through the RO membrane. This flush bypasses the membrane entirely.
Flushing Catalytic Carbon Filters
If your system treats chloraminated water, it likely includes a catalytic carbon stage. This filter also releases fines and needs flushing.
Step-by-Step
- Locate the grey three-way ball valve between the catalytic carbon and RO membrane.
- Turn the valve to direct water from the filter to the waste line (black tubing).
- Run water for 2 to 3 minutes.
- Return valve to normal position.
This prevents premature clogging and ensures optimal flow into the membrane.
Flushing With or Without DI Resin
The decision to flush with DI resin installed affects cost and efficiency.
Best Practice: Remove DI During Initial Flush
Membrane preservatives (especially glycerin) bind to DI resin, depleting its ion-exchange capacity. Flushing 5 to 10 gallons through DI can use up 30 to 50% of its lifespan. Disconnect the DI canister or install a bypass plug during initial flush.
Acceptable Alternative: Flush With DI Installed
This approach is simpler with no disassembly needed. The downside is wasted resin and increased long-term cost. For routine maintenance, leaving DI in place is acceptable.
Bottom Line: Remove DI for new installs. Leave it in for routine maintenance.
Flushing the Post-Filter
The post-filter ensures final taste and odor quality. Like pre-filters, it releases carbon fines when new.
How to Flush the Post-Filter
- Ensure post-filter is attached to faucet.
- Disconnect 3/8-inch inlet tubing from the T-connector on the tank.
- Disconnect outlet tubing from tank housing.
- Reconnect inlet tubing directly to tank housing.
- Open tank valve and faucet.
- Let water flow through post-filter until clear (1 to 2 minutes).
- Shut off and reconnect to original setup.
Water may appear black or cloudy initially. This is normal carbon dust.
What Flushing Can and Cannot Fix
Flushing is powerful but it has limits.
What Flushing Can Do
- Remove manufacturing residues
- Clear loose carbon fines
- Prevent early biofouling
- Improve short-term flow
- Extend membrane life
What Flushing Cannot Do
- Remove hard scale (calcium carbonate)
- Eliminate established biofilm
- Fix clogged pre-filters
- Restore degraded membranes
- Replace chemical cleaning
Rule of Thumb: If permeate flow drops 10 to 15%, flushing alone won’t help. It’s time for chemical cleaning or filter replacement.
Signs You Need to Flush or Do More
Watch for these indicators to stay ahead of problems.
Flush-Needed Symptoms
- First glass has odd taste or smell
- Slow initial flow that improves after running
- Black water from faucet (carbon fines)
- System idle for more than 24 hours
When Flushing Isn’t Enough
| Symptom | Likely Cause | Action |
|---|---|---|
| Persistent slow flow | Clogged pre-filter or low pressure | Replace sediment filter |
| Rising TDS | Membrane degradation | Test and consider replacement |
| High waste ratio | Fouling or seal failure | Diagnose and clean |
| No improvement post-flush | Deep scaling or damage | Chemical cleaning or replacement |
Pro Tip: Track monthly TDS and flow rates. Trends reveal issues before they become emergencies.
Common RO Flushing Mistakes to Avoid
Even experienced users make errors that reduce system life.
Mistake 1: Over-Flushing
Running unrestricted flow for hours can damage seals, stress the membrane, and accelerate wear.
Fix: Limit manual flushes to 5 to 10 minutes (routine) or 30 minutes max (startup or post-cleaning).
Mistake 2: Skipping Pre-Filter Maintenance
Clogged pre-filters reduce feed pressure, starving the membrane.
Fix: Replace sediment filter every 6 months and carbon every 6 to 12 months.
Mistake 3: Incomplete Post-Cleaning Rinse
Residual cleaning chemicals affect taste and safety.
Fix: Flush until pH is neutral, conductivity matches feed water, and no odor remains.
Mistake 4: Blaming the Membrane Too Soon
Slow flow is often due to low tank pressure, cold water, or clogged filters.
Fix: Diagnose upstream first.
When to Chemically Clean Instead
Flushing is preventive. Chemical cleaning is corrective.
Indicators for Chemical Cleaning
- Permeate flow down more than 15%
- Waste water ratio increased
- TDS consistently rising
- No improvement after flushing
Cleaner Types by Fouling
| Fouling Type | Cleaner |
|---|---|
| Hard scale (CaCO3) | Citric acid or mild HCl |
| Biofilm/organics | Alkaline cleaner (NaOH) |
| Iron/manganese | Chelating agent |
Warning: Only use membrane-safe cleaners. Harsh chemicals can destroy the membrane.
Long-Term Maintenance Schedule
Follow this plan to maximize system life:
| Task | Frequency |
|---|---|
| Manual flush | Every 3 to 6 months |
| Replace sediment filter | Every 6 months |
| Replace carbon filter | Every 6 to 12 months |
| Sanitize system | Annually |
| Check tank pressure | Annually (7 to 10 psi when empty) |
| Test TDS | Monthly (track trends) |
| Chemical cleaning | As needed (if flow drops more than 15%) |
Well water users: Double pre-filter changes and sanitize every 6 months.
Key Takeaways for Flushing Your RO System
Flushing your reverse osmosis system is simple but vital. Done correctly, it protects your investment, ensures clean water, and delays costly repairs. Focus on three core areas: timing, method, and consistency.
First, flush after installation, filter replacement, and any inactivity longer than 24 hours. Second, use the correct method for your goal: full pressure flushing for new membranes versus bypass flushing for routine maintenance. Third, maintain a schedule of manual flushes every 3 to 6 months alongside pre-filter replacements every 6 to 12 months.
Never skip pre-filter maintenance. Clogged filters starve the membrane and cause premature failure. Remove DI resin during initial membrane flushes to protect its capacity. Monitor performance trends with monthly TDS checks rather than waiting for problems to surface.
With this guide, you’re equipped to keep your RO system running like new for years.
Frequently Asked Questions About Flushing Reverse Osmosis Systems
Why do I need to flush my RO membrane?
Flushing removes stagnant, concentrated water, manufacturing residues, and loose contaminants from the membrane surface. It helps maintain flow, prevent early fouling, protect DI resin, and extend membrane life.
How often should I flush manually?
Flush every 3 to 6 months for routine maintenance. After installation or membrane replacement, perform one 30-minute flush or flush 5 to 10 gallons. After more than 24 hours of inactivity, flush 2 to 5 gallons.
Can flushing save money on replacements?
Yes. Regular flushing reduces scaling and fouling, delaying the need for chemical cleaning or membrane replacement. A well-maintained RO membrane lasts 3 to 5 years.
What are signs of a clogged RO membrane?
Signs include a 10 to 15% drop in permeate flow, increased waste water, slow tank refill, rising TDS readings, and no improvement after flushing. These indicate deeper cleaning or replacement is needed.
How long should an RO membrane last with proper care?
With proper maintenance including regular flushing, pre-filter changes, and annual sanitization, RO membranes can last 3 to 5 years in moderate water conditions. Hard water or poor pre-filter maintenance shortens this lifespan significantly.



