

A salty taste in your tap water is never normal and signals that concentrated brine is leaking into your plumbing. While softeners add trace sodium, the amount should remain far below the human taste threshold of 200 mg/L.
This guide helps you diagnose why your system is failing to rinse properly and provides step-by-step repairs. You will learn to perform a bypass test, clean critical injectors, and determine if you need a reverse osmosis system.
Perform the Bypass Test to Isolate the Problem
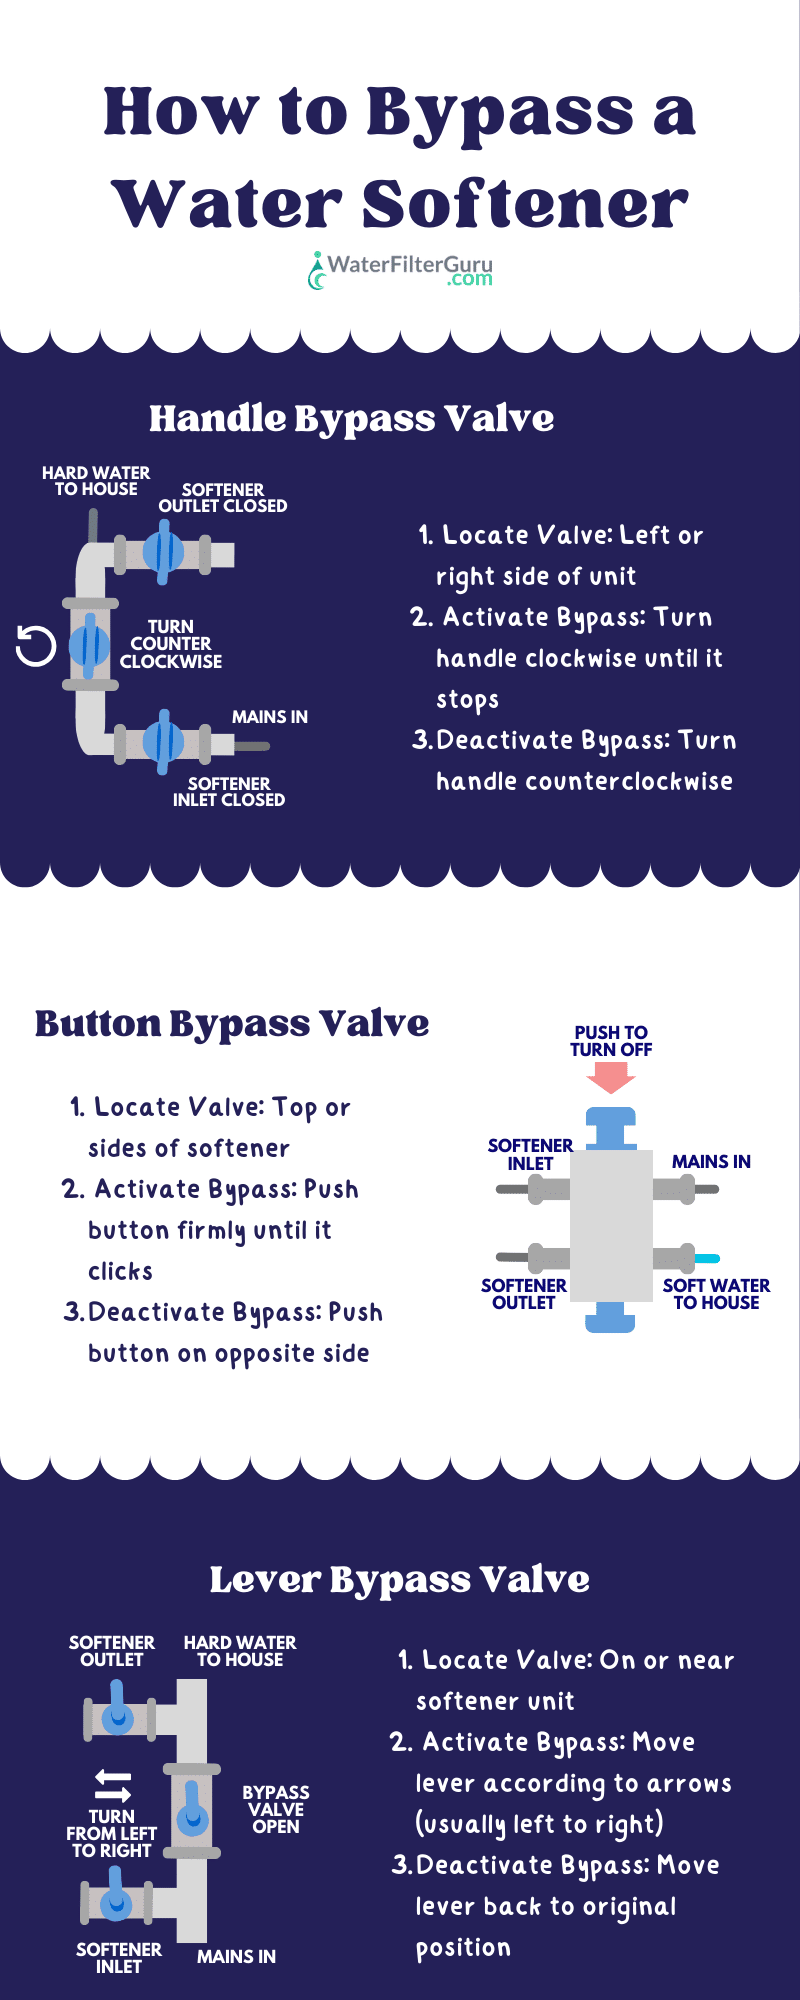
You must determine if the salt comes from your softener or your source water before attempting repairs. This simple test saves time and prevents unnecessary disassembly of your unit.
How to Execute the Bypass Procedure
Place your water softener in bypass mode for at least 24 hours. This setting routes raw water directly into your home while skipping the resin tank entirely.
- If water still tastes salty: The issue is not your softener. Your source water likely contains high sodium or chloride levels due to road salt runoff or brackish groundwater.
- If water tastes normal: The problem is your softener. Mechanical failure or incorrect settings are allowing brine to enter your pipes.
✅ Pro Tip: Use a TDS meter to measure water quality. A drop from over 300 ppm to under 100 ppm during bypass confirms the softener is the source.
Inspect Drain Lines for Clogs and Restrictions
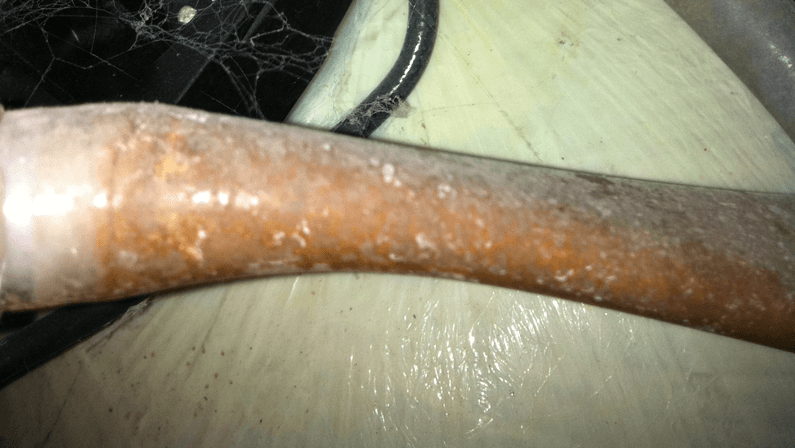
A restricted drain line is the most common cause of salty water because it prevents the system from flushing brine during regeneration. If dirty water cannot exit, it remains in the resin tank and mixes with your supply.
Check the Entire Drain Path
Follow the drain hose from the control valve to the discharge point outside or into a floor drain. Look closely for kinks, sharp bends, or sections crushed by furniture.
- Ensure the line is not frozen if it runs through a garage or basement.
- Verify the total length is under 10 feet to prevent back-pressure issues.
- Check for sediment buildup inside the tube that restricts flow.
Clean the Flow Control Restrictor
Locate the small flow control button where the drain line connects to the valve head. This component often gets clogged with resin fines or debris.
- Remove the restrictor carefully from the valve body.
- Soak it in white vinegar to dissolve mineral scale.
- Clear debris with compressed air or a soft brush.
⚠️ Warning: Never force a metal wire through the restrictor orifice. Damaging the calibrated hole will ruin the suction required for proper operation.
Clean the Brine Injector and Screen Assembly

The brine injector creates the suction needed to draw salt water from the tank. If this component is clogged, the system cannot pull brine efficiently or rinse it out completely.
Locate and Remove the Injector
On most models like the Fleck 5600SXT, the injector sits under a cover on the left side of the control valve. You must put the unit in bypass and depressurize the system before opening any parts.
- Unscrew the injector cap and remove the nozzle and screen.
- Soak the parts in warm vinegar for 15 to 30 minutes.
- Gently brush away any scale or sediment buildup.
❌ Critical Note: Never poke the injector nozzle with a metal tool. Even a tiny scratch alters the bore size and ruins the Venturi effect permanently.
Reassemble the parts ensuring the brine line connection is airtight. Any air leak here will disrupt the suction needed to draw brine.
Run a Manual Regeneration Cycle Overnight
An interrupted regeneration cycle often leaves concentrated brine sitting in your resin tank. Power outages or heavy water usage during the scheduled cycle can stop the rinse phase prematurely.
Why Cycles Get Interrupted
Your softener usually regenerates at night when water usage is low. Flushing a toilet or running a dishwasher during this time can drop pressure and halt the process.
Steps for a Full Manual Cycle
Initiate a manual regeneration using your control panel settings. Schedule this for a time when no one will use water for 6 to 8 hours.
- Watch the display to confirm all stages run: Backwash, Brine Draw, Slow Rinse, Fast Rinse, and Brine Refill.
- Wait at least two hours after completion before using water again.
- Taste the water the next morning to see if the issue is resolved.
✅ Pro Tip: Install a battery backup for your softener if you live in an area with frequent power outages to ensure cycles complete.
Fix an Overfull Brine Tank and Salt Bridges
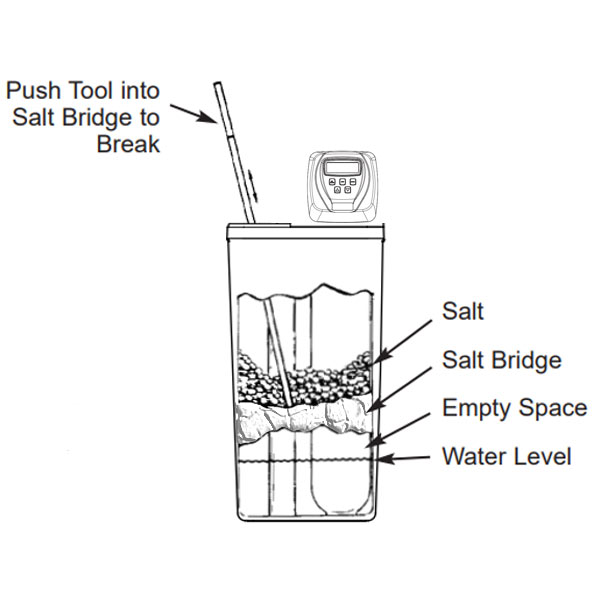
Too much water in the brine tank creates more brine than the system can rinse out. This excess salt water eventually pushes into your home plumbing.
Check Water and Salt Levels
Open the brine tank lid and observe the water level. Normal levels sit between 1 and 6 inches high depending on your model. If water is near the top, the float mechanism is likely stuck.
- Remove the float rod from the brine well and rinse it thoroughly.
- Ensure the float moves freely without snagging on tank walls or nuts.
- Verify the overflow tube is set to the correct height.
Break Salt Bridges
Tap the salt pile with a broom handle. A hollow sound indicates a salt bridge, which is a hardened crust trapping water underneath.
- Break the crust gently to allow salt to dissolve properly.
- Sco out any wet sludge at the bottom of the tank.
- Keep the tank no more than two-thirds full to prevent future bridging.
Diagnose Internal Valve Leaks and WSeals

Worn seals or pistons inside the control valve can allow brine to leak continuously into your service line. This causes a constant salty taste even when the unit is not regenerating.
Perform the Valve Hole Test
Set your softener to Service Mode with water flowing through the system. Remove the brine elbow and drain elbow from the valve body to expose the internal holes.
- Look into the brine hole and drain hole for 15 to 20 seconds.
- If you see water moving: There is a leak in the spacer stack, brine piston, or downflow piston.
- If dry: The valve seals are likely intact, and the issue lies elsewhere.
Replace Faulty Components
Order a repair kit specific to your model number if you detect a leak. These kits typically include the spacer stack and necessary pistons.
- Bypass and depressurize the system completely.
- Disconnect plumbing and remove the valve head from the resin tank.
- Disassemble the valve and replace the worn parts following manufacturer diagrams.
🔧 Note: Complex valves like Kinetico often require professional servicing due to their intricate internal mechanisms.
Verify Water Pressure and Programming Settings
Incorrect pressure or programming settings can sabotage the regeneration process. Low pressure prevents adequate rinsing, while wrong settings cause excessive salt usage.
Check System Water Pressure
Water softeners require 45 to 70 PSI to operate correctly. Pressure below 30 PSI is common in well systems with failing pumps or incorrect pressure tank settings.
- Attach a pressure gauge to an outdoor spigot to test current levels.
- Adjust the well pump pressure switch if readings are too low.
- Repair or replace the pump if it cannot maintain consistent pressure.
Review Softener Programming
Access your control panel and verify the hardness setting matches your actual water test results. Overestimating hardness causes the system to use too much salt.
- Ensure rinse time is set between 5 and 10 minutes.
- Confirm backwash time aligns with your resin volume.
- Reset to factory defaults if you are unsure of current configurations.
Address Source Water Contamination Issues
:max_bytes(150000):strip_icc()/installing-a-reverse-osmosis-system-2718849-hero-4b9b0d7bbd3941eeb12d23d3ebd7296b.jpg)
If your water tastes salty even during the bypass test, the problem originates from your source water rather than the softener itself.
Identify External Salt Sources
High sodium levels often appear in late winter or spring due to road salt runoff entering groundwater. Natural brackish aquifers or a cracked well casing can also introduce salt.
Install a Reverse Osmosis System
Standard carbon filters cannot remove dissolved sodium or chloride ions from water. You need a reverse osmosis (RO) system to effectively reduce salt content.
- Install an RO unit under your kitchen sink for drinking and cooking water.
- Choose a model with a carbon pre-filter to protect the membrane.
- Expect removal of 95 to 99 percent of dissolved salts and contaminants.
💡 Bonus: An RO system also removes nitrates, lead, and other harmful contaminants, making it ideal for health-conscious households.
Frequently Asked Questions About Salty Softened Water
Can I drink water that tastes salty from my softener?
You should avoid drinking water with a noticeable salty taste, especially if you are on a low-sodium diet. While brief exposure is generally not toxic to healthy adults, infants and pets should not consume it.
Why does my water only taste salty after regeneration?
This indicates an incomplete rinse cycle where brine was not fully flushed from the resin tank. Check your drain line for clogs or verify that no one used water during the regeneration cycle.
Will a carbon filter remove the salty taste?
No, standard carbon filters cannot remove dissolved sodium or chloride ions. You must install a reverse osmosis system to effectively remove salt from your drinking water.
How much sodium should a water softener add?
A properly functioning unit adds about 8 mg of sodium per glass for every grain of hardness removed. This amount is tasteless and significantly lower than the 200 mg/L threshold where humans detect salt.
What causes a salt bridge in the brine tank?
Humidity and overfilling the tank cause salt to harden into a crust known as a bridge. This prevents salt from dissolving properly and can lead to incorrect brine concentrations.
Key Takeaways for Fixing Salty Water Taste
A salty taste indicates that concentrated brine is entering your plumbing due to a mechanical failure or setting error. The most effective first step is the bypass test, which tells you if the problem lies with the softener or your source water.
Common fixes include cleaning clogged injectors, clearing drain line restrictions, and breaking salt bridges in the brine tank. If these steps do not resolve the issue, internal valve leaks or source water contamination may require professional repair or a reverse osmosis installation.
Start by performing the bypass test today to narrow down the cause. If the softener is at fault, clean the injector and drain line before attempting more complex valve repairs.


