

Hard water returning to your home often signals a clogged water softener that needs immediate attention. When salt bridges or injector blockages occur, your system stops removing minerals like calcium and magnesium effectively.
This guide explains exactly how to fix a clogged water softener by clearing salt compaction and cleaning critical valves. You will learn to diagnose symptoms, break hard crusts, and restore full water pressure using basic tools.
Identify Symptoms of a Clogged Water Softener
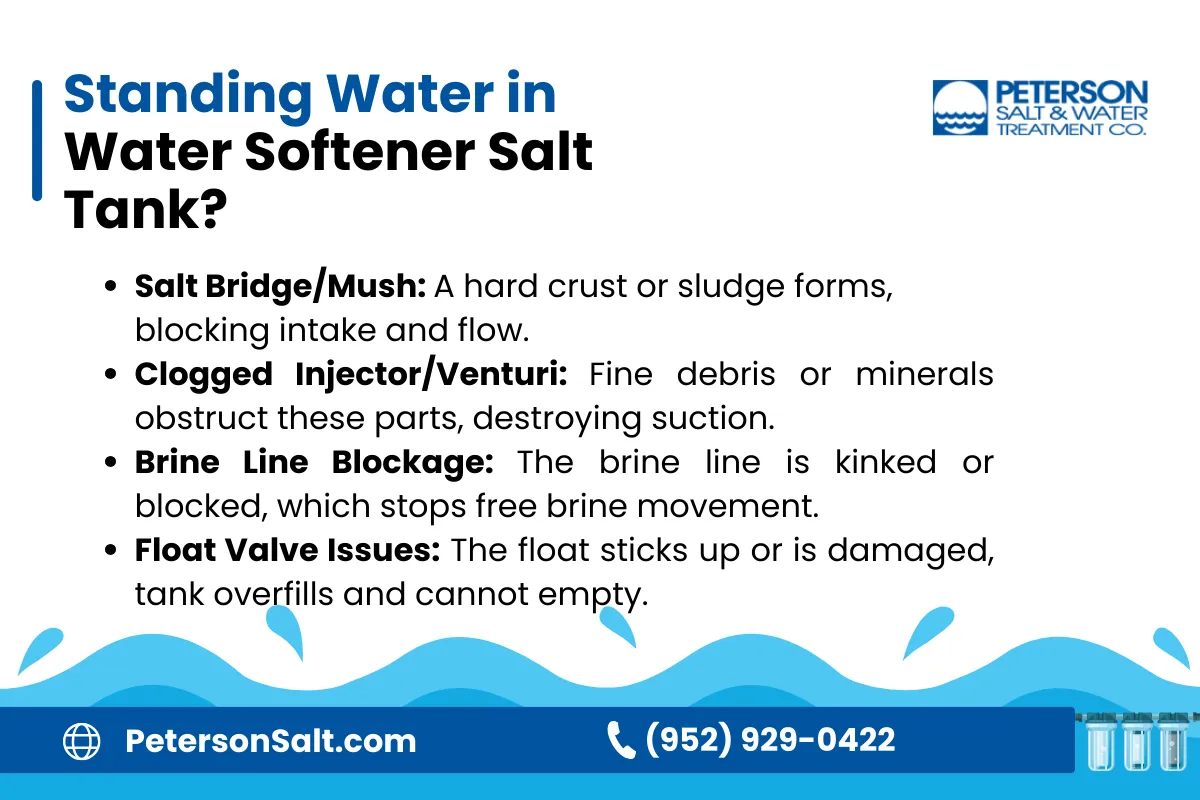
Performance declines quickly when blockages prevent proper regeneration cycles. You must recognize specific signs to confirm the issue before attempting repairs.
Watch for Hard Water Return
Soap fails to lather well and skin feels dry when the system stops working. Limescale builds up on faucets and shower doors despite the softener running.
* Static salt levels: The brine tank looks full but levels do not drop over weeks.
* Standing water: Water remains high in the tank after regeneration instead of draining.
* Low pressure: A system-wide drop suggests a blockage in the resin bed or control valve.
Test for Sediment Sources
Black or gritty particles in your water require immediate source identification. You must determine if the problem lies in your plumbing or the softener unit itself.
1. Bypass the softener and run cold water for five to ten gallons.
2. If water stays dirty, the issue is in your pipes or municipal supply.
3. If water clears, the softener is the culprit causing the contamination.
* Black particles often mean manganese or pipe corrosion rather than resin breakdown.
* White or gray sludge points to salt mush or a failing resin bed inside the tank.
Inspect the Brine Tank Interior
Open the brine tank lid to visually check for physical obstructions inside. Look for a hard crust forming on top with empty space or water underneath.
* Tap the surface gently to hear if it sounds hollow, which indicates a bridge.
* Check for wet, sludge-like salt at the bottom blocking the brine well.
* Look for solid, undissolved masses pressing against the brine well structure.
Diagnose Root Causes of Blockages
Understanding why clogs form helps you prevent them from happening again in the future. Most issues stem from salt behavior or hydraulic failures within the unit.
Salt Bridging and Compaction Issues
Pure salt pellets lack natural grit, so they clump tightly especially in humid environments. Over time, these clumps create significant operational failures.
* Bridging creates a dome that seals off water from dissolving lower salt layers.
* Compaction occurs when salt is overfilled or sits too long, forming a solid plug.
* Infrequent regeneration increases risk because less movement allows crystals to fuse together.
Hydraulic Component Failures
Even with clean salt, flow can be blocked by mechanical issues elsewhere in the system. Small components often get jammed with salt crystals or debris.
* Clogged injector: The tiny nozzle that draws brine gets jammed easily.
* Blocked brine line: The tube from brine tank to valve may be kinked or clogged.
* Drain line obstruction: Prevents proper flush during regeneration, causing overflow.
* Clogged control valve screen: Sediment or iron coats internal screens, restricting flow.
Environmental Triggers for Clogs
External factors often accelerate the clogging process inside your water treatment system. High iron content in water coats resin beads and clogs valves rapidly.
* Low water pressure below 40 psi prevents effective backwashing of the resin bed.
* Overfilling salt tank increases downward pressure, accelerating compaction at the base.
* High humidity causes salt to dissolve and re-crystallize into a thick sludge mass.
Break Salt Bridges and Clear Compaction
You can resolve most salt-related clogs using a methodical hot water treatment process. This approach dissolves hardened masses without damaging plastic components.
Shut Down and Bypass System
Safety is your first priority before working on any internal parts of the unit. You must isolate the system to prevent water damage or contamination.
1. Turn off power to the softener at the electrical source.
2. Rotate bypass valves to bypass mode to stop water flow through the unit.
3. Confirm water is flowing to the house by turning on a nearby faucet.
Warning: Never work on the tank while the system is active because brine can spill or damage internal parts.
Remove Loose Salt and Standing Water
Clear out accessible material to expose the clogged area for treatment. Use proper tools to avoid scratching the tank interior.
1. Scoop out loose salt with a plastic trowel or garden scoop.
2. Store clean salt in a bucket to reuse later if it is uncontaminated.
3. Use a shop vacuum to remove standing water and mushy sludge from the tank bottom.
* Dispose of brine properly according to local environmental guidelines.
* Avoid metal tools because scratches can harbor bacteria and cause cracks.
Break the Salt Bridge Mechanically
Apply gentle physical force to collapse any domed structures blocking the brine well. This step opens pathways for the hot water treatment.
1. Insert a wooden dowel or broom handle into the tank carefully.
2. Gently press down on the salt surface until you feel resistance.
3. Push until the crust collapses and breaks into smaller chunks.
4. Remove loosened chunks and vacuum debris from the tank bottom.
Dissolve Residual Clogs with Hot Water
Heat dissolves compacted salt effectively when applied correctly over time. This method requires patience but yields excellent results for severe clogs.
1. Heat three gallons of tap water to the hottest setting, but do not boil it.
2. Pour slowly around the brine well, avoiding direct pouring into the well itself.
3. Let the water sit for four to twenty-four hours to soften the mass.
4. Repeat the treatment if the clog persists after the initial soaking period.
Pro Tip: If the water level drops after soaking, the clog is breaking successfully. Repeat the process if needed for stubborn blocks.
Restart and Test Regeneration Cycle
Verify your repair by running a manual cycle to ensure proper brine draw. This confirms the system is ready to soften water again.
1. Vacuum out remaining liquid from the bottom of the brine tank.
2. Add four to five gallons of fresh water to the tank base.
3. Refill with two to three bags of fresh salt, preferably cubes.
4. Return system to service by turning power back on and closing bypass valves.
5. Initiate manual regeneration by pressing the cycle button for five seconds.
6. Watch the brine well as water should drop steadily over sixty minutes.
7. Run a second manual cycle if the initial draw seems slow or incomplete.
Clean Injectors and Valves Thoroughly
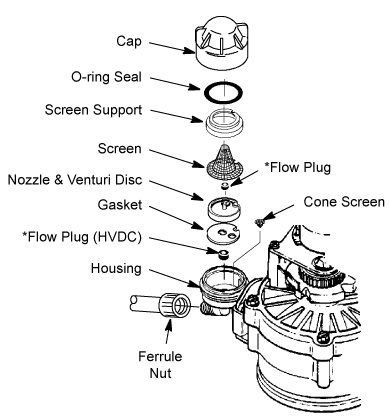
If the salt tank is clear but brine is not being drawn, the injector likely needs cleaning. This small component creates the suction necessary for regeneration.
Diagnose Injector Failure Symptoms
Specific signs point directly to injector blockage rather than salt issues. You can identify this problem by observing the regeneration process.
* Brine tank stays full of water even after a cycle.
* No suction noise occurs during the brine draw stage.
* The system fails to pull any brine from the tank entirely.
Access and Clean Injector Components
Disassemble the injector housing to access the tiny nozzle and screen inside. Cleaning these parts often restores full system function immediately.
1. Shut off water and power to the softener unit completely.
2. Locate injector housing on the control valve by checking your manual.
3. Remove injector screen and nozzle carefully to avoid losing small parts.
4. Inspect the tiny hole to see if light passes through it clearly.
5. Clear blockages with a fine pin or soft brush gently.
6. Soak parts in warm water for ten minutes if debris is stubborn.
Check Brine and Drain Lines
Inspect all tubing connected to the control valve for kinks or internal blockages. Clear airflow ensures proper suction and drainage during cycles.
1. Disconnect brine line from the control valve assembly.
2. Blow through the line to check for clear airflow throughout.
3. Inspect tubing for kinks, cracks, or visible obstructions inside.
4. Flush drain line with water to clear any accumulated debris.
5. Reconnect all lines securely before restoring power to the unit.
Test After Cleaning Components
Run a test cycle to confirm the injector and lines are functioning correctly. Listen for the return of normal operational sounds.
1. Restore power and water supply to the softener unit.
2. Start manual regeneration to begin the cleaning cycle.
3. Confirm brine level drops within ten to fifteen minutes of starting.
4. Listen for a soft gurgling sound which indicates suction is working.
Clear Resin Bed and Media Issues
Resin bed fouling causes dirty water and low pressure throughout your home. Extended backwashing can often restore flow without replacing media.
Extend Backwash Cycle Duration
Forceful water flow dislodges trapped sediment and iron from the resin beads. This deep cleaning method requires manual intervention during the cycle.
1. Initiate manual regeneration on your water softener unit.
2. When cycle reaches backwash stage, unplug the unit immediately.
3. Let water flow to drain for thirty minutes to deep-clean the resin bed.
4. Plug unit back in to finish the remaining regeneration steps.
5. Repeat two to three times for heavy iron or sediment contamination.
Replace Fouled Resin Media
Severe fouling may require complete media replacement to restore water quality. This advanced task involves draining and refilling the resin tank.
1. Bypass the system and disconnect resin tank from plumbing connections.
2. Drain water completely and dump old resin material out of tank.
3. Rinse tank thoroughly to remove all remaining debris and sludge.
4. Refill with new cation resin available from water treatment suppliers.
5. Reconnect plumbing and initiate a full regeneration cycle immediately.
Note: Resin replacement is complex and may require professional assistance if you are unsure about the process.
Prevent Future Clogs Effectively
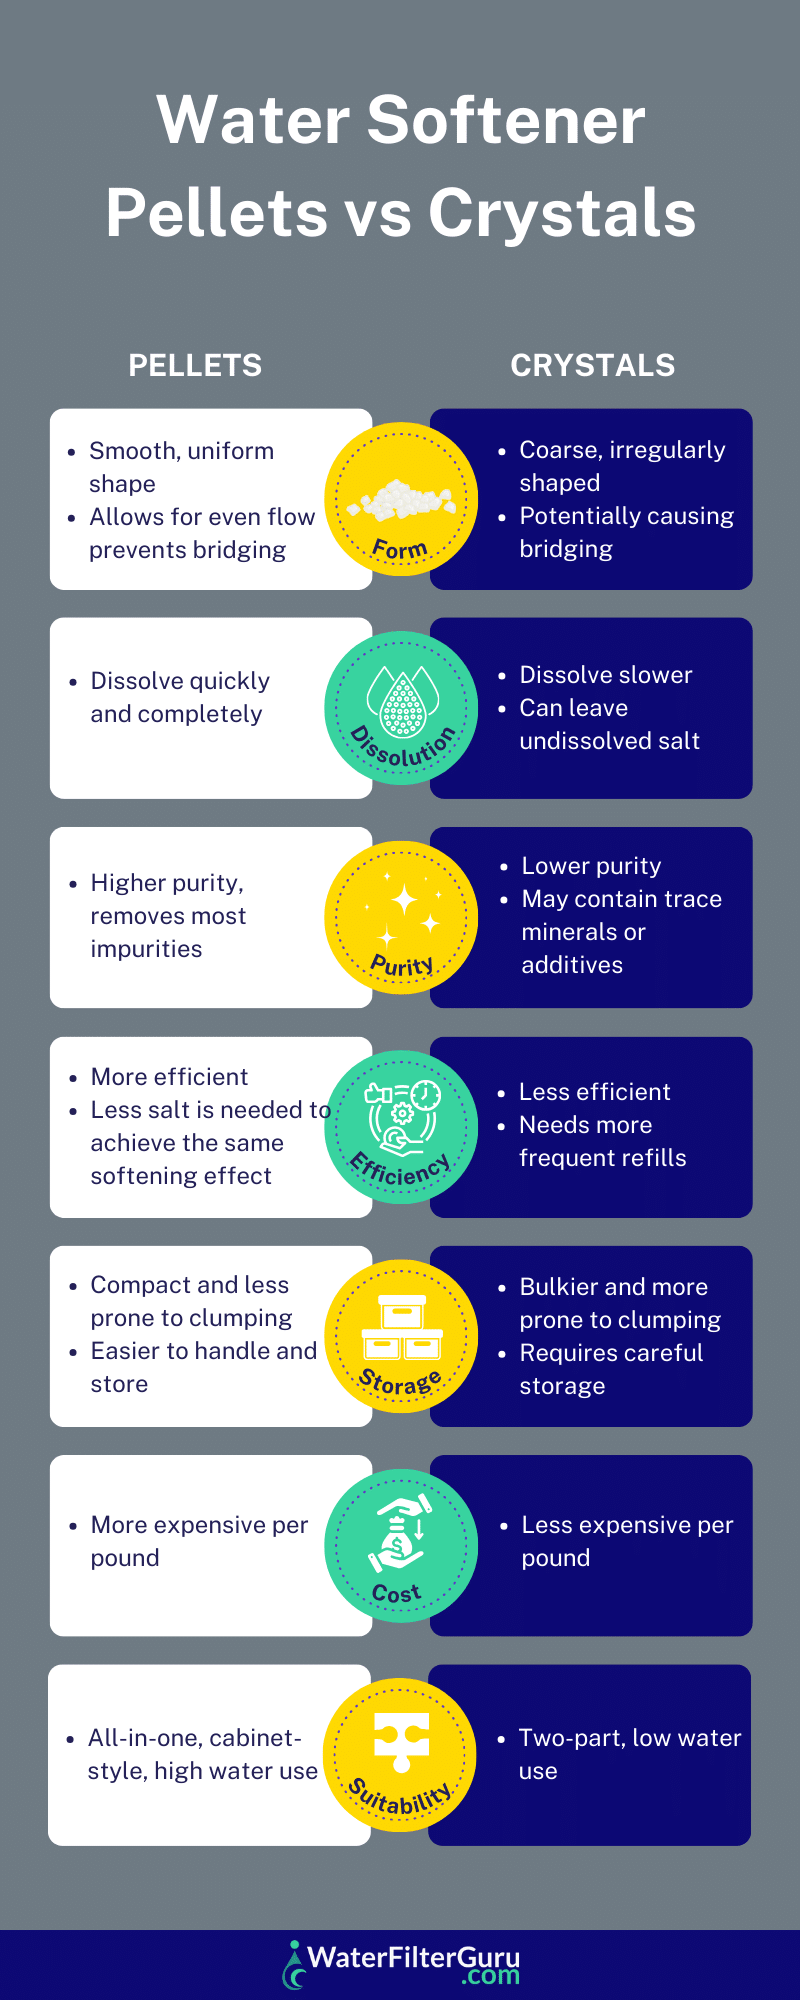
Regular maintenance prevents most clogs from forming in the first place. Proper salt management and scheduling keep your system running smoothly.
Manage Salt Levels Properly
Maintaining correct salt levels reduces pressure on the bottom layers of the tank. This simple habit prevents compaction and bridging issues significantly.
* Keep salt between one-quarter and two-thirds full at all times.
* Refill only when level drops to one-quarter rather than topping off constantly.
* Never overfill because excess weight causes compaction at the base.
Choose the Right Salt Type
Different salt types have varying risks for bridging and mushing. Selecting the correct type for your environment reduces maintenance needs.
| Salt Type | Pros | Cons | Best For |
|---|---|---|---|
| Cubes | Low bridging, dissolves well | Slightly more expensive | Most systems |
| Pellets | Widely available | Prone to bridging | Dry climates |
| Solar Crystals | Natural, less mush | More sludge | Low-humidity areas |
| Block Salt | Long-lasting | High bridge risk | Avoid in softeners |
Pro Tip: Use salt with anti-caking agents to reduce clumping and extend time between cleanings.
Schedule Monthly Inspections
Regular checks catch small problems before they become major clogs. A quick monthly routine saves hours of repair time later.
1. Open brine tank every thirty days to check salt condition.
2. Look for early signs of bridging or mush formation inside.
3. Break small clumps with a dowel before they harden completely.
4. Vacuum sludge if present to keep the brine well clear.
Maintain System Hygiene and Settings
System hygiene extends beyond the brine tank to include all connected components. Regular cleaning prevents secondary clogs and performance issues.
Clean Aerator and Drains Regularly
Sediment trapped in faucets and showerheads indicates system flushing needs. Clean these points monthly to maintain good water flow.
* Remove faucet aerators monthly and flush out trapped sediment.
* Clean showerheads to prevent clogging from iron or scale buildup.
* Inspect drain lines for slow drainage or visible obstructions.
Address Iron and Manganese Content
High mineral content requires specific treatment to prevent resin fouling. Test your water annually to adjust treatment strategies accordingly.
* If water has more than 1 ppm iron, use a resin cleaner monthly.
* For high manganese or sulfur, install a pre-filter before the softener.
* Test water annually to adjust treatment settings and chemical doses.
Optimize Regeneration Settings
Correct settings ensure your system regenerates often enough to prevent clogs. Adjust based on household size and water usage patterns.
* Demand-initiated systems: Set based on household size and water hardness levels.
* Time-based systems: Regenerate every three to seven days depending on usage.
* Smart models: Allow automatic adjustment but ensure settings are calibrated correctly.
Dispose of Waste Safely and Responsibly
Proper disposal of brine and sludge protects the environment and local water systems. Follow these guidelines to dispose of waste safely.
Approved Disposal Methods
Safe disposal methods prevent damage to local ecosystems and infrastructure. Always choose the most environmentally friendly option available.
* Pour brine and sludge on driveways or paved areas only.
* Let rain dilute and wash it away naturally over time.
* Follow local regulations for large-scale disposal needs.
Never Pour Brine Into Prohibited Areas
Certain disposal methods cause significant environmental harm and should be avoided. Protect local waterways and soil quality by following these rules.
* Storm drains harm aquatic life and bypass treatment facilities.
* Septic systems kill beneficial bacteria needed for waste breakdown.
* Gardens or lawns kill plants and degrade soil quality permanently.
* Sinks or toilets risk pipe corrosion and septic system failure.
Eco Tip: Use minimal hot water during cleaning to reduce brine volume and disposal needs.
When to Call a Professional Technician
Some issues require expert diagnosis and repair beyond basic homeowner maintenance. Recognize when professional help is necessary to avoid further damage.
Signs You Need Expert Help
Specific symptoms indicate serious mechanical or electronic failures. Call a technician if you observe these warning signs.
* Control panel is dead or displays persistent error codes.
* Leaks from tank seams or valve connections that worsen over time.
* Resin bed is channeling where water flows around media instead of through it.
* Repeated clogs despite proper maintenance and cleaning efforts.
* System is over ten to fifteen years old and may need replacement.
Upgrade Considerations for Older Units
Modern water softeners offer features that reduce maintenance and improve efficiency. Upgrading may be more cost-effective than repeated repairs.
* Self-cleaning brine systems reduce manual cleaning needs.
* Salt level sensors alert you before problems occur.
* Wi-Fi monitoring and alerts provide remote system status updates.
* Dual-tank systems ensure uninterrupted soft water during regeneration.
Troubleshoot Common Issues Fast

Quick reference helps you identify and fix common problems efficiently. Use this matrix to diagnose symptoms and apply immediate fixes.
| Symptom | Likely Cause | Fix |
|---|---|---|
| No salt use, hard water | Salt bridge or compaction | Hot water soak plus manual regeneration |
| Brine tank full, no draw | Clogged injector or brine line | Clean nozzle and check tubing connections |
| Black particles in water | Manganese or corroded pipes | Bypass test; clean resin or inspect plumbing |
| Low water pressure | Clogged valve or resin bed | Extended backwash or valve cleaning |
| Mushy salt at bottom | Humidity or poor salt type | Vacuum sludge; switch to cube salt |
| System won’t regenerate | Power or timer issue | Check outlet, reset control head |
Frequently Asked Questions About Clogged Water Softeners
How do I know if my water softener is clogged?
You likely have a clog if salt levels remain static, water pressure drops, or hard water symptoms return. Check for standing water in the brine tank after regeneration cycles.
Can I use boiling water to clear a salt bridge?
No, never use boiling water as it can warp or damage plastic tank components. Use hot tap water instead, which is safe and effective for dissolving salt.
How often should I clean my water softener brine tank?
Inspect your brine tank monthly and perform a full cleaning annually. Break up small bridges immediately to prevent them from becoming solid masses.
What causes black sediment in my soft water?
Black sediment usually indicates manganese, hydrogen sulfide, or corroded pipes rather than a softener defect. Run a bypass test to isolate the source.
Is it safe to pour brine down the drain?
No, pouring concentrated brine down drains can harm septic systems and municipal treatment plants. Dispose of brine on paved outdoor areas only.
How long does it take to fix a clogged softener?
Most salt bridge clogs resolve within four to twenty-four hours using the hot water method. Injector cleaning takes about thirty minutes if tools are ready.
Key Takeaways for Fixing Your Clogged Water Softener
Fixing a clogged water softener requires identifying whether the issue stems from salt compaction, injector blockage, or resin fouling. Most clogs resolve with hot water treatment and manual regeneration, restoring soft water within hours. Regular monthly inspections and proper salt management prevent ninety percent of future clogs effectively.
Take action today by inspecting your brine tank for standing water or salt bridges. If basic cleaning does not resolve the issue or your unit is over ten years old, consider contacting a professional for service or upgrading to a modern self-cleaning model.


