

Does your drinking water suddenly taste odd or smell musty? Mineral deposits and bacteria often build up inside your unit, even when you use bottled water. Regular maintenance is the only way to ensure your hydration remains safe and fresh.
This guide explains exactly how to clean Honeywell water dispenser units using vinegar, bleach, or boiling water. You will learn specific safety steps, disassembly instructions, and how to prevent future contamination in just one hour.
Essential Safety Steps Before Repairing Your Vacuum
Safety must be your top priority before touching any internal components. Incorrect handling can lead to electrical shocks or dangerous chemical reactions.
Unplug the Unit and Drain All Water
Always disconnect the power cord from the wall outlet immediately. This prevents electric shock while you work with water and cleaning solutions. Turn off any heating or cooling switches if your specific model features them.
Remove the water bottle and open both hot and cold taps. Let the water flow into a large bucket until the internal reservoir is completely empty. If ice blocks the flow, wait for it to melt or add warm water to speed up the process.
Gather Required Tools and Protective Gear
You need specific supplies to sanitize the unit effectively without damaging plastic parts. Choose one primary cleaning method based on your needs and unit type.
- Distilled white vinegar and hot water OR unscented bleach
- Long-handled soft-bristle brush
- Microfiber cloths or lint-free towels
- Mild dish soap and a small bucket
- Rubber gloves and safety glasses
- Small cork or plug (for hot/cold models using bleach)
Avoid abrasive sponges that scratch surfaces and harbor bacteria. Never mix bleach and vinegar as this creates toxic gas.
Remove and Wash Removable Components
Disassembling accessible parts ensures a deep clean and prevents cross-contamination during the sanitization phase.
Extract the Safeguard and Baffle
Locate the safeguard at the top center of the dispenser. Twist it counterclockwise and lift it off gently. Some models have a secondary piece underneath that requires a gentle upward pull to remove.
Next, pull out the baffle. This disc-shaped part directs water into the hot reservoir. Both components are critical for proper flow, so scrub them thoroughly with mild soap and water.
Clean Drip Trays and Spigot Paddles
Remove the drip tray and any removable spigot paddles from the front of the unit. Wash these items in warm soapy water using a soft sponge. Rinse them completely to remove all soap residue before drying.
Never submerge the air filter unless your manual explicitly states it is washable. If your model has one, remove it from the top or bottom ring and wipe it with a damp cloth. Ensure it is 100% dry before reinstallation.
Sanitize the Internal Reservoir Effectively
The internal reservoir holds water in contact with heating and cooling elements. This area is a hotspot for microbial growth and scale accumulation.
Use Vinegar for General Descaling
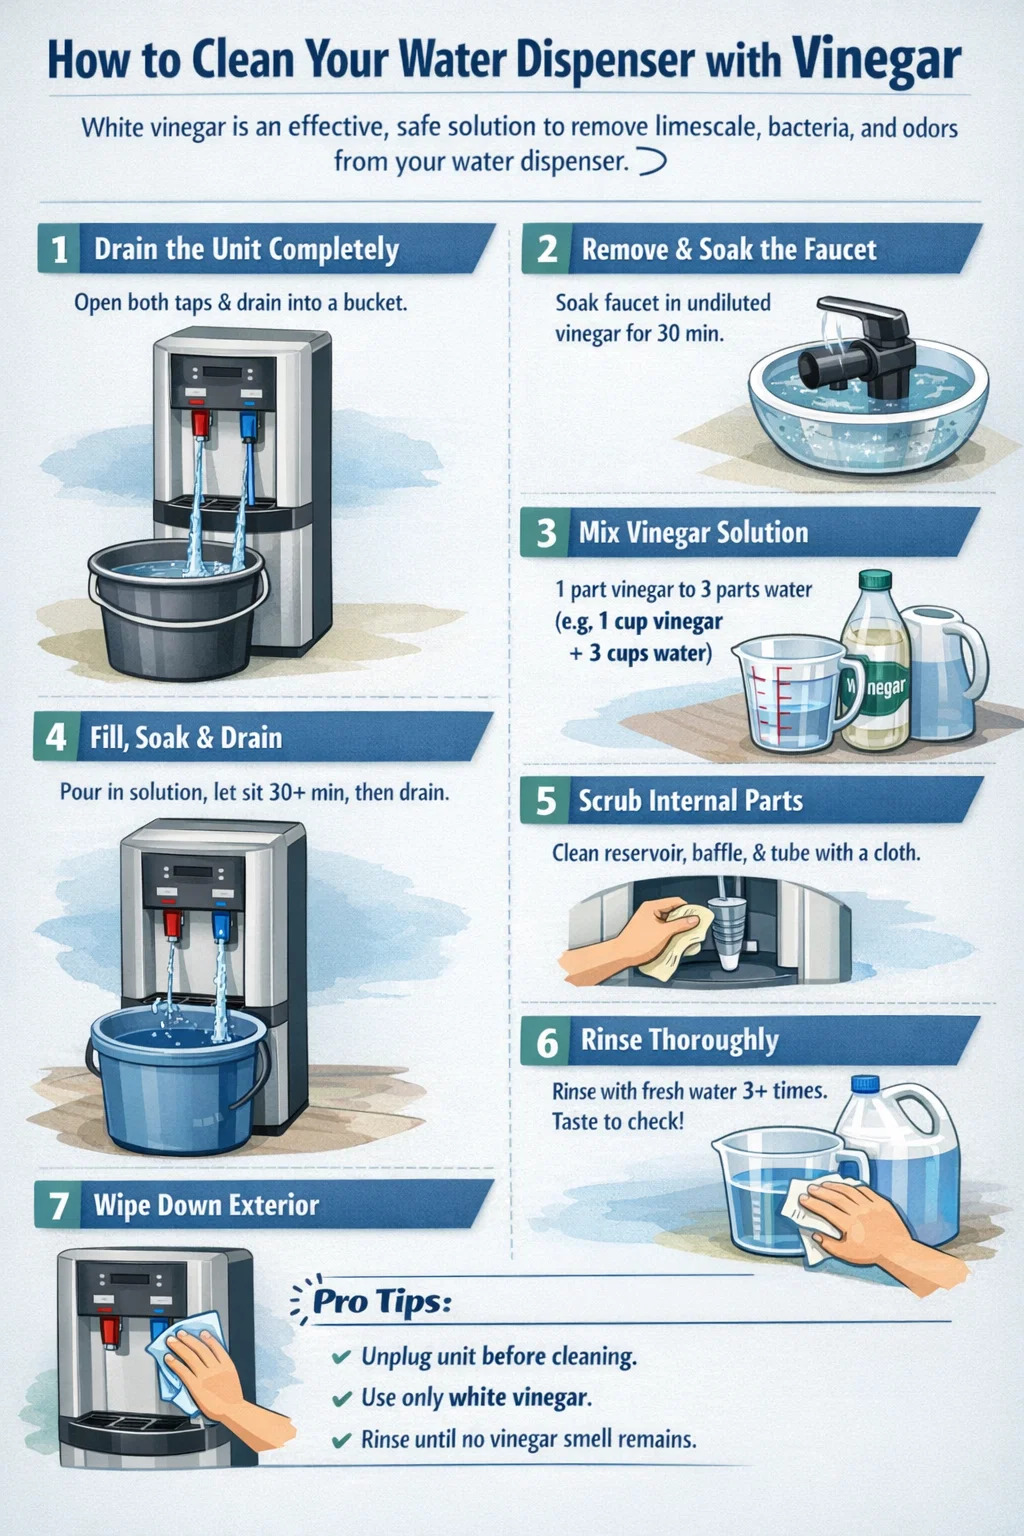
Vinegar is non-toxic and excellent for removing mineral deposits from both hot and cold tanks.
- Mix 1 cup of distilled white vinegar with 3 cups of hot water.
- Pour the solution directly into the empty reservoir.
- Scrub the interior walls with a long-handled brush, focusing on corners.
- Let the solution sit for 2 to 5 minutes.
- Drain the liquid completely through both taps into a bucket.
This method works well for most top-loading models and those with hot water dispensers.
Apply Bleach for Deep Sanitization
Bleach kills more germs than vinegar but requires extreme caution. Do not let bleach enter the hot water tank as it leaves a persistent chemical taste.
- Mix 1 teaspoon of unscented bleach with 1 gallon of water.
- Insert a small cork into the center hole leading to the hot tank to block it.
- Pour the bleach solution into the reservoir and scrub the interior.
- Let it sit for 3 to 5 minutes only.
- Drain the solution through the cold tap exclusively.
Never use bleach on units with hot water dispensers unless the hot inlet is securely sealed.
Try Boiling Water for Chemical-Free Cleaning
Boiling water offers powerful sanitization without chemical residues. This is ideal for households with children or sensitive palates.
- Heat water to approximately 220°F (just below boiling).
- Carefully pour it into the reservoir until full.
- Let it sit for 3 minutes to kill bacteria.
- Scrub the interior with a long-handled brush while wearing thick gloves.
- Drain the water through the cold spigot to avoid contaminating the hot tank.
Rinse Thoroughly to Eliminate Residue
Rinsing is non-negotiable regardless of your chosen cleaning method. Leftover agents can affect taste and safety.
Flush the System Multiple Times
Remove the cork or plug from the hot tank inlet if you used one. Fill the reservoir with clean tap or bottled water. Open both taps and let the water flow into a bucket until empty. Repeat this cycle 2 to 3 times to ensure all traces of cleaner are gone.
Verify Water Taste and Odor
Dispense a small cup of water from each tap after the final rinse. Taste it carefully. If you detect any vinegar or chlorine flavor, repeat the rinse process immediately. This step ensures no cleaning agents remain in the lines or tanks.
Reassemble Components and Clean Exterior
Finish the process by putting everything back together correctly and wiping down the outside surfaces.
Reinstall All Internal Parts
Place the dry baffle back into the reservoir ensuring it sits flat. Reattach the safeguard by aligning it properly and twisting clockwise until it locks. Reinstall the air filter if your model uses one.
Double-check that all parts are seated correctly. Misalignment can cause leaks or poor water flow later.
Wipe Down External Surfaces
Dampen a microfiber cloth with a vinegar-water solution or food-safe disinfectant. Wipe the entire exterior including spigots, base, and sides. Do not spray liquid directly onto the unit as moisture can damage electrical components. Clean the taps individually and dry all surfaces to prevent water spots.
Restart Unit and Maintain Performance
Your dispenser is now sanitized and ready to deliver clean, great-tasting water again.
Power Up and Prime the System
Place a fresh, full water bottle on the unit. Plug the dispenser back into the outlet and turn on the cooling and heating switches. Dispense 2 cups of water from each tap to flush any residual air. Wait about 30 minutes for the water to reach optimal temperatures.
Avoid drinking the first few cups immediately as they may contain trapped air.
Schedule Regular Maintenance Cleanings
Set a reminder to clean your Honeywell water dispenser every 3 to 6 months. High-traffic areas like offices need cleaning every 3 months. Home units with low traffic can go up to 6 months between cleanings.
Label the unit with the last cleaning date to stay on track. Clean immediately after long idle periods or water brand changes.
Perform Monthly Compressor Care
Dust buildup on the rear wire grid reduces cooling efficiency. Once a month, unplug the unit and vacuum lint from the back grill. Never lubricate the compressor as it is sealed and requires no maintenance.
Prevent Damage During Idle Periods
If the dispenser runs out of water, unplug it immediately. Running the heater or cooler without water can damage internal components. This simple step extends the unit’s lifespan significantly.
Troubleshoot Common Cleaning Issues

Even after cleaning, you might encounter minor issues. Here is how to fix them fast.
Water Tastes Like Bleach or Chemicals
Cause: Incomplete rinsing of the reservoir.
Fix: Flush the reservoir with clean water 2 to 3 more times. Dispense from both taps until the taste disappears completely.
White Residue or Cloudy Water Appears
Cause: Mineral buildup from hard water remains.
Fix: Use a stronger vinegar solution or commercial descaler. Soak for no more than 10 minutes to avoid material degradation.
Leaking Occurs After Reassembly
Cause: Baffle or safeguard not seated properly.
Fix: Turn off and unplug the unit. Remove and reinsert both parts, ensuring they click into place. Check the rubber gasket for debris.
Strange Odors Return Quickly
Cause: Stagnant water or infrequent use.
Fix: Increase cleaning frequency. If the unit sits unused for over a week, drain it and unplug until needed.
Model-Specific Cleaning Tips
Honeywell dispensers vary slightly by manufacturer. Know your type for best results.
Oasis Models (Tan-Colored)
To remove the top panel, place one hand on the back edge. Apply upward pressure to lift the entire panel off. To reinstall, press down firmly until it clicks into place.
Sunroc Models
Press down on the two back corners of the top panel. Lift the front edge and pull rearward to remove. Reattach by aligning the front lip and pressing down.
Bottom-Loading Units
These may have a quick-disconnect water line. Turn off and unplug the unit before disconnecting the line at the coupling. Cap or plug the inlet to prevent leaks during cleaning.
Frequently Asked Questions About Cleaning Honeywell Water Dispensers
How often should I clean my Honeywell water dispenser?
You should clean and sanitize the unit every 3 to 6 months. High-traffic areas like offices require cleaning every 3 months, while home units can go up to 6 months between cleanings.
Can I use bleach to clean a hot water dispenser?
No, you should not use bleach on hot water dispensers unless you plug the hot tank inlet. Bleach leaves a persistent taste in the hot tank that is difficult to remove.
What is the best solution for removing mineral buildup?
Distilled white vinegar mixed with hot water is the best solution for mineral deposits. Mix 1 cup of vinegar with 3 cups of hot water and let it sit for up to 10 minutes.
Why does my water taste like vinegar after cleaning?
This means the unit was not rinsed thoroughly enough. Flush the reservoir with clean water 2 to 3 more times until the taste is completely neutral.
Do I need to unplug the dispenser before cleaning?
Yes, always unplug the unit from the wall outlet before starting. This eliminates the risk of electric shock when working with water and cleaning solutions.
Key Takeaways for Cleaning Your Honeywell Water Dispenser
Regularly cleaning your Honeywell water dispenser ensures safe, great-tasting water and extends the life of your unit. Always unplug the device before starting, choose the right cleaning method for your model, and rinse thoroughly to remove all residues.
Stick to a 3 to 6 month schedule and perform monthly maintenance on the compressor grill. By following these steps, you can prevent bacterial growth and enjoy fresh hydration every day.



