

Is your laundry feeling stiff or soap scum building up despite having a water softener? Your Whirlpool unit likely needs a deep clean to remove iron buildup and mineral scale that standard salt cycles miss. Over time, these deposits clog internal parts and coat resin beads, causing the system to fail.
You can restore full efficiency by using an acid-based cleanser every four months and cleaning the venturi assembly annually. This guide explains exactly how to perform chemical cleaning, clear brine tank blockages, and maintain your salt levels properly. Follow these steps to extend your warranty and ensure soft water for years.
Choose the Correct Cleanser for Your Unit
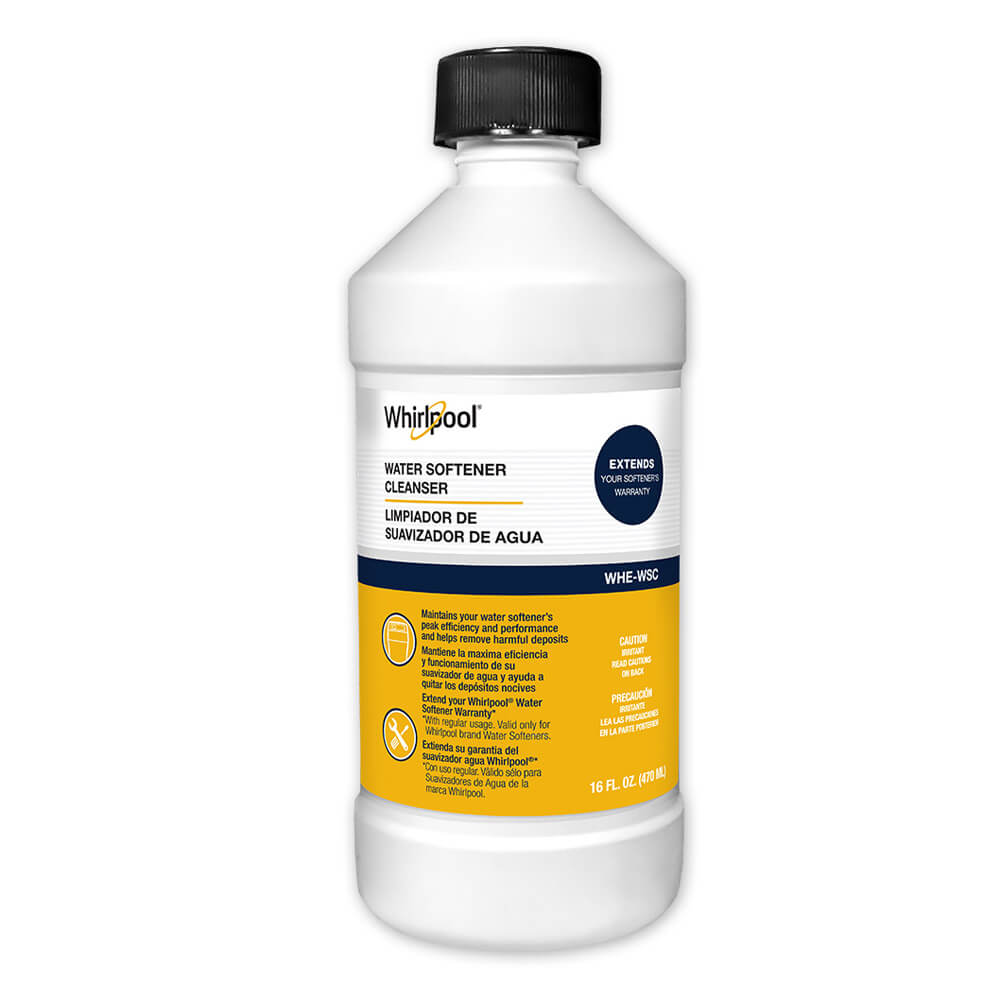
Using the right cleaning agent is the most critical step in maintaining your system. Generic acids may damage internal seals or fail to dissolve specific mineral deposits found in hard water.
Select Whirlpool Water Softener Cleanser
You must use Whirlpool Water Softener Cleanser or a compatible formula designed for these systems. This 16-ounce bottle contains a specialized acid solution that dissolves iron, scale, and organic buildup safely. One bottle treats the system effectively for up to four months. You can find this product at major retailers like Lowe’s or online, where in-store pricing is often lower.
Activate Extended Warranty Coverage
Using the official cleanser does more than just clean your water; it significantly extends your manufacturer warranty.
* Standard Models (WHES30, WHES40): Coverage increases from 1 year to 5 full years.
* Pro Series (WHESFC): Coverage jumps from 2 years to 10 full years.
* EcoPure Models (EP31, EP42): Parts warranty extends from 1 year to 5 years.
You must register your unit online and keep your purchase receipt to activate this benefit. Without the receipt, the warranty extension is void.
Execute the Chemical Cleaning Cycle

Performing a chemical clean requires careful timing to ensure the solution mixes properly with your brine. Follow this sequence to avoid damaging your water heater or wasting the cleanser.
Prepare the System Safely
- Check Salt Levels: Ensure salt is at least 2 inches deep. If it is below 1 inch, add salt now. If the tank is full, you can proceed.
- Disable Ice Maker: Turn off your ice maker to prevent contaminated water from entering the bin.
- Clear Alerts: Press any button on the display to dismiss “Clean Scheduled” messages.
- Open the Tank: Remove the brine tank cover and the brine well cap if your model has one.
Add Cleanser and Start Regeneration
- Pour the Solution: Empty the entire 16 oz bottle into the brine well or directly onto the salt bed. Do not add fresh salt immediately after pouring.
- Seal the Unit: Replace all caps and covers securely to prevent spills.
- Initiate Recharge: Press and hold the “Recharge” button for 3 seconds. On some models, you may need to press it twice. The system will start a cycle lasting 90 minutes to 2 hours.
- Avoid Water Usage: Do not use any water during this cycle. Using hot water could pull the cleanser into your water heater.
Flush Residual Debris
Once the regeneration cycle finishes completely, open a cold water faucet. Let it run for 20 minutes to flush out any remaining cleanser and loosened debris. Turn your ice maker back on and refill salt if necessary.
Diagnose High Water in the Brine Tank

If you see water pooling above 6 inches in your brine tank, the system is not drawing brine correctly. This issue often stems from a clogged venturi assembly, especially in Whirlpool Model 70 and T70 units.
Identify Venturi Failure Symptoms
Look for these specific signs that indicate a blockage:
* Water level remains high after regeneration.
* Salt level does not drop between cycles.
* The system fails to create suction during the brine draw.
* Drainage is delayed or incomplete.
If you notice these issues, mechanical cleaning of the venturi is required immediately.
Disassemble the Venturi Assembly
Cleaning the venturi requires removing the component from the control head. Work carefully to avoid damaging wires or losing small parts.
Isolate and Remove the Unit
- Shut Off Water: Close the bypass valve to stop water flow to the softener.
- Relieve Pressure: Open a nearby faucet briefly to release pressure in the lines.
- Remove Panels: Take off the front and side access panels. Be careful not to disturb wires connected to the control board.
- Disconnect Hoses: Detach the hose leading from the plunger tube to the brine tank. Check this hose for kinks or clogs.
- Extract Assembly: Use needle-nose pliers to remove the retaining clip. Gently pull the entire venturi assembly out of the housing.
Clean Internal Components Thoroughly
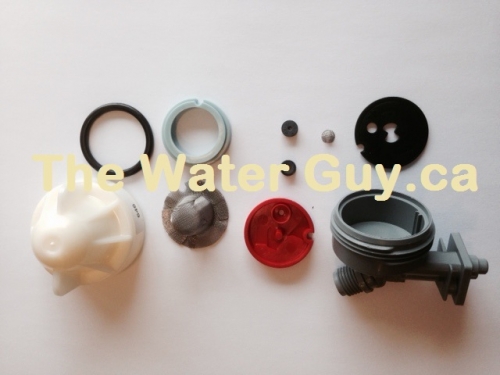
Once removed, the venturi must be taken apart completely to remove all mineral deposits.
Break Down the Parts
Lay out the components in order as you remove them. A typical assembly includes:
* Cap and O-ring
* Primary screen and small nozzle
* First rubber flow plug (concave side down)
* Secondary gasket and cone-shaped screen
* Second flow plug (concave side down)
* Large cone screen and O-ring tray
Soak and Scrub Deposits
Submerge all parts in warm soapy water for 5 to 10 minutes. Use a small brush or pipe cleaner to scrub the inlet and outlet ports, screens, and nozzles. If you have compressed air, blow out all passages to ensure they are clear. Water should shoot out forcefully when held under a tap. If flow is weak, recheck for blockages.
Reassemble the Venturi Correctly
Improper reassembly will prevent the suction needed to draw brine. Follow the sequence exactly to ensure a proper seal.
Follow the Specific Order
- Insert the cone-shaped screen into the side port, pointing down.
- Place the first flow plug with the concave side facing inward.
- Align the gasket groove with the housing keyway.
- Insert the next component, matching the groove to the keyway.
- Place the second flow plug with the concave side down.
- Add the large cone screen, aligning its groove with the keyway.
- Seat the O-ring into the O-ring tray.
- Screw on the cap firmly.
Inspect gaskets for stretching or cracking before final assembly. Replace any damaged parts with model-specific gaskets for Whirlpool 70 or T70 units.
Test the System After Repair
Verification ensures your maintenance was successful and the system is ready to soften water again.
Restore and Verify Operation
- Push the venturi assembly back into the housing until seated.
- Secure it with the retaining clip.
- Reconnect the hose to the plunger tube, ensuring no kinks.
- Replace access panels and open the bypass valve.
- Run a manual regeneration cycle.
Watch for success signs like full drainage of the brine tank and a drop in salt levels. Soft water should return within 24 hours.
Select the Optimal Salt Type

The type of salt you use directly impacts maintenance frequency and system longevity.
Compare Salt Options
- Evaporated Salt: Best for efficiency. It is 99.9% pure NaCl and creates minimal sludge. Highly recommended.
- Solar Salt: A balanced choice for cost and cleanliness but may leave moderate residue.
- Rock Salt: Avoid this type. It contains high impurities that cause mushing and clogs.
- Potassium Chloride: Use only if you require a sodium-free diet. It is less efficient and more expensive.
Using high-purity evaporated pellets prevents many common issues before they start.
Prevent Salt Bridges and Mushing
Improper salt maintenance leads to two main problems: bridging and mushing. Both stop the system from making brine.
Break Salt Bridges
A salt bridge is a hard crust forming across the tank, leaving water underneath untouched.
* Signs: Low salt alert despite a full tank.
* Fix: Gently poke the crust with a broom handle until it breaks and falls into the water. Wait 24 hours for brine to form.
Clear Salt Mushing
Mushing occurs when salt dissolves and recrystallizes into sludge at the tank bottom.
* Fix: Drain all water, remove old salt, scrub the tank, and refill with evaporated salt.
* Prevention: Clean the tank annually and use high-purity salt.
Adhere to a Maintenance Schedule
Consistency is key to keeping your Whirlpool water softener running for over a decade.
Follow This Routine
- Monthly: Check salt levels and look for bridges.
- Every 4 Months: Add cleanser to prevent fouling.
- Every 6–12 Months: Inspect and clean the venturi assembly.
- Annually: Perform a deep resin clean if you have high iron water.
Pro Tip: Schedule your cleanser applications with daylight saving time changes to remind yourself three times a year.
Troubleshoot Common Problems
Even with maintenance, issues can arise. Here is how to address frequent alerts and failures.
Address “Clean Scheduled” Alert
This is a reminder, not an error. Add your cleanser and press any button to clear the message.
Fix Water Not Draining
If water stays in the brine tank, check for salt bridges first. Next, inspect the brine line for kinks. Finally, test the venturi for clogs as described earlier.
Resolve Returned Hard Water
If hard water symptoms return, confirm salt is present and not bridged. Verify the system is regenerating on schedule. Repeat the chemical cleaning process if fouling is suspected.
Frequently Asked Questions About Cleaning Whirlpool Water Softeners
How often should I clean my Whirlpool water softener?
You should use a dedicated cleanser every 4 months or at least 3 times a year. Perform mechanical cleaning of the venturi assembly every 6 to 12 months to prevent clogs.
Can I use vinegar instead of Whirlpool cleanser?
No, you should use the specific Whirlpool Water Softener Cleanser. Generic acids like vinegar may not have the correct pH balance to dissolve iron and scale effectively and could void your warranty extension.
Why is there still water in my brine tank after cleaning?
Some water is normal, but high levels indicate a clogged venturi or salt bridge. Check the venturi assembly for blockages and ensure no salt crust is preventing brine formation.
Does cleaning the softener really extend the warranty?
Yes, using the official Whirlpool cleanser regularly extends warranties significantly. Standard models go from 1 to 5 years, while Pro Series models can reach 10 years of coverage with proof of purchase.
What happens if I ignore the “Clean Scheduled” message?
Ignoring this reminder allows mineral scale and iron to build up on resin beads. This reduces softening capacity, increases salt usage, and eventually leads to hard water returning to your home.
Key Takeaways for Maintaining Your Whirlpool Water Softener
Regular maintenance is the only way to ensure your Whirlpool water softener lasts over 10 years. You must combine quarterly chemical cleaning with annual mechanical inspection of the venturi assembly to prevent efficiency loss. Using high-purity evaporated salt and monitoring for bridges will keep your system running smoothly.
Start your next cleaning cycle today by purchasing the correct cleanser and scheduling a time to flush your system. Your appliances, clothes, and skin will benefit from the improved water quality immediately.



