If your Kinetico water softener fails to deliver silky water or shows scale buildup, neglected maintenance is likely the culprit rather than a broken unit. These durable twin-tank systems require specific care to prevent common issues like salt bridging and low pressure.
This guide details every essential task using official Kinetico protocols to keep your system running smoothly. You will learn how to manage salt levels, clean your brine tank safely, replace pre-filters on schedule, and troubleshoot problems before they escalate.
Optimize Brine Tank Salt Levels

Salt acts as the fuel for your regeneration cycle, making proper management critical for consistent soft water. Using the wrong type or filling the tank incorrectly leads to bridging, sludge accumulation, and system inefficiency.
Select the Correct Salt Type
You must use high-quality pellet or cube salt to ensure clean dissolution and minimal sediment. Morton salt in the yellow bag is the preferred choice because it resists bridging and is widely available at major retailers.
Avoid rock salt and solar salt as they contain impurities that clog the system and create excessive sludge. Potassium chloride is a viable alternative for eco-conscious users but requires specific float adjustments.
Pro Tip: Stick to one salt type consistently. Switching between regular salt and potassium without adjusting the float height causes overfilling or underfilling issues.
Maintain Ideal Fill Volumes
Keep your salt tank between half and two-thirds full at all times to ensure proper brine formation. Never fill the tank to the brim because overfilling encourages salt bridging where a hard crust blocks dissolution.
Refill the tank only when the level drops to one-quarter capacity or when only specks remain at the bottom. Wait for old salt to dissolve completely before adding more to prevent compaction.
Visual Cue: If the salt level remains static for weeks despite usage, a salt bridge has likely formed inside the tank.
Break Salt Bridges Safely
A salt bridge creates a solid crust over the water line that stops regeneration and returns hard water to your home. You will notice gritty water, poor lather, and filmy dishes when this occurs.
To fix this issue safely:
1. Tap the outside of the tank gently with your hand to loosen the crust.
2. Use a broom handle to press down on the salt pile in several spots.
3. Drain and clean the tank completely if the bridge does not break easily.
Warning: Do not use sharp tools or metal objects to break bridges as you could puncture the plastic tank.
Recover from Salt Depletion
Running out of salt will not damage newer Kinetico models immediately but will result in hard water delivery. The system continues to operate mechanically but cannot regenerate the resin beads without brine.
Simply refill the tank to the halfway mark to restore normal function. The system will resume producing soft water once the new brine solution forms.
Deep Clean Your Brine Tank Annually
Even with quality salt, sediment and sludge accumulate over time and hinder performance. Cleaning the tank every six to twelve months prevents odors and ensures efficient regeneration cycles.
Identify Cleaning Triggers
Inspect your tank every six to twelve months or sooner if you notice specific warning signs. Humid climates accelerate crusting and may require more frequent checks every three weeks.
Look for these indicators that cleaning is necessary:
* Foul or musty odors coming from the water
* Scale reappearing on fixtures and appliances
* Dry or sticky feeling skin after showering
* Visible dirt rings or sludge inside the tank
Prepare the System for Service
Ensure the salt level is nearly depleted before starting the cleaning process to minimize waste. Put the system in bypass mode by turning the control dial to yellow to stop water flow.
Wait until after a regeneration cycle completes to avoid interrupting operation. Gather a garden hose, mild dish soap, a rubber mallet, and two five-gallon buckets before beginning.
Safety First: Never use bleach, harsh chemicals, or abrasive pads that could damage internal components or leave harmful residues.
Disassemble and Clean Components
Start by removing the tank lid and scooping salt above the grid plate into a bucket for reuse. Discard any salt found below the grid as it is contaminated and unusable.
Remove the internal parts in this order:
1. Pull the float cup straight up from the brine well tube.
2. Unscrew the nut securing the brine well tube and remove the assembly.
3. Lift out the grid plate and entire tube assembly to expose the tank bottom.
Move the tank outdoors and flip it upside down over gravel to dump loose debris. Tap the exterior gently with a rubber mallet to dislodge stuck sediment without cracking the plastic.
Rinse the interior thoroughly with a garden hose or low-pressure washer. Scrub stubborn dirt rings with a green SOS pad and mild soap solution then rinse completely until the inside looks white and clean.
Reassemble and Adjust Float Height
Reinstall the bottom plate with the flat side facing outward and place the grid plate flat on the base. Insert the brine well tube so the small hole aligns with the tank outlet and hand-tighten the securing nut.
Slide the float cup back into place and ensure it moves freely without contacting the nut. Adjust the float height based on your salt type using a ruler for accuracy.
Set the float height to these specifications:
* Regular Salt: 7¾ inches from bottom to top
* Potassium Chloride: 8¾ inches from bottom to top
Restart the System Correctly
Add one inch of water above the grid plate to jumpstart brine formation immediately. Refill with fresh salt to the halfway mark and consider using hot water to speed initial dissolution.
Turn the bypass dial from yellow back to green to return the system to service mode. Test the float operation by squeezing the arm to ensure it activates and releases smoothly.
Replace Pre-Filter Cartridges Regularly
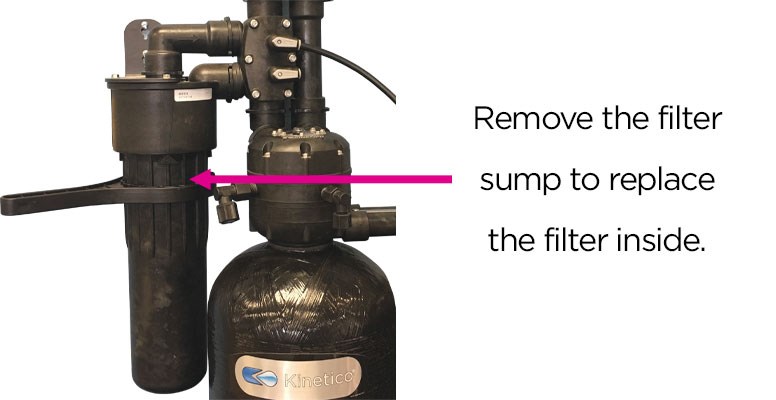
The pre-filter protects your softener resin from sediment and particulates that cause clogging. A neglected filter is the primary cause of low water pressure throughout your entire home.
Follow Replacement Schedules
Replace your pre-filter cartridge every four to six months depending on your water source and usage. Municipal water users can often wait six months while well water users may need changes every three months.
Monitor your water pressure closely and replace the filter immediately if you notice a drop in flow. Ignoring pressure loss strains the system and reduces the lifespan of your resin bed.
Swap the Filter Cartridge
Locate the pre-filter canister typically mounted on the side of the unit or nearby. Turn off the water supply if required by your specific model before proceeding.
Follow these steps to replace the filter:
1. Unscrew the housing canister carefully.
2. Remove the old cartridge and inspect the O-ring.
3. Insert the new cartridge ensuring the O-ring is seated correctly.
4. Reassemble the housing and restore water flow.
Check for leaks around the housing after reinstallation to ensure no unfiltered water bypasses the system.
Troubleshoot Common Water Softener Issues
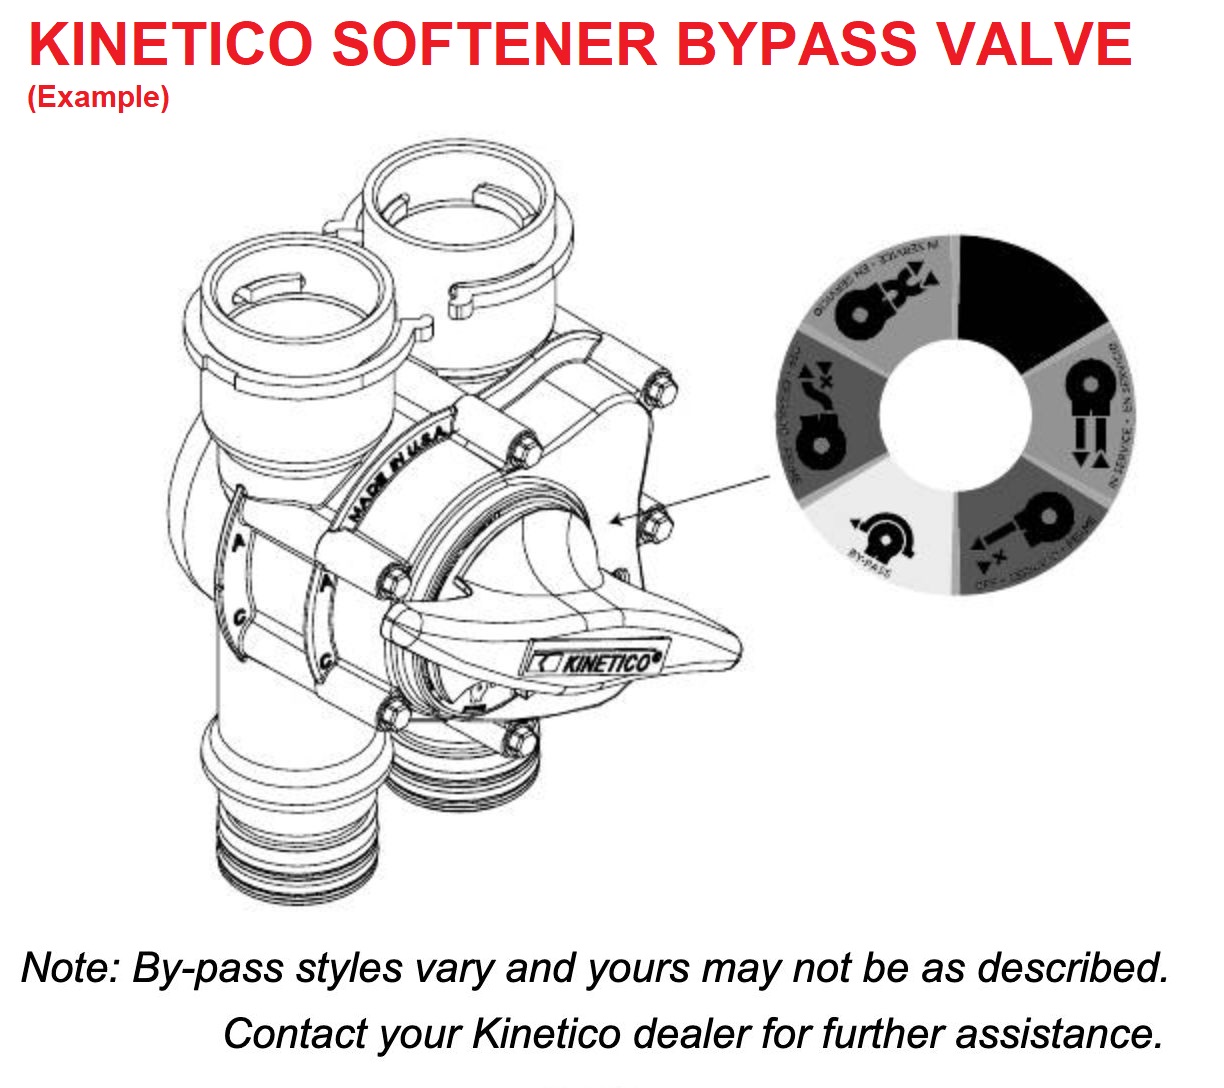
Most performance issues stem from simple causes like salt levels, filter status, or valve settings. Address these common problems quickly to avoid unnecessary service calls.
Restore Soft Water Quality
Verify the blue knob on the valve head is set to Service mode and not Bypass. An accidental bump can switch the valve and stop the softening process entirely.
Check for salt bridges or empty tanks if water feels hard or soap fails to lather. Force a manual regeneration if your usage patterns have changed recently due to guests or vacations.
Use a Phillips screwdriver to force regeneration:
1. Press down on the center valve screw firmly.
2. Turn clockwise until you hear a distinct click.
3. Allow one to two hours for the cycle to complete.
Diagnose Low Water Pressure
A clogged pre-filter is the number one cause of reduced flow throughout the house. Replace the cartridge first before investigating other potential causes.
Put the system in bypass mode if pressure remains low after filter replacement. If pressure improves in bypass mode the resin may be fouled and requires professional attention.
Address Strange Noises
Normal operation includes brief water flow sounds during regeneration cycles. Continuous running, air whooshing, or constant draining indicates a problem needing immediate action.
Try a manual regeneration to reset a stuck valve position. Check that the float is not tilted or jammed which can cause overflow conditions.
Switch to bypass mode immediately if noise or drainage continues to save water. Contact a certified Kinetico expert for internal seal or valve repairs.
Execute Seasonal Maintenance Routines
Environmental factors like temperature and humidity impact how your system performs year-round. Adjust your maintenance routine to account for these seasonal changes.
Prevent Freezing Damage
Systems installed in garages or unheated spaces risk freezing during cold weather. Drain the system and use plumbing-safe antifreeze if temperatures drop below freezing.
Refer to the official Kinetico winterization guide for detailed steps. Never leave water in the tank when freezing conditions are expected.
Combat High Humidity Effects
Moist air causes salt to clump and bridge faster than in dry conditions. Check the tank every three weeks in humid areas to ensure the salt remains loose.
Use high-quality pellets that resist moisture absorption. Keep the tank lid sealed tightly to minimize air exchange and humidity entry.
Schedule Annual Professional Service
Internal components wear over time even with perfect home maintenance. A yearly checkup by a factory-trained technician prevents major failures and extends system life.
Understand Professional Inspections
Technicians check valve operation, seal integrity, and regeneration timing accuracy during service visits. They also inspect the resin bed condition and flush the system with specialized cleaners.
Think of this service as an MOT for your softener that catches invisible issues early. Regular professional maintenance is often required to keep your warranty valid.
Know When to Call Experts
Contact a certified Kinetico expert immediately if water runs to drain continuously. Seek help if pressure stays low after filter changes and bypass testing.
Call for assistance if you suspect internal seal leaks or valve jams. Professional intervention is necessary if the resin looks dark or contaminated.
Frequently Asked Questions About Kinetico Water Softener Maintenance
How often should I clean my Kinetico brine tank?
You should clean the brine tank every six to twelve months depending on usage and water hardness. Humid climates may require cleaning every three weeks to prevent salt clumping and bridging.
What type of salt works best for Kinetico systems?
High-quality pellet or cube salt like Morton in the yellow bag works best for these systems. Avoid rock salt and solar salt as they create excessive sediment and sludge buildup.
Why is my water pressure low after changing the filter?
Low pressure after filter replacement may indicate fouled resin or plumbing issues elsewhere in the home. Put the system in bypass mode to test if the problem lies within the softener unit.
Can I use potassium chloride instead of regular salt?
Yes, potassium chloride is a valid alternative but requires adjusting the float height to 8¾ inches. Regular salt requires a float setting of 7¾ inches for proper operation.
What should I do if my salt tank forms a bridge?
Tap the tank sides gently or use a broom handle to break the crust safely without damaging the tank. Clean the tank thoroughly if the bridge is extensive or sludge has formed.
Does running out of salt damage the system?
Running out of salt will not damage newer Kinetico models immediately but will produce hard water. Simply refill the tank to restore normal softening function within hours.
Key Takeaways for Effective Kinetico Water Softener Maintenance
Proper kinetico water softener maintenance relies on consistent salt management, timely filter changes, and annual tank cleaning. Avoid rock salt, never overfill the tank, and act quickly when pressure drops or water hardness returns.
Schedule your next brine tank inspection today and check your pre-filter replacement date. Taking these proactive steps ensures your system delivers soft, scale-free water for decades to come.