

A Frigidaire water dispenser that suddenly stops working can derail your morning routine. The good news: roughly 70% of dispenser failures come down to a clogged filter, frozen line, or simple switch issue you can fix yourself. This guide walks you through every step of Frigidaire water dispenser repair, from quick checks to component-level fixes.
You’ll learn how the system works, how to test each part with a multimeter, and when it’s smarter to call a technician. Most repairs take under an hour and cost a fraction of a professional service visit, which averages $115 to $250 before parts.
Verify the Water Supply Before Disassembly
Many “broken” dispensers simply lack water. Always check the basics first.
Confirm the Shut-Off Valve and Line
Locate the water supply valve behind your refrigerator. Turn it counterclockwise until snug and fully open. Then pull the fridge forward and inspect the entire supply line for kinks, pinches, or crushing damage, especially where it passes under the unit or through cabinetry.
New installations often trap air pockets in the lines. To purge them:
- Press and hold the dispenser paddle.
- Let water run, even if it sputters at first.
- After 3 minutes, the system auto-shuts off; press again.
- Repeat for 5 to 10 cycles until flow becomes steady.
If no water appears, continue to the next diagnostic step.
Test Supply Pressure
Low household pressure mimics internal component failure. Here’s how to confirm:
- Shut off the supply valve.
- Disconnect the supply line from the fridge.
- Place the open end in a bucket.
- Briefly reopen the valve.
A strong, continuous stream confirms good supply. Weak flow or no water points to a plumbing issue upstream. Call a plumber before proceeding with any internal repairs.
Replace the Water Filter
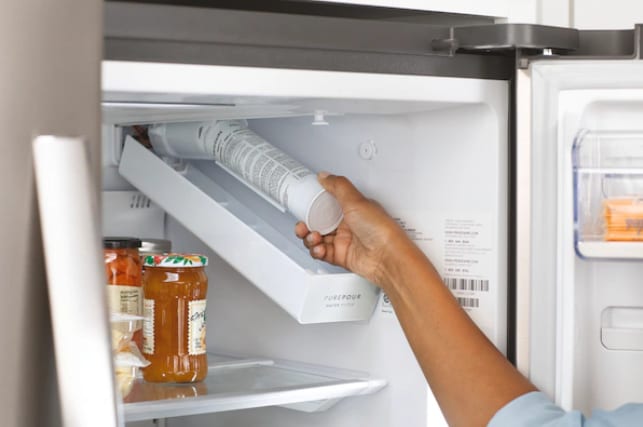
A clogged filter is the number one cause of Frigidaire dispenser failure. Even filters that look clean can block flow after 6 months of use.
Locate and Swap the Filter
Most Frigidaire models place the filter in one of two spots:
• Upper right corner inside the fridge compartment
• Bottom grille beneath the doors
Replacement steps:
- Unplug the refrigerator for safety.
- Press the release button or push down on the old filter.
- Pull it straight out.
- Remove protective caps from the new filter.
- Align the ridges with the housing grooves.
- Push in firmly until you hear a snap.
- Plug the fridge back in.
Use only genuine or certified compatible filters (PureSource or EveryDrop). Non-OEM filters may not seal correctly.
After installation, flush the system by dispensing 2 to 3 gallons to clear air and carbon residue.
Thaw a Frozen Water Line
If your ice maker works but no water flows from the dispenser, a frozen line is the likely culprit. This happens when the fridge runs too cold or ambient temperatures drop sharply.
Use a Hair Dryer Safely
- Unplug the refrigerator.
- Remove the lower front grille (snaps off or has screws).
- Locate the water tube running up the door.
- Set a hair dryer to low heat.
- Warm the area around the tube for 10 to 15 minutes.
Never use a heat gun or open flame. Plastic tubing can melt and cause leaks.
Try the Syringe Thaw Method
For faster results, inject warm water directly into the line:
- Heat water in a microwave (not boiling).
- Fill a syringe or Water Line Buddy tool.
- Disconnect the line at the dispenser end (place a towel below).
- Inject warm water slowly into the tube.
- Repeat until water flows freely.
Prevent recurrence by raising the fridge temperature to 37°F and ensuring proper rear clearance for airflow.
Test the Dispenser Micro Switch

A faulty switch stops the signal from reaching the water valve, even when everything else works perfectly.
Access the Switch
- Unplug the fridge.
- Remove the drip tray (pulls straight out).
- Unscrew the dispenser frame (usually 2 to 3 screws).
- Gently pull the panel down to release the tabs.
- Disconnect the wire harness (photograph it first).
The micro switch sits directly behind the paddle lever.
Check Continuity with a Multimeter
Set your multimeter to continuity or ohms (Ω).
- Disconnect wires from the switch.
- Touch probes to the two terminals.
- Unpressed state should read OL or infinite resistance.
- Pressed state should show 0 to 1 ohm (beep in continuity mode).
No beep when pressed means the switch is dead. Replace it with an OEM part matched to your model number. Reassembly takes 30 to 45 minutes. Tighten screws gently to avoid cracking plastic.
Diagnose the Water Inlet Valve

If the filter, lines, and switch all check out, the solenoid valve may be at fault. This component controls water entry into the fridge.
Locate and Test the Valve
- Unplug the fridge and shut off the water supply.
- Pull the unit away and remove the back access panel (¼ inch screws).
- Find the valve near the compressor with two wires and two water lines.
- Photograph the wiring before disconnecting.
- Disconnect the wires.
Set your multimeter to ohms and touch the probes to the valve terminals:
• Good reading: 100 to 500 Ω
• Bad reading: OL (infinite resistance)
No continuity means the solenoid is burned out and needs replacement.
Replace the Inlet Valve
- Close the water supply.
- Disconnect the water lines (keep a towel ready for residual water).
- Unscrew the valve from its mounting bracket.
- Install the new valve and reconnect lines and wires.
- Restore water and power.
Test the dispenser and check all connections for leaks. This repair rates as hard due to tight space and plumbing work. If uncomfortable, consider professional help.
Fix a Broken Dispenser Paddle

A loose or floppy paddle usually means the internal hinge cracked, a known issue on Whirlpool-manufactured Frigidaire models.
Try the Super Glue Fix (Temporary)
For a quick, low-cost repair:
- Unplug the fridge.
- Remove the front cover (3 screws).
- Disconnect the water line (friction fit, pulls straight off).
- Remove the two paddle screws and replace corroded ones with stainless steel.
- Clean broken surfaces with isopropyl alcohol.
- Apply Loctite Ultra Gel to the crack.
- Hold for 10 seconds and let cure overnight.
This fix can last months but isn’t permanent. Temperature swings weaken the bond over time.
Install a New Paddle Assembly (Permanent)
Order the full paddle kit (such as Frigidaire part 242270102) before starting.
Steps:
1. Remove the old paddle as described above.
2. Transfer the bracket to the new assembly if needed.
3. Insert the new paddle and secure with screws.
4. Reconnect water and power.
Total time: about 30 minutes. Cost: around $30. This is the only long-term solution.
Replace the Full Dispenser Module

When multiple components fail or wiring shows damage, replacing the entire module makes sense.
Remove the Old Module
- Unplug the fridge and shut off the water.
- Remove the lower trim screws.
- Unscrew the control panel at the bottom of the interface.
- Gently pull the panel downward to release clips.
- Disconnect the wire harness (note the orientation).
- Remove the module screws.
- Release the water tube from clips and guide holes.
Label wires if needed for accurate reassembly.
Install the New Module
- Thread the water line through the new module’s guides.
- Secure the tube in clips to prevent movement.
- Mount the module and tighten the screws.
- Reconnect the harness exactly as before.
- Snap the interface panel back into place.
- Reinstall screws and trim.
Restore power and water, then test the dispenser immediately. Check all connections for leaks. Use a model-specific part, since Frigidaire’s Gallery, Professional, and Standard lines use different modules.
Test the Door Switch
A bad door switch can disable the dispenser by signaling that the door is open.
Locate and Test
- Open the fridge door.
- Find the switch on the right wall (plastic plunger type).
- Gently pry it out with a putty knife.
- Disconnect the wires.
- Test with a multimeter in continuity mode.
Press the plunger:
• Should beep when pressed
• No beep means the switch needs replacement
Reconnect and reinsert the switch. If the dispenser works afterward, the switch was the culprit. Door switch failure often coincides with interior lights staying on or off unexpectedly.
Know When to Replace the Control Board
If every other part tests good but the dispenser still won’t work, the control board may be faulty.
Signs of Board Failure
• No power reaching the dispenser
• Error codes on the display
• Intermittent operation
• Ice maker also unresponsive
Diagnosis requires checking voltage output to the solenoid when the switch is pressed, best done with a technician’s tools.
Cost vs. Repair Decision
Control boards cost $170 to $400 and require precise wiring. Unless you’re experienced with appliance electronics, call a professional. Also consider the fridge’s age: units over 10 years old may not justify the repair cost.
Frequently Asked Questions About Frigidaire Water Dispenser Repair
Why is my Frigidaire water dispenser not working but the ice maker is?
This usually points to a frozen water line, clogged filter, or faulty dispenser micro switch. Start by replacing the filter and thawing the line with a hair dryer. If those don’t help, test the micro switch with a multimeter.
How often should I replace my Frigidaire water filter?
Every 6 months. Even if water looks clear, filters accumulate sediment and carbon residue that block flow over time. Set a reminder or follow the indicator light on premium models.
Can I use a non-OEM filter in my Frigidaire refrigerator?
Yes, but only if it’s certified compatible (such as EveryDrop). Non-certified filters may not seal properly and can cause leaks or reduced flow. Genuine PureSource filters offer the best fit and performance.
What does it cost to repair a Frigidaire water dispenser?
DIY repairs range from $5 for a frozen line thaw to $60 for an inlet valve. Professional service calls add $115 to $250 before parts. Most homeowners save $150 or more by handling repairs themselves.
How do I know if my water inlet valve is bad?
Test it with a multimeter set to ohms. A good valve reads 100 to 500 Ω. A bad valve reads OL (infinite resistance). Also check for sediment buildup or a valve that doesn’t open when the dispenser is activated.
Is it worth repairing a 10-year-old Frigidaire refrigerator?
It depends on the repair. Simple fixes like filters, switches, and valves are worth it. Expensive repairs like control boards ($170 to $400) on older units may not make financial sense compared to replacing the fridge.
Key Takeaways for Successful Frigidaire Water Dispenser Repair
Most Frigidaire water dispenser problems come from three simple causes: clogged filters, frozen lines, and faulty switches. Replace your filter every 6 months, keep the fridge temperature at 37°F, and maintain 2 to 3 inches of rear clearance to prevent freezing.
Always unplug the refrigerator and shut off the water before any repair. Use a multimeter to test components logically, starting with the easiest fixes first. Photograph wiring before disconnecting anything, and use only OEM or certified parts matched to your specific model number.
For paddle repairs, the super glue method works temporarily but a $30 replacement assembly is the only permanent fix. Save hundreds by handling these repairs yourself, and call a technician only when the control board fails or plumbing work feels beyond your skill level.


