

Does your Frigidaire refrigerator not dispensing water despite having a full ice tray? This frustrating issue often stems from a locked control panel, clogged filter, or frozen water line. You can usually fix these problems quickly without expensive service calls.
This guide provides step-by-step instructions to diagnose and repair your unit. You will learn how to test water pressure, thaw frozen lines, and replace faulty components like the inlet valve. Follow these proven methods to restore fresh water flow today.
Check Control Lock Status First

A locked display is the most common reason a Frigidaire refrigerator stops dispensing water. The control lock feature prevents accidental activation, which is useful for households with children. If your buttons feel unresponsive, check this setting before assuming a mechanical failure.
How to Unlock the Dispenser Panel
To restore function, you must toggle the lock state manually.
* Locate the “Lock” button on your dispenser interface.
* Press and hold the button for exactly 3 seconds.
* Listen for an audible beep or watch for the lock icon to disappear.
* Test the water lever immediately to confirm the system is active.
If the panel remains unresponsive after unlocking, the issue may lie deeper within the electrical system. Always verify the lock status after any power outage, as some models revert to a locked state when power is restored.
Verify Water Supply and Pressure Levels
Insufficient water pressure or a closed supply valve will prevent your refrigerator from dispensing. The water inlet valve requires specific pressure to open and allow water into the unit. Without adequate force, the dispenser remains dry regardless of other conditions.
Test Household Water Pressure
Your home water pressure must fall between 20 PSI and 120 PSI for proper operation. Pressure below 20 PSI is insufficient to activate the inlet valve mechanism.
1. Turn off the water supply valve located behind or under the refrigerator.
2. Disconnect the water line at the push-to-connect coupling on the back of the unit.
3. Place a bucket under the open line and briefly turn the supply valve back on.
4. Observe the strength of the water stream exiting the line.
Strong flow? Your house supply is adequate, pointing to an internal fridge issue.
Weak or no flow? Check the main shutoff valve under your sink or near the fridge connection. Ensure it is fully open. You may need to install a pressure gauge for an accurate reading if the problem persists.
Inspect Supply Line for Kinks
A bent or pinched water line behind the refrigerator can completely stop water flow. Pull the refrigerator forward carefully to inspect the path from the wall to the unit. Look for sharp bends, crushed sections, or loose fittings. Straighten any kinks immediately and reconnect the line securely. Replace damaged lines with a new 1/4-inch copper or braided supply line.
Replace and Prime the Water Filter

A clogged or improperly installed water filter is a leading cause of slow or non-existent water flow. Filters trap sediment and carbon particles, but they become restrictive over time. Replacing an old filter often resolves flow issues instantly.
Install the Correct Filter Model
Using the wrong filter model can restrict flow or cause leaks. Always match your refrigerator model number to the correct filter, such as the FPR1000S1.
1. Open the filter compartment, typically located in the upper rear interior of the fridge.
2. Push the old filter in slightly to release the locking mechanism, then pull it straight out.
3. Remove the protective caps from the new filter and insert it into the housing.
4. Push firmly until the filter clicks into place.
Prime the System After Installation
You must prime the system after every filter change to remove air pockets and carbon dust.
* Dispense 4–6 cups of water through the dispenser.
* Expect some sputtering initially as air escapes the lines.
* Continue until the water runs clear and steady.
Skipping this priming step traps air in the line, causing the dispenser to sputter or fail entirely. If your old filter shows cracks or bulges, check your freezer temperature, as freezing can damage the filter housing.
Use the Ice Maker to Diagnose the Issue
The ice maker serves as an excellent diagnostic tool to isolate the problem area. By observing whether the ice maker produces ice, you can determine if the issue is systemic or isolated to the dispenser.
No Ice Production Indicates Upstream Failure
If your Frigidaire is not making ice and not dispensing water, the problem lies upstream. The water inlet valve is the primary suspect in this scenario. Since this single valve controls water flow to both the ice maker and the dispenser, a failure here stops all water functions. Check the water supply and inlet valve first.
Ice Production Isolates the Dispenser
If the ice maker is producing ice normally, water is successfully entering the refrigerator. This confirms:
* The water inlet valve is functioning.
* The main water supply is adequate.
* The issue is isolated to the dispenser assembly.
Focus your troubleshooting on the frozen dispenser line, clogged filter, faulty dispenser switch, or control board signals. This simple test eliminates half the possible causes and saves significant diagnostic time.
Test the Water Inlet Valve Functionality
A failed water inlet valve stops water before it ever enters the refrigerator interior. This component sits at the bottom rear of the unit and regulates flow based on electrical signals.
Locate and Test the Valve
To test the valve for electrical continuity, follow these steps:
1. Turn off the power and water supply to the refrigerator.
2. Remove the lower back access panel to expose the valve.
3. Disconnect the electrical connectors from the valve solenoids.
4. Set a multimeter to the ohms (Ω) setting.
5. Touch the probes to each solenoid terminal to check for continuity.
No continuity? The valve is electrically dead and requires replacement. Even if the valve tests good electrically, sediment buildup can block internal passages. If you have strong water pressure at the supply line but no flow into the fridge, replace the valve.
Bypass the Valve for Confirmation
You can confirm valve function by bypassing it temporarily. Remove the water line from the valve’s outlet side and place a bowl underneath. Briefly turn the water supply back on. If water flows freely, the valve is clogged or failing to open. If no water flows, the issue remains with the household supply or shutoff valve. Replacement valves typically cost between $40 and $80.
Thaw a Frozen Water Line

A frozen water line is a frequent culprit, especially in cold kitchens or when freezer temperatures are set too low. Ice blocks the narrow tube running through the door, stopping water flow while potentially leaving the ice maker functional.
Confirm Freezer Temperature Settings
Set your freezer temperature to 0°F or slightly higher. Temperatures below this threshold increase the risk of the water tube freezing inside the door panel. If your freezer is colder than -2°F, adjust the thermostat and wait 24 hours before retesting the dispenser.
Access the Dispenser Assembly
To reach the frozen line, you must partially disassemble the freezer interior:
1. Remove the bottom storage tray inside the freezer compartment.
2. Unscrew the three screws securing the back cover panel.
3. Carefully disconnect the electrical plug from the dispenser unit by pressing the retention tab.
4. Remove the three additional screws holding the dispenser assembly in place.
5. Gently pull the water tube out from the bottom of the fridge.
Warning: Never use pliers to pull the tube, as this can crush or rupture the plastic tubing.
Defrost the Line Safely
Choose one of the following methods to thaw the ice blockage:
* Flush with Hot Water: Hold the tube over a sink and pour hot (not boiling) water through it repeatedly until flow is restored.
* Use a Syringe: Fill a large syringe with warm water and inject it forcefully into the top end of the tube to break up the ice.
* Apply a Hair Dryer: Reinstall the tube temporarily and use a hair dryer on low heat along the outer edge of the door. Move slowly to avoid melting internal insulation.
Once thawed, reassemble the unit in reverse order. Test the dispenser after waiting 10–20 seconds for water to travel from the valve to the spout.
Inspect the Dispenser Switch and Control Board
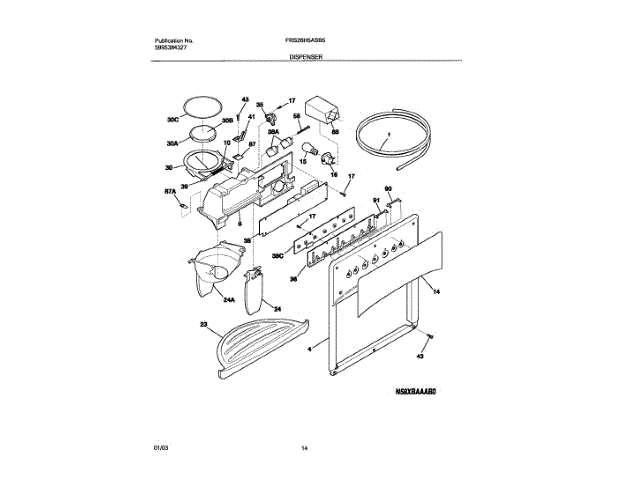
Electrical faults can mimic mechanical failures, leading to misdiagnosis. If water lines are clear and the inlet valve works, check the components that trigger the water flow.
Test the Dispenser Switch
The dispenser switch activates when you press a cup against the lever. To test it:
1. Remove the dispenser cover, which usually snaps off.
2. Locate the switch positioned behind the lever mechanism.
3. Set a multimeter to continuity mode.
4. Press the switch manually while monitoring the meter.
If the meter shows no beep or reading when pressed, the switch is defective. Order a replacement part that matches your specific model number.
Check the Control Board
The main control board sends the necessary signals to the water inlet valve and dispenser motor. Signs of board failure include unresponsive buttons even when unlocked, displayed error codes, or an ice maker that works while the water valve receives no signal. Ensure your refrigerator has steady power, as voltage fluctuations can corrupt board operation. If all other components test correctly, the control board may need professional replacement.
Follow the Ultimate Troubleshooting Checklist
Use this logical flow to fix your Frigidaire refrigerator not dispensing water efficiently:
| Step | Action | If True | Do This |
|---|---|---|---|
| 1 | Is display locked? | Buttons unresponsive | Hold Lock for 3 sec |
| 2 | Is ice being made? | No ice | Test inlet valve and supply |
| Ice is made | Focus on dispenser line/switch | ||
| 3 | Filter older than 6 months? | Slow or no flow | Replace & prime filter |
| 4 | Test supply line flow | Weak flow | Check house pressure or valve |
| Strong flow | Look for frozen line | ||
| 5 | Freezer below 0°F? | Suspected freeze | Thaw line with warm water |
| 6 | All mechanical checks pass? | Still no water | Test switch and control board |
Sticking to this order eliminates guesswork and helps you identify the root cause quickly.
Prevent Future Dispensing Problems
Regular maintenance prevents most water dispensing issues from recurring. Implement these habits to ensure long-term reliability.
Replace Filter Every 6 Months
Set a calendar reminder to change your water filter every six months. A fresh filter ensures maximum flow rate, better-tasting water, and reduced strain on the inlet valve.
Maintain Proper Freezer Temperature
Keep your freezer set at 0°F. Colder settings significantly increase the risk of the water line freezing, especially during short-term usage cycles.
Flush After Filter Changes
Always run 4–6 cups of water after installing a new filter. This process removes loose carbon dust and eliminates air pockets that cause sputtering.
Inspect Supply Line Annually
Check the water supply line once a year for kinks, leaks, or wear. This is especially important if you move your refrigerator frequently for cleaning or flooring projects.
When to Call a Professional
Some issues require expert assistance or specialized tools. You should seek professional service if:
* Replacing the inlet valve does not restore water flow.
* The control board displays persistent error codes like “FF” or “SE”.
* You notice water leaking from the dispenser area or door.
* You feel uncomfortable disassembling internal electrical components.
For units installed within the last 30 days, contact your original installer. Improper line setup is common in new homes and may be covered under installation warranties.
Frequently Asked Questions About Frigidaire Water Dispensing
Why is my Frigidaire refrigerator not dispensing water but making ice?
This indicates the water inlet valve and main supply are working. The issue is likely a frozen water line in the door, a clogged filter, or a faulty dispenser switch. Focus your troubleshooting on these specific components.
How do I unlock a Frigidaire water dispenser that is locked?
Press and hold the “Lock” button on the control panel for exactly 3 seconds. You should hear a beep or see the lock icon disappear, indicating the dispenser is now active.
What water pressure is required for a Frigidaire dispenser to work?
Your home water pressure must be between 20 PSI and 120 PSI. Pressure below 20 PSI is insufficient to open the water inlet valve, resulting in no water flow.
How often should I replace my Frigidaire water filter?
Replace the water filter every 6 months. A clogged filter can reduce water flow by up to 50% and affect the taste and quality of your drinking water.
Can a frozen water line cause no water but still make ice?
Yes. The ice maker uses a different fill cycle and location than the dispenser. If the line running through the door freezes due to low freezer temperatures, water dispensing stops while ice production continues.
What should I do if the water dispenser sputters after changing the filter?
This is normal and indicates air in the lines. You must prime the system by dispensing 4–6 cups of water. This removes air pockets and carbon dust, restoring steady flow.
Key Takeaways for Fixing Your Frigidaire Refrigerator Not Dispensing Water
Most cases of a Frigidaire refrigerator not dispensing water are resolved by checking the control lock, replacing the water filter, or thawing a frozen line. Start with these simple, user-accessible fixes before moving to complex mechanical tests. Regular maintenance, such as changing filters every six months and monitoring freezer temperatures, prevents most future issues.
If basic troubleshooting fails, use the ice maker test to isolate the problem to the inlet valve or dispenser assembly. With the right diagnostic approach, you can restore your water dispenser efficiently. If you encounter electrical faults or persistent leaks, contact a certified technician for safe repair.


