
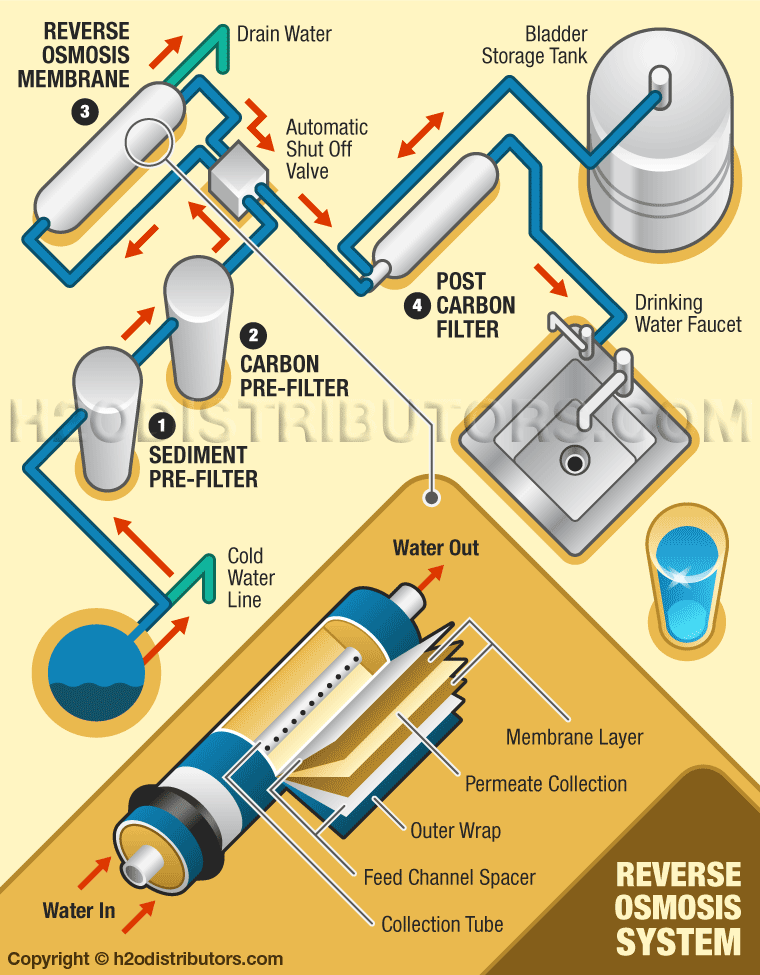
Is your reverse osmosis water filter producing low flow, bad-tasting water, or leaking? These systems are powerful but complex, and even small issues like a clogged filter or under-pressurized tank can shut down performance completely. The good news: most problems are fixable with basic tools and a step-by-step approach. In this guide, you’ll learn how to diagnose and repair every common RO system failure, from continuous drain flow to zero water output. We’ll walk you through inspection, testing, and repair using proven techniques so you can restore clean, fast-flowing water fast.
Diagnose Continuous Drain Flow
If your RO system runs nonstop and sends water down the drain, it’s wasting water and likely won’t fill the tank. This is one of the most common RO failures, and it usually points to a valve or flow issue.
Test and Replace Faulty ASO Valve
The automatic shut-off valve stops water flow when the tank is full. If it fails, water keeps running.
How to test:
1. Open the RO faucet and let out 20 oz of water.
2. Watch the drain line.
* If flow stops, the ASO is working.
* If flow continues, the ASO may be faulty.
Fix: Replace the ASO valve. Match the model to your system. Turn off water, disconnect tubing, and install the new valve with proper orientation.
Check for Leaking Check Valve
The check valve prevents backflow from the tank. If it leaks, pressure cannot build, so the ASO won’t close.
Test:
1. Shut off the feed water while the system is running.
2. Observe the drain line.
* Water continues flowing means the check valve is leaking.
* Flow stops means the ASO is the likely culprit.
Fix: Replace the check valve at the outlet of the membrane housing.
Inspect Flow Restrictor
The flow restrictor controls how much water goes to the drain. If it’s missing, clogged, or the wrong size, the system cannot build pressure.
Check flow rate:
1. Disconnect the drain line at the saddle.
2. Collect water for 30 seconds.
3. Multiply by 2 to get oz/min.
4. Compare to expected values.
| Membrane (GPD) | Expected Drain Flow (oz/min) |
|---|---|
| 50 | 350–400 |
| 75 | 575–650 |
| 100 | 730–900 |
Fix: Install the correct flow restrictor. For a 50 GPD system, use approximately 150 ml/min.
Restore Low or No Faucet Flow
When your RO faucet trickles or produces nothing, the cause is often simple: a water-logged tank, clogged filter, or closed valve.
Test and Re-Pressurize Storage Tank

A failed bladder prevents pressure buildup, killing flow.
Diagnose:
* Weight test: Empty tank weighs 1–2 lbs; full tank weighs 20–28 lbs. If heavy but delivers little water, it’s water-logged.
* Tap test: Hollow sound means empty; solid thud means full.
* Pressure test: Use a tire gauge on the Schrader valve after draining the tank. It should read 6–8 psi when empty.
Re-pressurize if bladder is intact:
1. Shut off feed water and close the tank valve.
2. Open the faucet to drain completely.
3. Disconnect the tank and drain it fully.
4. Inflate to 7 psi using a bike pump.
5. Reconnect and wait 2–4 hours to refill.
Replace the tank if pressure won’t hold. Cost is typically $45–$50.
Replace Clogged or Expired Filters
Old filters restrict flow and reduce water quality.
Check flow:
1. Close the tank valve.
2. Open the faucet and let it drip for a minute.
3. Collect water for 60 seconds.
4. Measure in oz/min.
Compare to expected permeate flow:
| Membrane (GPD) | Expected Permeate (oz/min) |
|---|---|
| 50 | 3.0–4.0 |
| 75 | 4.5–6.0 |
| 100 | 8.0–9.0 |
Fix: Replace sediment filters every 6–12 months, carbon pre-filters every 6–12 months, post-filters every 6–12 months, and RO membranes every 2–3 years.
Check Valves and Tubing for Blockages
A closed valve or kinked tube stops flow entirely.
Fix:
* Ensure the tank ball valve is open.
* Confirm the feed water valve is fully open.
* Inspect tubing for kinks, crushing, or disconnection.
* Cut tubing cleanly with a tubing cutter and insert approximately 1 inch into fittings.
Silence Noisy RO Operation
Gurgling, hissing, or vibrating noises are not normal. They usually mean air, high drain flow, or loose parts.
Purge Trapped Air
After filter or membrane changes, air enters the system.
Fix: Run the system for 10–15 minutes. Open the faucet and let water flow until the noise stops.
Secure Drain Line and Saddle
A loose drain saddle or vibrating tube causes noise.
Fix:
* Tighten the drain saddle on the P-trap.
* Ensure drain tubing has a continuous downward slope.
* Prevent siphoning by routing the line up to form an air gap loop above the sink drain.
Test for Excessive Drain Flow
High flow causes gurgling and wastes water.
Measure:
1. Disconnect the drain at the saddle.
2. Time 30 seconds of flow.
3. Multiply by 2.
If flow exceeds expected values, check the flow restrictor, ASO valve, and check valve.
Fix Poor Water Quality

If your RO water tastes bad, smells, or has high TDS, it’s not filtering properly.
Replace Carbon Filters
Chlorine taste or musty odor means expired carbon filters.
Fix: Replace both pre- and post-filters. Use carbon block filters for best VOC and chlorine removal.
Sanitize Against Bacterial Growth
Stagnant water breeds biofilm, causing foul or rotten egg smells.
Clean:
1. Mix 1 tbsp unscented bleach per gallon of water.
2. Pour into the RO faucet.
3. Let sit 20–30 minutes.
4. Flush the system for 5–10 minutes.
Replace the storage tank if odor persists, as biofilm cannot be fully removed from inside.
Test and Replace RO Membrane
High TDS means the membrane is failing.
Test:
1. Use a TDS meter on tap water.
2. Test RO water output.
3. If output TDS exceeds 10–15% of input, replace the membrane.
Stop Leaks at Housings and Fittings
Leaks are common after filter changes. Most stem from O-rings or tubing.
Inspect and Lubricate O-Rings
Dry, cracked, or misaligned O-rings leak.
Fix:
1. Shut off water and relieve pressure.
2. Remove the filter housing.
3. Check the O-ring for cracks, flattening, or stretching.
4. Clean and lubricate with food-grade silicone grease.
5. Reinstall, ensuring the O-ring is fully seated.
Repair Tubing Connections
Scratched or improperly inserted tubing leaks.
Fix:
* Cut tubing with a tubing cutter for a clean end.
* Insert 1 inch into quick-connect fittings.
* Pull gently to test security.
* Replace kinked or damaged sections.
Repair Air Gap Faucet Leaks
Air gap faucets leak due to clogs or excess tubing.
Clear Clogged Air Gap Chamber
Water backs up if the air gap is blocked.
Fix:
1. Remove the chrome cover.
2. Clean the chamber with a pipe cleaner or small brush.
3. Flush with water.
Shorten Drain Tubing
Excess tubing creates loops that trap water.
Fix: Keep tubing short and straight from faucet to drain saddle. Avoid tight bends or siphons.
Replace Base O-Ring
A failed O-ring under the faucet base causes leaks.
Fix:
1. Remove the faucet.
2. Replace the O-ring.
3. Lubricate with vegetable oil before reassembly.
4. Tighten the base nut securely.
Perform Flow Rate Testing
Flow tests reveal system health. Use them to confirm repairs.
Test Permeate Flow
- Close the tank valve.
- Open the faucet.
- Wait for a steady drip.
- Collect water for 60 seconds.
- Measure in oz/min.
Test Drain Flow
- Disconnect the drain at the saddle.
- Collect for 30 seconds.
- Multiply by 2.
Interpret Results
- Both low means clogged pre-filters or low feed pressure.
- Drain high, permeate low means wrong or missing flow restrictor.
- Both zero means closed valve or kinked tubing.
- Both normal means the problem is the tank, faucet, or post-filter.
Follow Preventive Maintenance Schedule
Prevent failures with regular upkeep.
| Component | Replace Every | Notes |
|---|---|---|
| Sediment Filter | 6–12 months | More often in sandy water |
| Carbon Filter | 6–12 months | Protects membrane from chlorine |
| RO Membrane | 2–3 years | Replace if TDS jumps or flow drops 50% |
| Post-Filter | 6–12 months | Ensures great taste |
| Storage Tank | 5–7 years | Replace if bladder fails |
Handle Special Cases
Well Water Systems
RO does not remove dissolved gases like hydrogen sulfide.
Fix: Install aeration, greensand filter, or carbon tank before RO. Remove chlorine to protect the TFC membrane.
Cold Water Installations
RO output drops below 50°F.
Fix: Install in a heated area. Use a permeate pump or booster pump for better performance.
Use the Right Tools
Have these on hand:
* Low-pressure tire gauge
* Bike pump
* Tubing cutter
* Food-grade silicone lubricant
* Replacement O-rings
* TDS meter
* Measuring cup
* Bucket
* Unscented bleach for sanitizing
When to Call a Professional
Seek help if:
* Repairs fail after full diagnosis
* Feed pressure is below 30 psi and needs a booster pump
* Membrane replacement seems too complex
* Leaks persist after O-ring fixes
* You suspect cross-connection or code issues
Frequently Asked Questions About Reverse Osmosis Water Filter Repair
Why does my RO system run constantly and never stop?
This usually indicates a faulty automatic shut-off valve, a leaking check valve, or a missing flow restrictor. Test each component and replace the faulty part to restore normal operation.
How do I know if my RO storage tank needs replacement?
If the tank feels heavy but delivers little water, won’t hold air pressure, or produces no output despite other components working, the bladder has likely failed and the tank needs replacement.
What causes low water flow from my RO faucet?
Low flow is typically caused by a water-logged tank, clogged filters, a closed ball valve, or kinked tubing. Check each of these areas systematically to identify the cause.
How often should I replace my RO filters?
Sediment and carbon filters should be replaced every 6–12 months. The RO membrane typically lasts 2–3 years, depending on water quality and usage.
Why does my RO water taste bad?
Bad taste usually comes from expired carbon filters, bacterial growth in the system, or a failing RO membrane. Replace filters first, then sanitize if needed, and test the membrane if problems persist.
Can I repair my RO system myself, or do I need a professional?
Most RO problems are fixable with basic tools and the steps in this guide. Call a professional if feed pressure is below 30 psi, if membrane replacement is needed, or if leaks persist after replacing O-rings.
Key Takeaways for Fixing Your Reverse Osmosis Water Filter
Most RO problems are fixable with patience and the right approach. Start by diagnosing continuous drain flow with ASO and check valve tests. Restore low faucet flow by checking tank pressure, replacing clogged filters, and ensuring all valves are open. Fix poor water quality through filter replacement, system sanitization, and membrane testing. Address leaks at housings by inspecting and lubricating O-rings, and cut tubing cleanly for proper fitting. With regular maintenance including filter changes every 6–12 months and membrane replacement every 2–3 years, your RO system can deliver clean, great-tasting water for 5–10 years. Now that you know how to fix reverse osmosis water filter issues, you’re ready to restore performance fast.