You press the lever on your KitchenAid refrigerator and nothing happens. No water flows, no motor hums, and the silence is frustrating. This common issue often stems from a simple setting like Control Lock or a clogged filter rather than a broken machine.
This guide helps you diagnose why your KitchenAid refrigerator not dispensing water by checking locks, filters, and switches first. You will learn step-by-step repairs to restore flow without needing an expensive service call.
Verify Control Lock Status Immediately
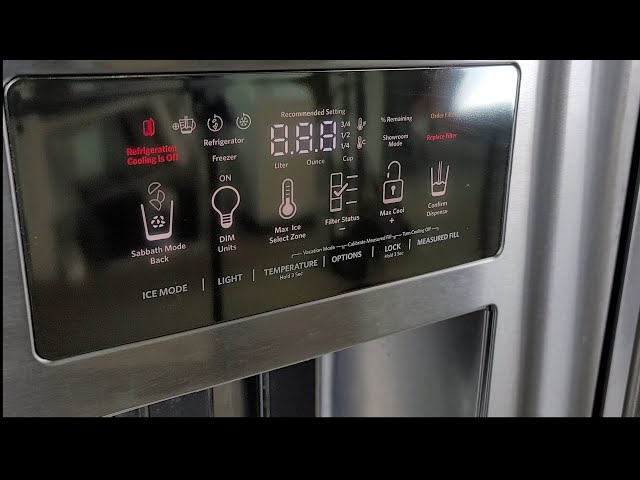
A locked control panel is the most frequent reason for a non-responsive dispenser. The system disables all buttons to prevent accidental activation, leaving you with no water output.
How to Unlock the Dispenser Panel
Check your display for a lock icon or notice if the buttons feel unresponsive to touch.
- Locate the button labeled “TO LOCK” or marked with a padlock symbol.
- Press and hold this button for exactly three seconds.
- Watch the display until the lock indicator disappears.
- Test the water lever to confirm the panel responds.
If the lock icon remains or the panel stays dead, ensure your refrigerator has power. This quick check solves many “broken” dispenser complaints instantly.
Pro Tip: If you cannot find the lock button, search for your specific model number on the KitchenAid website to download the manual.
Replace or Re-Seat the Water Filter

A clogged or misaligned filter restricts water flow significantly. Even a new filter can cause issues if it is not seated correctly or if it is a defective off-brand unit.
Identify Filter Failure Symptoms
Look for signs that your current filter is blocking the water path or failing to seal.
- Water flows intermittently or stops completely.
- Ice production slows down or halts.
- Water tastes bad or has an unusual odor.
- The filter does not click firmly into place.
KitchenAid recommends changing filters every six months to maintain pressure and quality. Using generic filters often leads to fitment problems that block flow.
Reinstall or Swap the Filter
Remove the current filter and inspect it for cracks or swelling before putting it back.
- Twist the filter counter-clockwise to remove it from the housing.
- Check the O-rings for damage and ensure the filter is clean.
- Reinsert the filter and rotate clockwise until it clicks loudly.
- Run water for two minutes to clear air pockets.
If water still does not flow after reseating, install a genuine KitchenAid filter. If the problem persists with a new OEM filter, the issue likely lies with the internal filter head.
Expert Note: Many users assume a major breakdown when the real culprit is simply a filter that was not clicked in all the way.
Inspect Water Supply Lines for Blockages
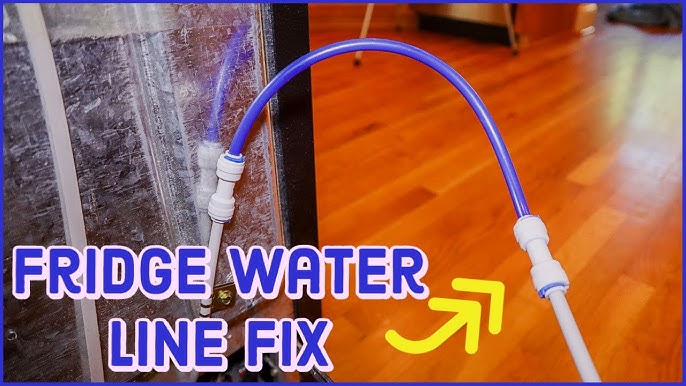
Water cannot reach your glass if the supply line is kinked, pinched, or frozen solid. Physical obstructions in the tubing are common causes of sudden flow loss.
Locate and Fix Kinks in Tubing
Pull the refrigerator away from the wall carefully to access the back and bottom areas.
- Examine the water line behind the unit for sharp bends.
- Straighten any kinks gently to restore the circular path of the tube.
- Ensure the line is not pinched between the fridge and the wall.
Thaw a Frozen Water Line
Lines running near the freezer compartment can freeze internally, creating an ice blockage.
- Turn off the ice maker to stop production cycles.
- Set the freezer temperature slightly warmer, such as 10°F, for 12 to 24 hours.
- Wait for the internal ice plug to melt completely.
- Reset the temperature and test the dispenser.
If thawing restores flow, consider adding insulation to the line or adjusting your freezer settings to prevent recurrence.
Test Electrical Switches for Continuity

Two electrical switches control the dispensing signal. If either switch fails, the valve never receives power to open, resulting in silence.
Diagnose Door Switch Problems
The door switch tells the fridge the door is closed, allowing the dispenser to operate safely.
- Symptom: The dispenser is dead even when the door is shut tight.
- Test Method: Unplug the fridge, locate the switch near the door frame, and use a multimeter.
- Procedure: Remove wires and test for continuity while manually pressing the switch.
- Result: Infinite resistance means the switch is broken and needs replacement.
Never force a stiff switch as this can break the plastic housing. Replace it if it feels faulty.
Check Dispenser Switch Function
The dispenser switch activates when you physically press the water lever or paddle.
- Symptom: Pressing the paddle yields no click or sound.
- Test Method: Access the switch behind the front panel and disconnect wires.
- Procedure: Use a multimeter to check for continuity while pressing the lever.
- Result: Lack of continuity confirms the switch has failed electrically.
Both switches are low-voltage components but require the power to be off before testing. Replacement parts are affordable and often include installation instructions.
Replace the Internal Filter Head Assembly
If filters and switches are good, the internal filter head is the likely failure point. This component connects the filter to the water system and frequently wears out.
Recognize Filter Head Failure Signs
Look for specific indicators that the head assembly itself is compromised.
- No water flows and no sound occurs when dispensing.
- Water leaks around the filter housing area.
- The filter feels loose or will not lock in place.
- Drips appear after removing the filter.
A cracked or worn filter head cannot seal properly, blocking flow regardless of filter condition.
Install New Filter Head in Six Steps
Follow this precise procedure to replace the assembly without causing leaks.
- Confirm Silence: Ensure the dispenser makes no sound when pressed to rule out valve issues.
- Access the Head: Open the filter compartment, take a photo of the setup, and remove the filter.
- Release Clips: Use a screwdriver to release the two retaining clips holding the head.
- Disconnect Lines: Move the fridge, remove the rear panel, and use two wrenches to disconnect water lines at the back.
- Transfer Housing: Move the plastic housing from the old head to the new one for proper alignment.
- Reassemble and Test: Route lines exactly as photographed, reconnect fittings, secure clips, and run water to check for leaks.
Pro Tip: Run two to three gallons of water after installation to flush air from the new assembly.
Evaluate the Water Inlet Valve Condition
The water inlet valve controls water entry from your home supply into the refrigerator. Failure here prevents any water from entering the system.
When to Suspect Inlet Valve Failure
Consider this component if all other checks pass but flow remains zero.
- Water pressure at the wall supply is strong.
- Filter, lines, and switches are fully functional.
- The internal filter head has been replaced recently.
This valve sits at the back of the unit where the main water line connects.
Seek Professional Repair Services
Replacing an inlet valve often involves complex plumbing and electrical work.
- Risk Factor: Improper installation can cause flooding or damage refrigerant lines.
- Recommendation: Contact a certified technician for valve diagnosis and replacement.
- Reasoning: Professionals have the tools to test voltage and pressure accurately.
Attempting this repair yourself without experience risks significant water damage to your kitchen floor.
Prevent Future Dispensing Issues
Regular maintenance prevents most water dispensing failures before they start. Simple habits keep your system running smoothly.
Maintain a Replacement Schedule
Set a calendar reminder to change your water filter every six months. Even if water tastes fine, internal clogging reduces pressure over time.
Use Only Genuine Filters
Original Equipment Manufacturer (OEM) filters ensure perfect fit and function. Generic alternatives often cause:
- Poor seating and leaks
- Restricted water flow
- Damage to the filter head threads
Inspect Lines Annually
Once a year, pull the fridge out to check the water line condition. Look for kinks, wear, or dampness around connections. Keeping the interior dry also protects switches from moisture damage.
Frequently Asked Questions About KitchenAid Water Dispensing
Why is my KitchenAid refrigerator not dispensing water but the ice maker works?
This usually indicates a problem specific to the water dispenser path, such as a frozen dispenser line or a faulty dispenser switch. Since the ice maker uses a different path or timing, it may still function while the dispenser is blocked.
How do I know if my water filter is clogged?
Signs include slow water flow, strange tastes, or the dispenser making a straining noise. If you have not changed the filter in six months, it is likely clogged and restricting pressure.
Can a frozen water line cause no water flow?
Yes, ice can block the tube completely, stopping all flow. This often happens if the freezer is set too cold or if the line lacks proper insulation near the cooling unit.
What does it mean if the dispenser makes no sound at all?
Silence usually points to an electrical issue like an engaged Control Lock, a failed door switch, or a broken dispenser switch. It can also indicate a failed filter head that is not signaling the valve.
Is it safe to replace the filter head myself?
Yes, if you follow the steps carefully and use two wrenches to avoid cracking fittings. However, if you are uncomfortable working with water lines, hiring a professional is recommended.
Key Takeaways for Fixing Your KitchenAid Refrigerator
Restoring water flow often requires checking simple settings before replacing parts. Start by unlocking the Control Lock, then verify your filter is seated correctly and replaced every six months.
If basic checks fail, inspect the supply lines for kinks and test the electrical switches for continuity. Replacing the internal filter head solves many silent failures that mimic major breakdowns.
Take action today by checking your lock status and filter age. These quick steps resolve most KitchenAid refrigerator not dispensing water issues without professional help.