
You press the paddle on your fridge and nothing happens. No water, just a blinking light or an annoying beep that won’t quit. Whether you just swapped out the filter or your dispenser stopped responding overnight, learning how to reset water dispenser units can save you a service call and hours of frustration. This guide covers brand-specific reset steps for KitchenAid, Whirlpool, Brio, and standard refrigerator dispensers.
Below you’ll find clear instructions for power cycling, resetting filter alerts, purging trapped air, and fixing common dispensing failures. Each method is broken down by model type so you can match the steps to your exact appliance.
Power Cycle the Dispenser for a Quick Reset

When your dispenser lights work but no water flows, or the entire control panel freezes up, a power cycle often clears the glitch. This method works across most major brands like Samsung, LG, GE, and Whirlpool.
Disconnect Power for 30 Seconds
- Unplug the refrigerator from the wall outlet
- Alternatively, flip the circuit breaker to the kitchen
- Wait a full 30 seconds to let the control board drain stored error codes
- Restore power and test the dispenser
If the lights still won’t respond after this step, move on to checking the wiring connections behind the unit.
Reseat the Power Connector Behind the Panel
A loose connector is a surprisingly common cause of total dispenser failure. Here’s how to check it:
- Remove the grill at the base of the fridge or the door hinge cover
- Locate the electrical connector behind these panels
- Unplug it and firmly reconnect it
- Match the black alignment marks on both sides for proper contact
Once reconnected, test the dispenser again. Misaligned connectors are one of the top reasons dispensers go completely dark.
Swap Out the Dispenser Control Board
If power cycling and reseating fail, the control board itself may be faulty:
- Order a replacement board that matches your exact model number
- Installation usually requires no tools, just a simple plug-in swap
- Keep water lines away from freezing temperatures to prevent internal damage
This step usually resolves stubborn electrical issues that other resets can’t fix.
Reset the KitchenAid Filter Status Light
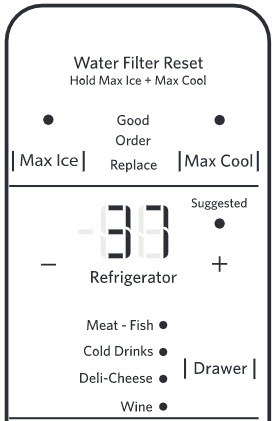
KitchenAid fridges don’t reset the filter light on their own. You have to do it manually after every filter swap, or the alert stays on permanently.
Find the Filter Indicator Location
The status light usually sits on the dispenser panel near the water and ice buttons. On some models, you’ll find it inside the fresh food compartment near the top controls. Look for these visual cues:
- Text reading “Filter” or “Replace Filter”
- Color changes from blue to yellow, orange, or red
Match the Reset Method to Your Dispenser Type
KitchenAid uses several control layouts. Pick the one that matches your fridge:
Press MAX COOL and MAX ICE Together
- Hold both buttons at the same time for 3 seconds
- Watch for a 3-second countdown on the display
- The icon flashes and a tone plays to confirm the reset
Hold the FILTER RESET Button
- Press and hold the FILTER RESET button until the light shuts off
- This signals a successful reset
Hold the WATER FILTER Button
- Press and hold the WATER FILTER button for 3 seconds
- The icon turns blue and “Replace Filter” disappears from the screen
Navigate OPTIONS Then FILTER RESET
- Press OPTIONS on the control panel
- Select FILTER RESET from the menu
- Press MEASURED FILL to confirm
- The status light turns off when complete
Hold LIGHT and ICE TYPE Together
- Press and hold LIGHT and ICE TYPE at the same time for 3 seconds
- A beep confirms the reset and the light shuts off
Understand the Filter Light Color Guide
- Blue means the filter is working fine
- Yellow or orange means it’s time to reset or replace
- Red means the filter is overdue and needs replacement first
Reset the Whirlpool Filter Light by Fridge Type

Whirlpool reset steps depend on whether you own a French door or side-by-side model. The button location and procedure differ between the two styles.
French Door Models: Reset from the Interior Panel
- Open both refrigerator doors to access the interior
- Look up at the control panel on the ceiling inside the fridge
- Check the filter light color:
– Blue means no action is needed
– Orange means a reset is required - Locate the reset button beneath the status light
- Press and hold it for 3 seconds or until you hear a beep
- Release the button and close the doors
The light should turn off, confirming the reset worked.
Side-by-Side Models: Reset from the Freezer Door
- Find the control panel on the exterior of the freezer door
- Locate the water filter reset button on that panel
- Press and hold it until you hear a chirp or beep
- Release the button once the sound plays
If the orange light stays on, repeat the process or check that the filter is seated correctly.
Clear Brio Dispenser Beeping After a Filter Change
Brio countertop dispensers often keep beeping after a new filter goes in. A simple button press won’t fix this. You need a forced hardware reset to clear the error.
Run a Power Cycle While Holding the Reset Button
- Unplug the Brio unit from the wall
- Press and hold the filter reset button on the front or side
- While still holding the button, plug the unit back in
- Keep holding for 5 to 10 seconds until:
– The beeping stops
– The alert light stops blinking
– The exclamation mark disappears from the display
This forces a full system reboot and clears memory errors that block filter recognition.
Why Standard Resets Fail on Brio Units
Brio dispensers use a memory-based monitoring system. If the unit isn’t fully powered down during the reset, it keeps the old filter status stored. The power cycle with the button held ensures a clean reset at the hardware level.
Pro Tips for Brio Filter Resets
- Always seat the new filter fully before attempting a reset
- Use only genuine Brio filters since counterfeits often trigger false alerts
- If beeping returns within days, repeat the reset and double-check filter alignment
Fix No Water Flow After a Filter Change
Even after a successful reset, you might still get nothing from the dispenser. The most common causes are air trapped in the lines or a clogged filter cartridge.
Purge Air from the Water Lines
After installing a new filter, air often gets trapped inside the system:
- Make sure the dispenser lock is off (hold the lock button until the indicator light turns off)
- Press and hold the dispenser cradle for 2 full minutes
- Let water run continuously to flush out trapped air
This step is critical because airlocks block flow even when everything else is working properly.
Test the System with a Filter Bypass Plug
To isolate whether the filter is the problem:
- Remove the current filter from its housing
- Insert the bypass plug that came with your fridge
- Try dispensing water through the door
Here’s how to read the results:
- Water flows means the filter needs replacement
- No water means the issue is in the supply line, valve, or dispenser motor
If the bypass test fails, move on to checking the water supply connections.
Check the Water Supply and Connections
A disrupted water supply is one of the most common reasons a dispenser stops working. Before assuming a part failed, verify the basics.
Inspect These Key Connection Points
- Water supply valve should be fully open (usually behind the fridge)
- Water line should be free of kinks, bends, or crushed sections
- Inlet hose should show no cracks or blockages
If water pressure seems low or absent:
- Turn off the supply valve
- Disconnect the hose and test flow into a bucket
- No water means the valve or home plumbing line may be blocked
⚠️ Never attempt plumbing repairs yourself. Always contact a licensed plumber for supply line issues.
Replace and Prime a New Water Filter
Installing a fresh filter isn’t the final step. You also need to prime it to remove air and carbon particles before use.
Know When to Replace the Filter
Standard replacement timing:
- Every 6 months
- Or after 200 gallons of water
- Whichever comes first
Common signs that a filter is overdue:
- Slow or weak water flow
- Cloudy or off-tasting water
- Small or hollow ice cubes
- Long dispensing times
Even without an alert light, replace filters at least every 9 months to maintain water quality.
Prime the New Filter After Installation
Follow these steps after putting in a fresh filter:
- Run water through the dispenser for 3 minutes straight
- Or dispense 1.5 gallons of water total
- Discard this water since it contains carbon particles and trapped air
- Reset the filter indicator using your model’s method
Skipping the priming step can cause gurgling sounds, weak flow, and poor ice quality.
Use Only Genuine Manufacturer Filters
Counterfeit or off-brand filters may physically fit your fridge, but they create real problems over time.
Risks of Non-Genuine Filters
- Poor filtration that leaves bad taste, odor, or particles
- Reduced water flow from inferior media
- Damage to internal valves and sensors
- Voided warranty on certain models
Always use manufacturer-recommended filters and verify the part number matches your fridge model before installation.
Recognize Normal Dispenser Behavior
Not every drip signals a malfunction. Some water behavior after dispensing is completely standard.
Post-Dispensing Drips Are Normal
- 1 to 2 drops after dispensing is expected
- Hold your cup under the nozzle for 2 to 3 seconds after releasing the button
- This lets residual water drain properly
Excessive dripping or continuous leaking may point to a faulty valve. Contact a technician if the problem persists.
Prevent Future Dispenser Problems
A few simple habits keep your dispenser running smoothly for years.
Schedule Filter Replacements in Advance
- Mark your calendar every 6 months
- Set phone reminders so you never miss a swap
- Buy filters in bulk to avoid delays when it’s time to replace
Clean the Dispenser Nozzle Regularly
- Wipe the nozzle weekly with a damp cloth
- Sanitize monthly using a vinegar solution
- This prevents mineral buildup and mold growth
Monitor Indicator Lights Promptly
- Respond immediately to orange or red alerts
- Reset the indicator after every filter change
- Don’t ignore beeping or blinking since it signals a real issue
Know When to Call a Professional
Some problems go beyond what a simple reset can fix. Knowing when to call for help protects your appliance and your warranty.
Seek Service If These Conditions Apply
- Power cycling and resets fail to restore function
- Water supply is confirmed good but nothing dispenses
- Control board replacement doesn’t solve the issue
- You suspect internal valve or pump failure
Contact manufacturer support or a certified technician for these situations. Avoid tampering with sealed components yourself.
Frequently Asked Questions About Water Dispenser Resets
How long do you unplug a refrigerator to reset the dispenser?
Unplug the fridge or flip the breaker for at least 30 seconds. This gives the control board enough time to clear stored error codes. Plug it back in and test the dispenser immediately.
Why is my water dispenser still not working after a reset?
Air may be trapped in the lines, or the filter could be clogged. Hold the dispenser cradle for 2 minutes to purge air, then test with a bypass plug to isolate the filter as the cause.
Do I have to reset the filter light after every replacement?
Yes, on most KitchenAid and Whirlpool models the light does not reset automatically. You must manually reset it using the button combination that matches your dispenser type.
Why does my Brio dispenser keep beeping after a filter change?
Brio units use memory-based monitoring that requires a full power cycle. Unplug the unit, hold the reset button, plug it back in while still holding, and wait 5 to 10 seconds for the alert to clear.
How do I know when my water filter needs replacing?
Most filters last 6 months or 200 gallons. Warning signs include slow flow, cloudy water, hollow ice cubes, and longer dispensing times. Replace the filter even without an alert light every 9 months.
Can I use a non-genuine filter in my refrigerator?
Off-brand filters may fit, but they often cause poor filtration, reduced flow, and sensor damage. Using them can also void your warranty. Always choose manufacturer-recommended filters matched to your model.
Key Takeaways for Resetting Your Water Dispenser
Resetting a water dispenser depends entirely on your brand and model. Power cycling fixes most electrical glitches, while manual button combinations clear filter status lights on KitchenAid and Whirlpool fridges. Brio units require a forced power cycle with the reset button held to clear stubborn beeping.
Always prime new filters for 3 minutes after installation, purge air by holding the dispenser cradle for 2 minutes, and use only genuine manufacturer filters to protect your system. Check the water supply valve and connections before assuming a part has failed.
Start by identifying your dispenser type and following the matching reset steps above. Most issues resolve within minutes using these methods, saving you the cost and wait time of a service call.



