

Is your Kinetico water softener failing to produce soft water or making strange noises? These symptoms often point to salt bridging, a clogged pre-filter, or sludge buildup that requires immediate attention. Unlike electric models, your system relies on water pressure to regenerate, making regular maintenance essential for peak performance.
This guide explains exactly how to clean a Kinetico water softener step by step using manufacturer guidelines. You will learn to clear salt bridges, sanitize the brine tank, replace pre-filters, and troubleshoot common issues like low pressure or continuous running.
Clean the Brine Tank to Restore Regeneration

A dirty brine tank reduces regeneration efficiency and can cause overflow or total system failure. Cleaning this component every 6 to 12 months prevents salt buildup and ensures your home receives consistent soft water.
Detect and Break Salt Bridges
Salt bridging occurs when a hard crust forms over the salt, creating a hollow space that stops brine production. Tap the side of the tank with your hand to listen for a hollow sound, which indicates a bridge is present. Use a broom handle to gently push down on the crust in several places until it breaks apart. Never use metal tools like screwdrivers or hammers, as they can crack the plastic tank.
Remove Salt and Internal Components
Turn the bypass valve until the yellow section is visible to stop water flow. Lift the float cup straight up and unscrew the securing nut to remove the brine well tube. Scoop unused salt from above the grid into a clean bucket for later use. Discard any spent salt found below the grid plate, as it is no longer effective for regeneration.
Scrub and Sanitize the Interior
Move the tank outside to a gravel surface to avoid damaging your flooring with salt runoff. Flip the tank upside down and tap the exterior with a rubber mallet to dislodge stuck residue. Scrub the interior walls and grid plate with warm soapy water and a green SOS pad. If you suspect mold, mix 2 ounces of bleach with 3 gallons of water, let it sit for 15 minutes, then rinse thoroughly to protect resin beads.
Reassemble and Refill with Pellet Salt
Place the base plate with the thin edge facing the small hole, then align the grid plate large holes correctly. Reinstall the brine well tube and hand-tighten the securing nut without over-tightening. Slide the float back in slowly to ensure it moves freely without hitting the nut. Add 1 inch of water above the grid, then refill the tank with high-quality pellet salt like Morton yellow bag.
Replace the Pre-Filter to Fix Low Pressure
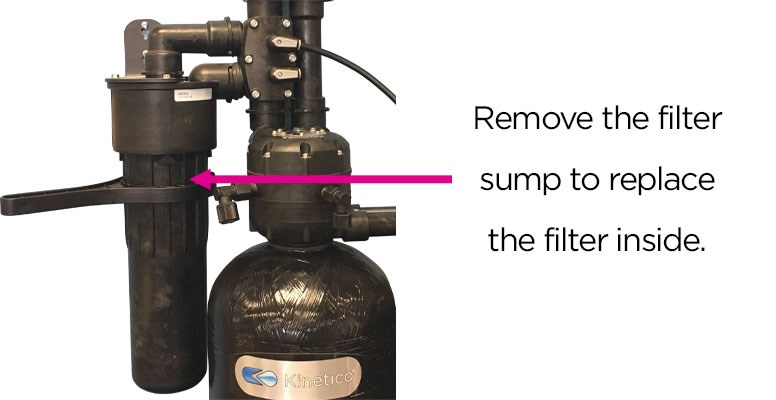
Low water pressure throughout your house is often caused by a clogged pre-filter rather than softener failure. Replacing this filter every 4 to 6 months keeps sediment out of the system and maintains strong water flow.
Shut Off Water and Release Pressure
Rotate the bypass valve to the yellow position to isolate the system from the main water supply. Attach a hose to the drain port and direct the other end into a bucket or floor drain. Open the upper front valve slowly while holding the valve body steady to prevent it from spinning, especially on older single-valve models.
Remove Housing and Inspect Cartridge
Use a wrench to turn the pre-filter housing clockwise to unscrew and remove it from the base. Pour out any remaining water and inspect the cartridge for heavy sediment or debris. Rinse reusable filters under clean running water until they are clear, or discard disposable cartridges that appear worn or clogged.
Reinstall Filter and Restore Service
Insert the clean or new cartridge into the housing, ensuring it seats properly. Reattach the housing by turning it counterclockwise until it stops, then align the marked arrows on the housing and base for a proper seal. Close the drain valve and front valve, then rotate the bypass valve back to green to restore full water flow to your home.
Manage Salt Levels to Prevent System Downtime

Using the right salt type and maintaining correct levels prevents bridging, mushing, and unexpected system downtime. Proper salt management is the single most effective way to keep your Kinetico running smoothly.
Select High-Quality Pellet or Cube Salt
Choose high-purity pellet salt or cube salt for your system, such as Morton salt in the yellow bag. Avoid rock salt entirely because it contains dirt and impurities that clog the brine system and damage components. Potassium chloride is an acceptable alternative but requires specific float height adjustments to function correctly.
Maintain Optimal Fill Levels
Add salt only when the level drops below ¼ full or when you can no longer see water at the bottom of the tank. Never fill the tank past ½ to ⅔ full, especially in households with fewer than four people, as overfilling increases the risk of salt bridging. Always wait for the existing salt to dissolve completely before adding more to the tank.
Address Salt Mushing Immediately
Salt mushing creates a thick sludge layer at the bottom that can clog the brine draw mechanism. Break up the sludge with a broom handle and scoop it out of the tank carefully. You can dissolve clean sludge in hot water and pour it back in, but discard any dirty or discolored mush to prevent recurrence.
Inspect and Adjust the Float Assembly
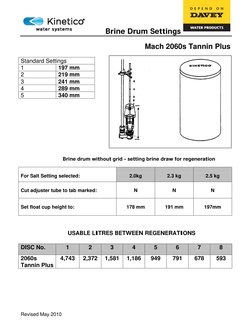
A misaligned float causes the brine tank to overflow or underfill, leading to inefficient regeneration cycles. Monthly checks of the float assembly keep the brine system balanced and prevent water waste.
Verify Float Height Settings
Measure the distance from the base to the bottom of the float cup to ensure correct calibration. For sodium chloride, the float should sit at exactly 7¾ inches. If you use potassium chloride, adjust the setting to 8¾ inches. Replace the float assembly immediately if it appears crooked or bent, as it will not seal properly.
Clean and Test Float Movement
Soak the float assembly in hot water to dissolve any mineral buildup that restricts movement. Reinstall it slowly into the tank, ensuring it glides freely without hitting the brine well nut. Watch the next regeneration cycle to confirm water stops flowing when the float rises to the set level.
Diagnose Common Kinetico Problems
Quick troubleshooting prevents minor issues from becoming major repairs that require professional service. Understanding these common problems helps you act fast when symptoms appear.
Troubleshoot Hard Water Symptoms
Ensure the bypass valve is set to green (Service) and not yellow before investigating other causes. Confirm salt is present in the tank and that no bridges are blocking dissolution. If both are fine, force a manual regeneration by inserting a Phillips screwdriver into the valve head and turning clockwise with downward pressure until you hear a click.
Identify Causes of Low Water Pressure
Put the system in bypass mode by turning the valve to yellow. If your water pressure improves significantly, the pre-filter is clogged and needs replacement. If pressure stays low even in bypass mode, the issue lies within your home plumbing rather than the softener unit.
Stop Continuous Running Noises
Hearing continuous water or air movement indicates a stuck valve or seal failure that needs immediate attention. Try a manual regeneration to reset the cycle position of the internal valves. If the noise continues or water drains nonstop, switch to bypass mode immediately and call a technician to prevent wasting hundreds of gallons.
Prevent Future Issues with Regular Maintenance
Regular maintenance keeps your Kinetico softener running efficiently for years without costly repairs. Following a consistent schedule protects your investment and ensures reliable soft water.
Follow a Strict Maintenance Schedule
Check salt levels monthly and refill when the tank is ¼ full. Replace the pre-filter every 6 months for municipal water or every 4 months if you have well water. Deep clean the brine tank every 6–12 months and inspect the float monthly for straightness and smooth operation.
Avoid Common Maintenance Mistakes
Never use metal tools on the plastic tank to avoid cracking the material. Do not overfill the tank with salt or skip pre-filter changes, as sediment kills resin beds. Never use bleach unless sanitizing for mold, and always rinse thoroughly to avoid damaging the resin.
Know When to Call a Professional
Contact a professional if the system cycles nonstop, makes grinding noises, or refuses to regenerate after troubleshooting. Internal seals or valves may be damaged and require specialized repair tools. Also, keep the system in bypass during boil orders to avoid contaminating the resin bed with unsafe water.
Frequently Asked Questions About Cleaning Kinetico Water Softeners
How often should I deep clean my Kinetico brine tank?
You should deep clean the brine tank every 6 to 12 months depending on your water quality and usage. Areas with very clean water may extend this to once every five years, but annual inspection is standard practice.
Why is my salt level not going down in the tank?
This usually indicates a salt bridge where a hard crust prevents salt from dropping into the water. Tap the tank to check for a hollow sound and use a broom handle to gently break the crust.
Can I use bleach to clean my Kinetico water softener?
You can use bleach only for sanitizing mold or bacteria, mixed at 2 ounces per 3 gallons of water. You must rinse the tank thoroughly afterward because residual bleach can damage the resin beads inside the softener.
What type of salt works best for Kinetico systems?
High-quality pellet salt or cube salt works best, with Morton yellow bag salt being a reliable option. Avoid rock salt because its impurities clog the brine system and reduce efficiency.
How do I force my Kinetico softener to regenerate?
Insert a Phillips screwdriver into the center of the valve head and turn clockwise with downward pressure until you hear a click. The system will begin a 1 to 2 hour regeneration cycle automatically.
Key Takeaways for Maintaining Your Kinetico Water Softener
Cleaning your Kinetico water softener involves regular brine tank maintenance, pre-filter replacement, and proper salt management. Focus on breaking salt bridges early, replacing filters every 4 to 6 months, and keeping the float assembly clean to ensure consistent soft water performance.
Start by checking your salt levels and inspecting the float assembly today to prevent future issues. If you notice low pressure or strange noises, follow the troubleshooting steps in this guide or contact a professional technician for complex internal repairs.



