Your water softener is leaking or you are leaving for a long vacation. You need to stop the system immediately to prevent flooding or save resources. Knowing how to turn off water softener units correctly requires two specific actions: bypassing the water flow and cutting electrical power. Many homeowners make the mistake of only doing one, which leaves their home vulnerable to leaks or wasted salt.
This guide explains exactly how to identify your valve type and perform the correct shutdown steps. You will learn safe methods for every major brand and how to restore normal operation without damaging your plumbing. Follow these instructions to protect your home and equipment effectively.
Distinguish Between Bypass Mode and Power Deactivation
Turning off your system is not a single action but a two-part process depending on your specific goal. You must understand the difference to manage your water treatment properly.
Bypass mode redirects water around the resin tank so untreated hard water flows into your home. The plumbing remains pressurized, but the softener stops treating the water. This is the correct step for maintenance, leaks, or outdoor watering needs.
Power deactivation cuts electricity to the control head completely. This stops all regeneration cycles, salt usage, and digital functions. You should use this method for long-term shutdowns or electrical safety during repairs.
When Should You Use Bypass Mode?
Engage bypass mode during emergency leaks, extended vacations, or when cleaning the brine tank. It allows water to flow to your house while isolating the softener unit. This prevents water from flowing through a damaged component or wasting salt while you are away.
When Must You Cut Electrical Power?
Cut power when leaving for more than a week or during major repairs. The bypass valve does not stop the internal timer, so the unit may still try to regenerate. Unplugging the unit ensures no water is drawn into the system unexpectedly.
Identify Your Specific Bypass Valve Architecture

Correctly identifying your valve type is the most critical step before attempting to turn off the system. Using the wrong method can snap plastic levers or crack brass housings. Inspect the area behind the control head carefully.
Lever-Style Bypass Systems
Common on Fleck 5600 models, these feature a single metal lever. In normal operation, the lever aligns parallel with the pipes. To bypass, rotate the lever 90 degrees until it is perpendicular to the plumbing lines. Do not force it if mineral buildup makes it stiff.
Two-Valve Plastic Bypass Assemblies
Found on Clack and generic units, these have two plastic levers on the inlet and outlet sides. Both levers align with the pipes during normal use. To engage bypass, turn both levers 90 degrees inward following the arrow direction. Both must be fully turned to prevent mixed water flow.
Push-Button Bypass Mechanisms
Older Sears, GE, and Autotrol units often use a red button on a brass valve. The button sits extended during normal service. Push the red button firmly inward until it is flush with the housing to bypass. If stuck, turn the button slightly clockwise to loosen sediment, but never turn it counter-clockwise.
Three-Valve Ball Valve Configurations
Custom installations and Culligan systems may use three distinct ball valves. Two outer valves control inlet and outlet flow, while a center valve controls the bypass line. Normal operation has outer valves open and the center closed. To bypass, close both outer valves and open the center valve.
Rotary Knob and Digital Interfaces
Some Culligan models use a large blue knob that turns clockwise to bypass. High-end smart softeners allow you to toggle bypass mode via a touchscreen or mobile app. These digital systems often let you set a timer for automatic return to service mode.
Execute Bypass Mode on Mechanical Valves
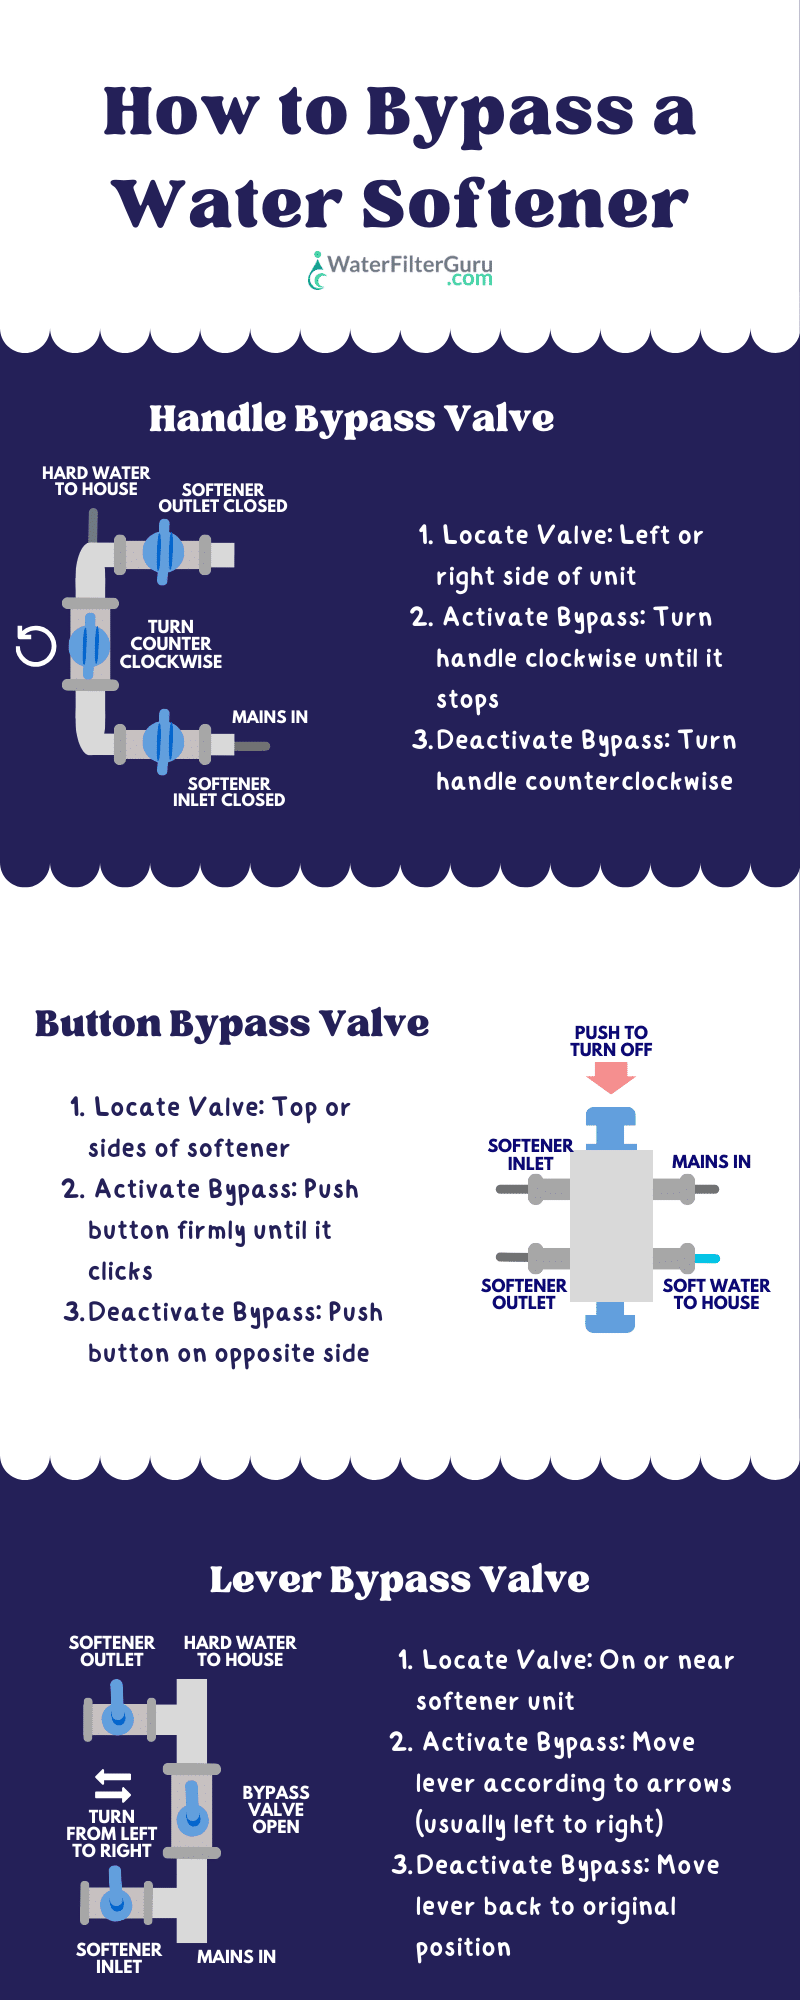
Follow these specific steps based on the valve architecture you identified. Precision prevents damage to the valve internals and ensures a complete shutoff of the softening process.
Steps for Lever and Dual-Knob Systems
- Locate the valve assembly directly behind the control head.
- Rotate the lever or knobs 90 degrees as indicated by flow arrows.
- Ensure handles are fully seated in the new position without wobbling.
- Verify that handles are perpendicular to the pipe direction for bypass.
Steps for Push-Button Valves
- Open a faucet elsewhere in the house to relieve water pressure.
- Push the red button inward firmly until it sits flush with the housing.
- Use a rubber mallet to gently tap the button if it resists movement.
- Avoid using metal hammers or excessive force that could crack the component.
Steps for Three-Valve Assemblies
- Turn the two outer valves clockwise until they are fully closed.
- Turn the center valve counter-clockwise until it is fully open.
- Listen for water flow through the center bypass line to confirm success.
- Double-check that side valves are tightly closed to prevent leakage.
Restore Normal Softening Operation Safely
Returning your system to service requires reversing the bypass steps and flushing your plumbing lines. Skipping the flush can send hard water into your water heater and appliances.
Reversing Mechanical Bypass Positions
Return all levers, knobs, or buttons to their original service positions. For lever systems, align the handle parallel with the pipes. For push-button models, push the blue service button inward to pop the red button back out. Ensure three-valve systems have the center closed and sides open.
Flushing Hard Water From Pipes
Hard water remains in your pipes after you restore the softener. Run a cold water tap for three to five minutes to clear these lines. Do not use hot water or run appliances until soft water returns to prevent scale buildup in your heater.
Cut Power to Stop Regeneration Cycles
Bypassing the water flow does not stop the electronic timer from initiating a regeneration cycle. You must cut power to prevent the unit from using salt and draining water while in bypass mode.
When Is Power Deactivation Necessary?
Unplug the unit for vacations longer than a week or during major repairs. This prevents the system from attempting to regenerate while water flow is restricted. It also eliminates any electrical risk if the unit has suffered water damage from a leak.
How to Safely Deactivate the Unit
- Locate the power cord plugged into the outlet behind the softener.
- Pull the plug firmly from the wall socket.
- Alternatively, switch off the dedicated circuit breaker for the unit.
- Combine this step with bypass mode for a complete system shutdown.
Draining for Long-Term Storage
Drain the system if you plan to leave it off for months or during freezing weather. Open any drain valves to empty the tanks and prevent freezing damage. Consult your manual for specific draining instructions for your model.
Troubleshoot Stuck Valves and Common Errors
Valves often stick due to infrequent use, mineral buildup, or dry O-rings. Knowing how to address these issues safely prevents catastrophic failure of the valve assembly.
Why Valves Become Stuck
Mineral deposits from hard water can seize internal mechanisms over time. Plastic levers may become brittle, and O-rings can dry out without regular movement. This is especially common in push-button and lever-style valves.
Safe Loosening Techniques
Turn stuck push-buttons clockwise slightly to break sediment bonds. Use a screwdriver in the slots of rotary knobs for gentle leverage. Apply hand pressure only on plastic levers to avoid snapping them.
Critical Mistakes to Avoid
Never force a lever that will not move, as this snaps plastic components. Do not use metal hammers on push-button valves, as this cracks the housing. Avoid turning red buttons counter-clockwise, which damages internal threads.
Verify Bypass Status and Water Quality

Confirming that your system is truly in bypass mode ensures your home is protected. Visual checks and water quality tests provide the necessary verification.
Visual Confirmation Methods
Check that levers are perpendicular to pipes or buttons are flush with the housing. For three-valve systems, ensure the center valve is open and side valves are closed. Digital displays should indicate “Bypass” mode if applicable.
Testing Water Hardness Levels
Run a tap and check for the slippery feel of soft water versus the dry feel of hard water. Use a hardness test strip to confirm a spike in mineral content. Soap should lather less effectively when the system is correctly bypassed.
Frequently Asked Questions About Turning Off Water Softeners
Does putting my water softener in bypass stop it from using salt?
No, bypass mode only stops water from flowing through the resin tank. The control head can still initiate a regeneration cycle and use salt unless you also cut the electrical power to the unit.
Can I drink water when my softener is in bypass mode?
Yes, the water is simply untreated hard water containing calcium and magnesium. It is safe to drink unless your local water authority has issued specific advisories about your raw water source quality.
How long can I leave my water softener in bypass mode?
You can leave it in bypass indefinitely, but your home will have hard water. Prolonged exposure leads to scale buildup in pipes and appliances, so only use bypass for maintenance, leaks, or short-term needs.
What happens if I forget to flush pipes after restoring service?
Hard water trapped in your pipes will flow into your water heater and appliances. This can cause immediate scale buildup and reduce the efficiency of your water heater until the lines are fully flushed.
Why won’t my push-button valve move to the bypass position?
Sediment buildup or dried O-rings often cause this issue. Try turning the button slightly clockwise to loosen it, or tap it gently with a rubber mallet. Do not force it if it remains stuck.
Key Takeaways for Turning Off Your Water Softener
Properly shutting down your system requires both bypassing the water flow and cutting electrical power. Always identify your specific valve type before attempting to turn handles or push buttons to avoid breakage. Remember to flush your plumbing lines after restoring service to protect your water heater from hard water.
Take action now by locating your bypass valve and testing its movement. Knowing these steps beforehand ensures you can react quickly to leaks or prepare confidently for your next vacation.