Is your water softener brine tank overflowing or staying completely dry? A malfunctioning brine tank stops the regeneration cycle, leaving your home vulnerable to hard water problems like scale buildup and poor soap performance. When the system fails to draw or create brine solution, the resin bed cannot recharge, rendering the entire unit useless.
This guide shows you exactly how to fix water softener brine tank problems using a step-by-step diagnostic approach. You will learn to identify salt bridges, clean clogged injectors safely, and repair float assemblies to restore soft water quickly.
Verify Safety and System Status Before Repairs
Always confirm safe working conditions before touching any internal components. Skipping these preliminary checks can lead to accidental flooding or misdiagnosis of the actual problem.
Confirm Power and Mode Settings
Ensure the control panel displays normal status and is not stuck mid-regeneration. Check for blank screens, error codes, or recent power loss alerts that might halt the cycle. Force a manual regeneration if the display seems unresponsive to test basic functionality.
Depressurize and Isolate the Unit
Turn the bypass valves to cut household water pressure from the softener completely. This critical step prevents flooding when you disconnect lines or open the brine well. Wait several minutes for internal pressure to release before removing any fittings.
Inspect Valve Positions and Drain Lines
Verify that inlet, drain, and brine line isolation valves are fully open to allow proper flow. A partially closed valve often mimics internal mechanical failure. Confirm the drain hose has a proper air gap of 6 to 18 inches above the floor and is not kinked.
Diagnose Excess Water in Brine Tank
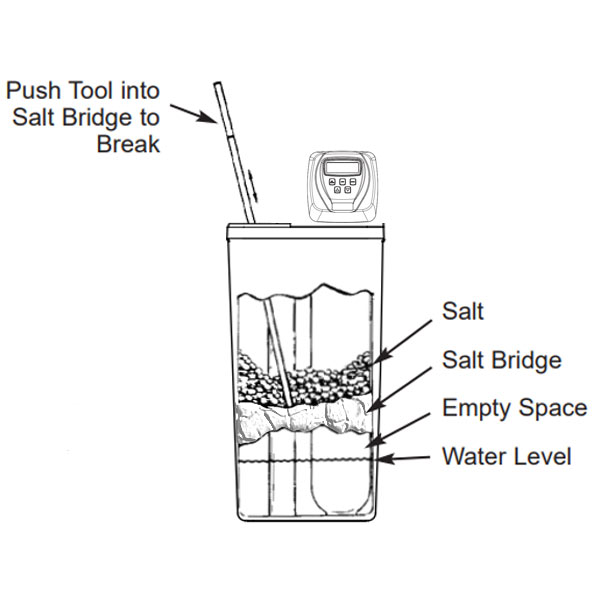
If the tank remains full after regeneration, the system failed to draw the brine solution into the resin tank. Start with simple salt issues before moving to complex mechanical parts.
Break Salt Bridges Gently
A salt bridge forms a hard crust across the top of the salt, trapping water underneath and preventing dissolution. Press gently on the surface with a wooden broom handle to detect a hollow, solid feeling. Use the tool to crack the bridge carefully without using metal, which can puncture the tank liner.
Remove Salt Mushing Sludge
Mushing occurs when fine salt dissolves and recrystallizes into thick sludge at the bottom, blocking the brine well intake. Empty the tank completely if you see standing water and performance drops. Scoop out sludge, vacuum the base, rinse with warm water, and refill with high-purity solar or pellet salt.
Clean the Injector and Venturi Assembly
The injector creates the suction needed to pull brine into the resin tank, making it the number one cause of failed brine draw. Clogs here stop the entire regeneration process immediately.
Remove and Soak Components
Shut off water and disconnect the injector cap to extract the nozzle and throat assembly. Soak these parts in white vinegar or CLR for 30 minutes to dissolve scale and iron deposits effectively.
Clear Orifice Safely
Use a wooden toothpick or soft brush to clear the central hole of any remaining debris. Never use metal pins because they can enlarge the orifice, altering flow rates and ruining system efficiency. Rinze thoroughly and inspect O-rings for cracks or swelling before reassembly.
Reinstall Correct Size Injector
Ensure the injector matches your specific system specifications exactly. An incorrect size disrupts the regeneration cycle even if the part is clean. Replace the entire injector kit per manufacturer guidelines if cleaning fails to restore suction.
Inspect Brine Line and Float Assembly
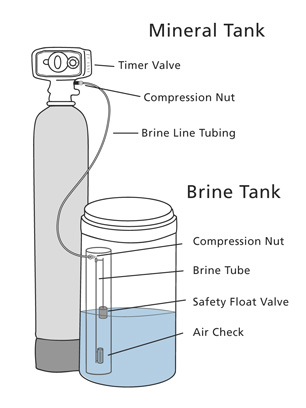
Air leaks or blockages in the brine line break the suction required for proper operation. You must check every connection point from the tank to the valve.
Test for Air Leaks
Inspect where the brine line connects to the float valve for loose fittings or cracked tubing. Look for missing split rings or O-rings that allow air to enter and break the vacuum seal. Ensure the tube is cut square and pushed fully into the fitting before tightening the nut snugly.
Flush the Brine Line
Disconnect both ends of the line and blow air or flush with water to clear salt crystals. Reconnect securely and run a manual cycle to verify the system draws brine properly.
Check Float Movement
Lift the float by hand to ensure it moves freely up and down without sticking. Clean the guide tube with vinegar if the float feels stuck due to mineral buildup. Replace the float if it appears waterlogged or cracked, and ensure the air check seals properly.
Clear Drain Line and Flow Control
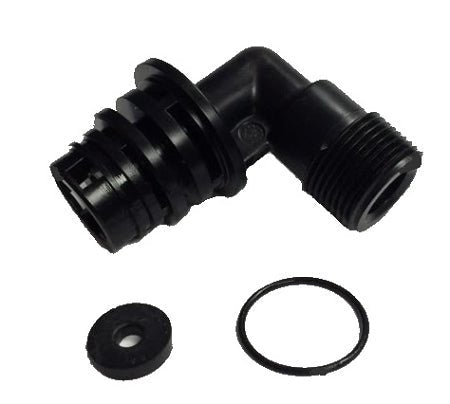
Poor drainage prevents the pressure differential needed for the brine draw to occur. A blocked drain line stops the system from pulling brine out of the tank.
Unclog Drain Hose
Follow the drain line from the valve to the discharge point looking for kinks or freezing. Blow air through the hose or flush with water to remove any obstructions. Ensure the hose slopes downward and discharges with an appropriate air gap.
Clean Drain Line Flow Control
Remove the small button-like Drain Line Flow Control (DLFC) and soak it in vinegar to remove mineral buildup. Check for debris especially if you have high-iron water in your area. Reinstall only when clean and flowing freely, confirming it matches the correct size for your valve.
Diagnose Brine Tank Not Filling
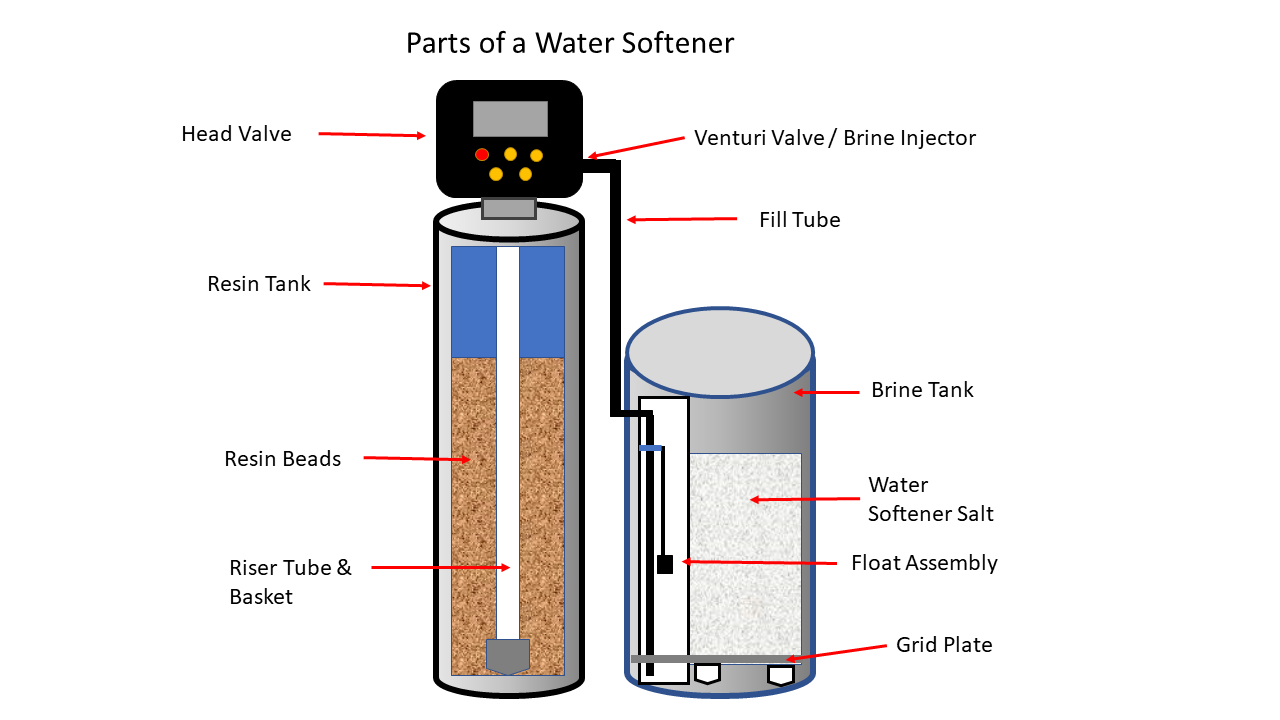
If the tank stays dry when it should be filling, water is not entering during the brine fill stage. Investigate supply-side issues and programming settings immediately.
Verify Seal and Injector Function
A failed O-ring at the brine line connection stops water entry completely. Replace worn seals and clean the brine fill injector, which is separate from the suction injector. Use vinegar and a soft brush to clear any clogged orifices blocking incoming water.
Check Back Pressure Issues
If the drain hose is too high, it creates back pressure that prevents the tank from filling. Keep the hose loop below the brine level and at least 6 inches off the floor to avoid siphoning issues.
Review Programming Settings
Incorrect brine fill time or salt dose settings can skip the filling stage entirely. Access the control panel and confirm hardness settings match test results and brine refill time is set between 5 to 15 minutes. Force a manual regeneration to observe if water enters the tank.
Test Internal Valve Components
When external parts check out, internal failures within the control valve may be to blame. These issues often require more advanced troubleshooting skills.
Inspect Spacer Stack and Pistons
Disconnect the drain and brine lines with the system in service mode to look into the valve body. If water flows continuously, the spacer stack or pistons are damaged and need replacement. This requires replacing the internal valve kit to restore function.
Evaluate Cam and Micro Switches
In timer-based models, a worn cam or faulty micro switch can skip the brine draw step entirely. Open the timer cover and watch the cam rotate smoothly, applying food-grade lubricant if it feels stiff. Replace broken switches or misaligned cams to fix the cycle.
Address Commercial System Issues
Large or duplex systems have added complexity that requires specific attention to detail. Commercial units often face higher demands and more intricate plumbing configurations.
Confirm Flow Direction and Metering
In duplex setups, swapped inlet or outlet lines can cause one tank to regenerate nonstop. Trace plumbing carefully and verify meter cables are on the correct tanks to prevent phantom demand.
Monitor Iron Fouling
High iron levels rapidly clog injectors and resin beds in commercial applications. Install an iron filter or use low-pH resin cleaners periodically to maintain efficiency. Test feed water annually to adjust maintenance schedules accordingly.
Install Alarms and Sensors
Use brine level switches and drain flow sensors tied to building automation systems. Immediate alerts prevent overflow and detect stalled regenerations before they cause water damage.
Follow Step-by-Step Repair Protocol
Use this sequence for fast and thorough troubleshooting of any brine tank issue. Following a logical order saves time and prevents missed steps.
- Bypass and depressurize the unit completely
- Inspect salt for bridges or mushing
- Clean injector with vinegar and wooden pick
- Flush brine and drain lines thoroughly
- Check float movement and seals
- Verify DLFC and drain pitch
- Review programming and settings
- Run manual regeneration to observe draw
- Inspect internal valve parts if still failing
Prevent Future Brine Tank Problems
Avoid repeat issues with smart maintenance and proper salt selection. Consistent care extends the life of your water softener significantly.
Choose the Right Salt
Use high-purity solar or pellet salt to minimize insoluble buildup. Avoid rock salt because it leaves behind 5 to 10 percent insoluble sludge that causes mushing. Store salt indoors off concrete and keep the brine tank lid sealed tightly.
Clean Every 6 Months
Schedule biannual injector cleaning and brine line inspection to prevent clogs. Annually sanitize the resin bed with a bleach solution following manufacturer instructions.
Upgrade to Demand-Based Control
Switch from time-clock to metered regeneration to match cycles to actual water use. This reduces wear, salt use, and water waste by up to 40 percent while preventing unnecessary cycling.
Frequently Asked Questions About Brine Tank Repair
How much water should be in my brine tank normally?
A normal brine tank holds 6 to 14 inches of water above the salt bed, depending on the model. The water level should rise during the fill stage and drop significantly during the draw stage. If the tank is full to the rim or completely dry, you have a problem.
Can I use a metal pin to clean the injector?
No, never use metal tools like pins or needles to clean the injector orifice. Metal can enlarge the tiny hole, altering the flow rate and ruining system efficiency. Always use a wooden toothpick or soft brush for cleaning.
Why is my brine tank full of sludge?
Sludge forms when fine salt granules dissolve and recrystallize into a cement-like substance at the bottom. This condition, called mushing, blocks the brine well and restricts flow. You must empty, clean, and refill the tank with high-purity salt to fix it.
How often should I clean my water softener injector?
You should clean the injector and venturi assembly every six months to prevent clogs. If you have high-iron water, check and clean these components more frequently. Regular cleaning prevents most brine draw failures.
What causes a brine tank to overflow?
Overflowing usually results from a stuck float, a salt bridge, or a clogged drain line. A malfunctioning float valve allows water to enter continuously, while a salt bridge prevents proper dissolution. Check these components first if your tank overflows.
Key Takeaways for Fixing Your Water Softener Brine Tank
Most brine tank issues stem from salt quality problems, clogged injectors, or air leaks in the brine line. By systematically checking the float, cleaning the venturi with non-metal tools, and verifying drain flow, you can fix overfilling or no-fill conditions in under an hour.
Persistent problems likely point to internal valve damage or control board faults that require professional attention. With regular cleaning and high-purity salt, your water softener will deliver reliable soft water for years. Start your repair today by inspecting your salt tank and cleaning the injector assembly.