
Is your Aquasure water softener failing to draw salt or leaving scale on your dishes despite a full brine tank? Many homeowners face sudden drops in water quality due to clogged injectors, salt bridging, or simple programming errors that mimic mechanical failure. These issues often stem from mineral buildup or incorrect gallon settings rather than broken parts. This comprehensive Aquasure water softener troubleshooting guide provides step-by-step solutions to restore your system. You will learn how to clean critical components, replace faulty cables, and configure digital settings for peak performance.
Diagnose Why Your Brine Tank Won’t Draw Salt
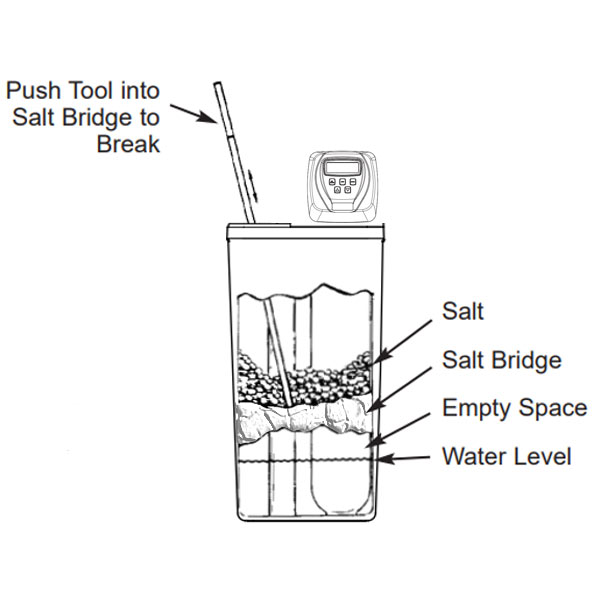
A softener that skips the brine draw phase cannot recharge its resin bed, resulting in hard water flowing through your taps. This specific Aquasure water softener troubleshooting scenario usually points to a blockage in the brine line or a physical barrier in the salt tank. Before disassembling valves, you must rule out simple obstructions like salt bridges or floating debris.
Check for Salt Bridging and Blockages
Salt bridging occurs when dissolved salt recrystallizes into a hard crust above the water line, preventing fresh salt from dissolving.
* Remove the brine tank lid and inspect the salt level.
* Press down firmly with a broom handle to feel for empty space below the surface.
* Break any detected crusts manually and flush the area with warm water to clear debris.
If the salt moves freely, the blockage likely lies within the brine connector or float chamber assembly.
Clean the Brine Level Float Chamber
Mineral deposits often clog the Brine Level Float Chamber (BLFC), stopping water from entering the brine tank to create suction.
1. Shut off the main water supply and turn both bypass knobs clockwise to isolate the unit.
2. Use an adjustable wrench to loosen the brine connector, then unscrew it by hand.
3. Extract the internal retainer using needle-nose pliers and separate the rubber washer.
4. Scrub the washer and connector interior with a soft brush to remove all scale.
5. Use compressed air to blow out any remaining particles from internal channels.
Reassemble With Correct Torque Specifications
Improper reassembly causes leaks that ruin the vacuum needed for brine draw.
* Reinsert the cleaned washer into the retainer and place it back in the connector.
* Apply a thin layer of food-grade silicone grease to the O-ring.
* Hand-tighten the connector until you feel resistance.
* Turn the wrench only 1/8 turn further to secure it.
* ⚠️ Warning: Over-tightening crushes O-rings and damages threads, leading to immediate leaks.
Restore water flow by opening bypass valves counterclockwise and check for drips.
Repair Injector Assembly That Fails to Create Suction
If the brine tank is clear but the system still fails to pull salt, the injector assembly is likely clogged or the piston is stuck. The injector creates the vacuum pressure required to lift brine, and even tiny mineral deposits can stop this process entirely. Regular cleaning prevents complete regeneration failure.
Remove Injector Cover Without Damage
The injector sits beneath a cover on the control head that requires careful removal to avoid warping the housing.
1. Use a Phillips head screwdriver to locate the mounting screws.
2. Loosen each screw 2–3 turns at a time, alternating between opposite corners.
3. Lift the cover off gently once all screws are loose.
4. Pull the injector assembly straight out from the valve body.
Inspect and Clean the Brine Piston
The brine piston moves internally to regulate suction and must slide freely.
* Examine the piston surface for rust, cracks, or deformation.
* Press the spring manually to ensure it returns smoothly to its original position.
* Clean debris with a soft brush and apply food-grade silicone grease to the O-ring.
* Replace the piston if the spring feels weak or stuck.
Clear the Injector Orifice and Screen
A clogged screen or orifice is the most common cause of Aquasure water softener troubleshooting calls regarding hard water.
* Use needle-nose pliers to remove the screen and the injector tip.
* Scrub all parts thoroughly, focusing on the tiny hole in the injector tip.
* Rinse components and use compressed air to clear internal channels.
* Lubricate both O-rings on the injector before reinserting them.
Reinstall Assembly and Test Regeneration
Proper seating ensures the vacuum seal holds during the cycle.
1. Push the assembly upward and then forward until it clicks into place.
2. Grease the cover O-ring and reattach the cover using the alternating screw method.
3. Return the system to service mode and monitor the next regeneration.
4. Listen for a distinct gurgling sound, which confirms successful brine draw.
Replace Faulty Meter Cable for Accurate Tracking

When your softener ignores water usage or displays zero gallons, the meter cable has likely failed. This component sends flow data to the control head, and a broken connection forces the system into inefficient timer-based modes. Replacing the cable restores accurate usage tracking and prevents unnecessary regeneration cycles.
Identify Meter Cable Failure Symptoms
Diagnose the issue before opening the control head to avoid unnecessary work.
* The system regenerates on a timer rather than based on actual water use.
* The display shows “0” gallons or erratic usage numbers.
* Error codes related to flow sensing appear on the screen.
If these signs match your experience, proceed with cable replacement immediately.
Install New Meter Cable Correctly
Electrical safety is paramount when accessing internal components of the control head.
1. Unplug the power cord from the wall and disconnect it from the control head.
2. Pull the old meter cable up from the external meter to detach it.
3. Remove the two screws on the back of the control head and open the cover.
4. Free the old cable from the internal holding pegs.
5. Gently pull the digital panel forward to access the circuit board.
6. Unplug the cable from the first port on the board.
Secure Connections and Verify Operation
Routing the new cable correctly prevents signal interference and physical damage.
* Feed the new cable through the housing hole from the outside in.
* Plug it into the first port on the circuit board until it clicks.
* Route the cable around the holding pegs without twisting or pinching.
* Reattach the back cover and tighten the screws securely.
* Connect the external end to the meter until you hear a click.
* Restore power and run water to verify the gallon counter increases.
Correct Digital Control Programming Errors
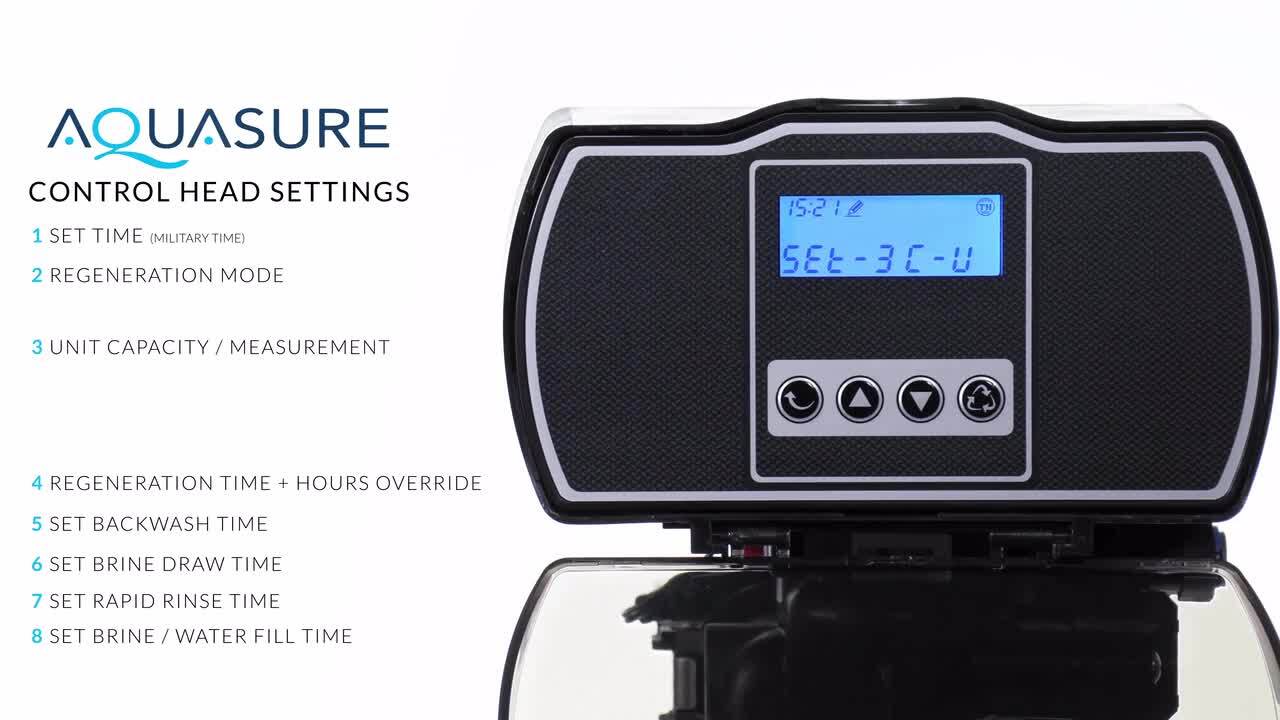
Many Aquasure water softener troubleshooting cases involve perfectly functioning hardware with incorrect settings. Misconfigured regeneration modes or gallon capacities cause the system to run too often or not enough. Understanding the digital interface ensures your softener matches your household needs.
Access Setup Mode Properly
Entering the programming menu requires a specific button combination to prevent accidental changes.
* Press and hold the Curved Arrow and Up Arrow buttons simultaneously.
* Wait for the display to show “Set 1” before releasing.
* Use the Curved Arrow to move between settings and Up/Down arrows to change values.
Select Optimal Regeneration Mode
Setting 2 determines when your system recharges, impacting efficiency and salt usage.
* Time-based: Regenerates daily regardless of usage (inefficient).
* Meter-based: Regenerates only when capacity is exhausted.
* Time Meter Delay: The recommended setting that combines usage tracking with a set time (e.g., 2:00 AM) for regeneration.
Choose Time Meter Delay to ensure soft water is always available while avoiding unnecessary cycles.
Adjust Gallon Capacity for Household Size
Setting 3 defines how much water the system treats before regenerating.
* The default is often 1,000 gallons, which may not suit your home.
* Calculate the correct value based on household size and incoming water hardness.
* Use the manufacturer’s Total Gallons Calculation Tool for precision.
* Avoid setting this value too low, which wastes water, or too high, which causes hard water breakthrough.
Avoid Advanced Setting Modifications
Settings 5 through 8 control internal valve timing and flow calibration.
* These come preconfigured by Aquasure for optimal performance.
* Do not alter these values unless directed by technical support.
* Incorrect changes can damage the valve mechanism or ruin the resin bed.
Force Regeneration Cycle When System Stalls

If your softener skips its scheduled regeneration, do not assume immediate mechanical failure. Power interruptions or bypass valve positions often prevent the cycle from starting. Verifying these basic elements can save you from unnecessary part replacements.
Verify Power and Bypass Valve Status
The system cannot regenerate without electricity and proper water flow configuration.
* Ensure the unit is plugged in and the display is active.
* Check that bypass valves are open (turned counterclockwise).
* Confirm the main water supply valve is fully open.
A closed bypass valve stops water flow and halts the regeneration process entirely.
Override Timer and Force Manual Cycle
You can trigger a regeneration manually to test system components.
1. Press and hold the Curved Arrow and Down Arrow buttons together.
2. The system will initiate a full regeneration sequence immediately.
3. Listen for the motor sound, followed by gurgling during the brine draw.
4. Observe water flowing to the drain during the rinse phase.
If the manual cycle works but automatic cycles fail, revisit your programming settings in Setting 2 and Setting 3.
Stop Leaks Around Control Head and Connections
Water pooling near your softener often indicates improper reassembly after maintenance or dried-out seals. Leaks waste water and can cause significant property damage if ignored. Most leaks result from missing lubrication or incorrect tightening techniques.
Identify Common Leak Sources
Pinpointing the exact location helps target your repair efforts effectively.
* Check the brine connector for drips during regeneration.
* Inspect the injector cover for seepage.
* Examine the meter cable port for moisture.
Dry the area completely and observe the system during a cycle to locate the source.
Lubricate O-Rings to Prevent Seepage
Dry or damaged O-rings are the primary cause of water leaks in softener systems.
* Apply food-grade silicone grease to every O-ring before reassembly.
* Focus on the brine connector, injector cover, piston shaft, and meter port.
* Replace any O-rings that appear cracked, flattened, or torn.
Proper lubrication ensures a watertight seal and smooth component movement.
Follow Proper Tightening Sequences
Uneven tightening warps covers and creates gaps for water to escape.
* Hand-tighten all connections first to establish alignment.
* Use a wrench for only a 1/8 turn past hand-tight on plastic connectors.
* Tighten injector cover screws evenly using an alternating pattern.
Restore Water Softening Performance
If you still experience scale buildup or dry skin after maintenance, the system may have deeper issues. Performance problems often relate to resin health or persistent configuration errors that require further investigation.
Test Post-Regeneration Water Hardness
Verify system output with a reliable test kit immediately after a cycle.
* Ideal results show 0–1 grain per gallon (gpg).
* Acceptable levels remain under 3 gpg.
* Readings above 5 gpg indicate a functional problem requiring attention.
High hardness suggests issues with brine draw, salt bridging, or incorrect gallon settings.
Evaluate Resin Bed Condition
Resin beads lose effectiveness over time and eventually require replacement.
* Typical resin life spans 10–15 years depending on water quality.
* Signs of exhaustion include soft water lasting only 1–2 days between cycles.
* No amount of cleaning or reprogramming fixes exhausted resin.
Consider resin replacement if all other troubleshooting steps fail to improve performance.
Preventive Maintenance Schedule for Longevity
Regular care prevents most Aquasure water softener troubleshooting emergencies before they occur. A consistent maintenance routine extends the life of your system and ensures consistent water quality year-round.
Clean Brine System Every Six Months
Frequent cleaning prevents salt bridges and connector clogs.
* Remove and clean the BLFC and brine connector thoroughly.
* Lubricate the O-ring with food-grade silicone grease.
* Inspect the salt tank for mushing or bridging issues.
Perform this task in spring and fall for best results.
Service Injector Assembly Annually
Annual service keeps the suction mechanism functioning perfectly.
* Disassemble and clean the injector orifice and screen.
* Test the piston spring for strength and smoothness.
* Lubricate all moving seals and O-rings.
Combine this with your meter cable inspection for efficiency.
Verify Settings Biannually
Household changes often require programming adjustments.
* Confirm time and gallon capacity settings match current needs.
* Ensure “Time Meter Delay” mode remains active.
* Update calculations if family size or water hardness changes.
Frequently Asked Questions About Aquasure Water Softener Troubleshooting
Why is my Aquasure softener not using salt?
This issue usually stems from salt bridging in the tank or a clogged brine connector. Check for a hard crust above the water line and break it up if present. If no bridge exists, clean the brine level float chamber and injector assembly to restore proper suction.
How often should I clean the injector assembly?
You should clean the injector assembly every 6 to 12 months depending on water hardness. High hardness areas require more frequent cleaning to prevent mineral buildup in the tiny orifices. Regular maintenance ensures consistent brine draw and optimal regeneration.
What does it mean if my gallon count stays at zero?
A static gallon count typically indicates a faulty meter cable or a disconnected wire inside the control head. Replace the meter cable following the manufacturer’s routing instructions. Ensure the new cable clicks securely into the first port on the circuit board.
Can I change the regeneration time on my Aquasure softener?
Yes, you can adjust the regeneration time in Setting 4 of the digital control menu. The default is usually 2:00 AM, but you can change this to any time that suits your schedule. Use the Curved Arrow and Up/Down buttons to modify the setting.
Why is my water still hard after regeneration?
Hard water after regeneration suggests the system failed to draw brine or the resin bed is exhausted. Check for injector clogs, salt bridges, or incorrect gallon capacity settings. If maintenance does not resolve the issue, the resin may need replacement.
Is it safe to use any grease on O-rings?
No, you must use only food-grade silicone grease on all O-rings and seals. Petroleum-based lubricants can degrade rubber components and contaminate your water supply. Food-grade grease ensures safe operation and long-lasting seals.
Key Takeaways for Effective Aquasure Water Softener Troubleshooting
Most Aquasure water softener troubleshooting challenges resolve with proper cleaning of the brine system and injector assembly. Regular maintenance, correct programming, and timely cable replacements keep your system running efficiently for years. Focus on preventing salt bridges, lubricating O-rings, and verifying gallon capacity settings to avoid hard water issues.
Take action today by inspecting your brine tank and testing your water hardness. If you notice reduced performance, follow the cleaning steps outlined in this guide before calling for service. Consistent care saves money on salt, water, and potential repairs while ensuring your family enjoys soft water every day.


